The post Wildcard SSL Certs: Let’s Encrypt & Cloudflare appeared first on Justin Silver.
]]>My servers have been using free Let’s Encrypt SSL certificates for some time now, but I was really excited to hear about support for wildcard SSL certificates in 2018. Wildcards are now available thus I am now using Let’s Encrypt Wildcard SSL Certificates with Cloudflare DNS-01 challenges from my Jenkins CI/CD server. The wildcard ssl cert is generated manually the first time, afterwards it uses a root user cron job to check for certificate renewals. After the certbot tool is finished with the renewal request it calls a “post hook” script that copies the wildcard SSL certificates (as needed) to the Jenkins home directory. From there they can be deployed via SSH to the servers.
The SSH user does not have root access, rather the wildcard SSL certificates are symlinked from a user account to the Nginx configuration. Nginx is scheduled to gracefully reload approximately 30 minutes after the SSL certificate renewals are processed, therefore new any new certificate will be served shortly after it is generated.
Generate Wildcard SSL Certs
# configuration for cloudflare
CLOUDFLARE_EMAIL="[email protected]"
CLOUDFLARE_API_KEY="put-your-key-here"
DOMAIN="your-domain.com"

# as root configure your cloudflare secrets
mkdir -p /root/.secrets
cat <<CLOUDFLARE_CONFIG > /root/.secrets/cloudflare.ini
dns_cloudflare_email="$CLOUDFLARE_EMAIL"
dns_cloudflare_api_key="$CLOUDFLARE_API_KEY"
CLOUDFLARE_CONFIG

# make sure they are hidden, the api key is more powerful than a password!
chmod 0700 /root/.secrets/
chmod 0400 /root/.secrets/cloudflare.ini

# install pip, upgrade, then install the cloudflare/certbot tool
yum install -y python-pip
pip install --upgrade pip
pip install certbot-dns-cloudflare

# generate a wildcard cert for the domain using a dns challenge
#
# --quiet, suppress output
# --non-interactive, avoid user input
# --agree-tos, agree to tos on first run
# --keep-until-expiring, keep existing certs
# --preferred-challenges, specify to use dns-01 challenge
# --dns-cloudflare, use the cloudflare dns plugin
# --dns-cloudflare-credentials, path to ini config
# -d, domains to generate keys for, you can add additional ones if needed
certbot certonly \
  --quiet \
  --non-interactive \
  --agree-tos \
  --keep-until-expiring \
  --preferred-challenges dns-01 \
  --dns-cloudflare \
  --dns-cloudflare-credentials /root/.secrets/cloudflare.ini \
  -d $DOMAIN,*.$DOMAIN
Ubuntu / Debian
apt-get update -y
apt-get install -y python3-pip
pip install --upgrade acme pip
pip install certbot-dns-cloudflare
Certbot Post Hook for Jenkins
This bash script will be run after certbot renewals are processed to make the SSL certs available to Jenkins for distribution to the servers.
# where we are going to store the SSL certs for deployment
JENKINS_SSL="/home/jenkins/secrets/ssl"
DOMAIN="your-domain.com"

# run this after the certbot renewal to copy keys to jenkins
POST_HOOK_PATH="/usr/local/bin/certbot-post-hook"
cat <<CERTBOT_POST_HOOK > "$POST_HOOK_PATH"
# copy ssl certs and keys
cp /etc/letsencrypt/live/$DOMAIN/fullchain.pem "$JENKINS_SSL/$DOMAIN-fullchain.pem"
cp /etc/letsencrypt/live/$DOMAIN/privkey.pem "$JENKINS_SSL/$DOMAIN-privkey.pem"

# make sure the jenkins user can read them
chown -R jenkins.jenkins "$JENKINS_SSL"
CERTBOT_POST_HOOK

# make post hook executable
chmod +x "$POST_HOOK_PATH"
SSL Certificate Renewals
On the Jenkins server add a crontab entry for the root user to process SSL certificate renewals. Note the path to $POST_HOOK_PATH above is used here, so adjust as needed. The same credentials used to generate the cert will be used here as well, as a result they do not need to be included again.
# process let's encrypt renewals at 3:30am
30 3 * * * /usr/bin/certbot renew --quiet --post-hook /usr/local/bin/certbot-post-hook > /dev/null 2>&1
Certbot Post Hook for Jenkins
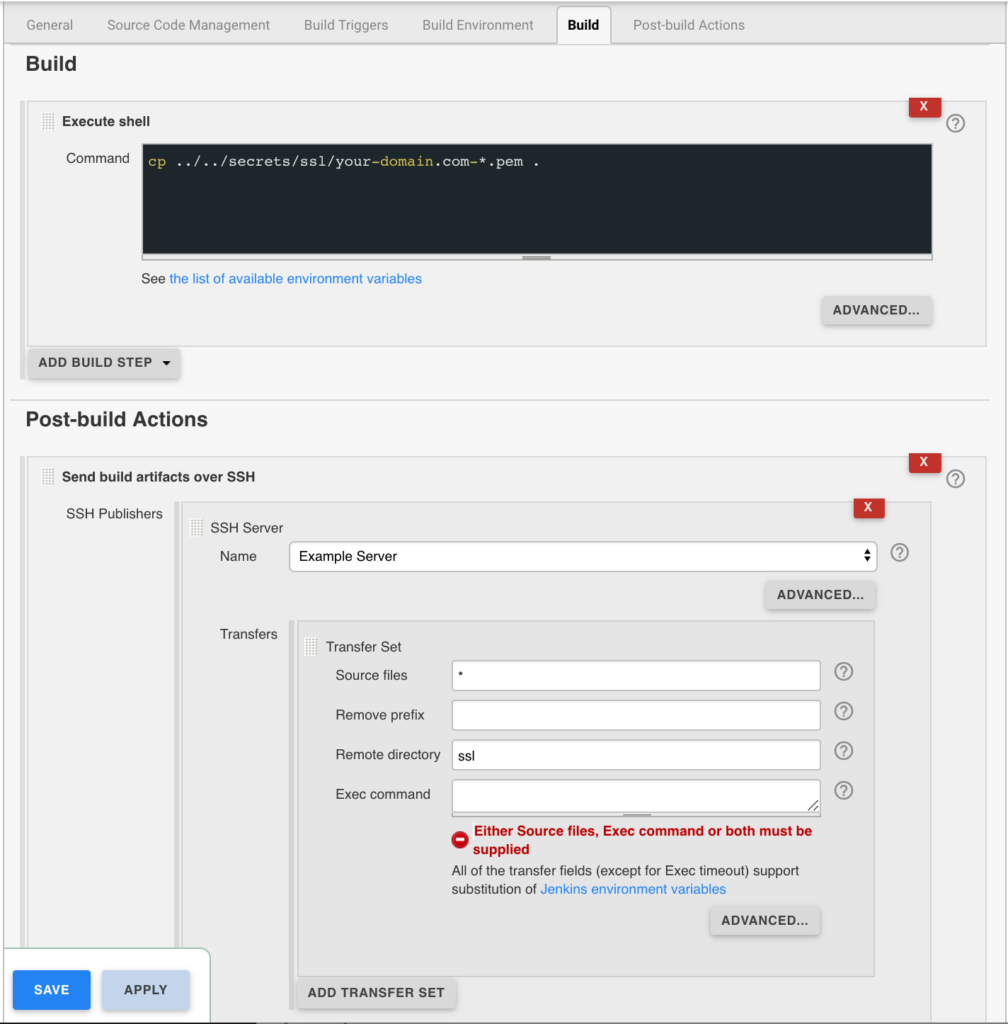
Jenkins is used to handle the SSL certificate deployment to the app servers because it is already set up to deploy files to my servers via SSH. First the required certificates are copied to the workspace, then uploaded using an SSH transfer set to each server. These certificates are then symlinked by the root user to the Nginx configuration for user. A cron job on each app server gracefully restarts nginx nightly to pick up any new certificates.
In the example below the certificates end up in a user home directory like so /home/username/ssl/your-domain.com-fullchain.pem therefore you will need to adjust for your username and domain.
Gracefully Reload Nginx
Pick up new certificates from renewals by gracefully reloading Nginx via a root cron job due to Nginx not seeing the change otherwise.
# reload nginx gracefully at 4:00am
0 4 * * * /usr/sbin/service nginx reload
The post Wildcard SSL Certs: Let’s Encrypt & Cloudflare appeared first on Justin Silver.
]]>The post Using NGINX as an Atlassian JIRA Reverse Proxy appeared first on Justin Silver.
]]>I use JIRA in a cloud infrastructure where it’s obviously desirable to serve the contents over SSL, therefore I set up an NGINX as a JIRA reverse proxy for unencrypted requests to the JIRA backend service and handle the SSL on the front end with Let’s Encrypt. We need to let JIRA know that we are proxying it over HTTPS however by setting some values in server.xml first.
Notice that my Let’s Encrypt SSL certificates are in the /etc/letsencrypt/live/jira.doublesharp.com directory, but yours will be specific to the hostname you create them for. The certs are created via the letsencrypt command and use Nginx to process the validation request. Once created the generated PEM files can be used in your Nginx config. Note that you will need to comment out this line in the SSL config if they don’t yet exist, start Nginx to create the certs, uncomment the lines to enable SSL, and then restart Nginx once again (whew!).
JIRA Reverse Proxy Configuration
Configure JIRA to add proxyName, proxyPort, scheme, and secure parameters to the Tomcat Connector in server.xml.
<Connector port="8081"
           maxThreads="150"
           minSpareThreads="25"
           connectionTimeout="20000"
           enableLookups="false"
           maxHttpHeaderSize="8192"
           protocol="HTTP/1.1"
           useBodyEncodingForURI="true"
           redirectPort="8443"
           acceptCount="100"
           disableUploadTimeout="true"
           bindOnInit="false"

           proxyName="jira.doublesharp.com"
           proxyPort="443"
           scheme="https"
           secure="true"
/>
Don’t forget to copy the database driver to $JIRA_INSTALL/lib.
Nginx Reverse Proxy Configuration
Note use of “jira.doublesharp.com” in config and change as needed. This configuration uses a subdomain specific certificate from Let’s Encrypt, but you could also use a Wildcard Certificate for your JIRA reverse proxy setup as well which can help to consolidate your key generation.
# Upstream JIRA server on port 8081. Use 127.0.0.1 and not localhost to force IPv4.
upstream jira {
  server       127.0.0.1:8081 fail_timeout=0;
}

# listen on HTTP2/SSL
server {
  listen       443 ssl http2;
  server_name  jira.doublesharp.com;

  # ssl certs from letsencrypt
  ssl_certificate /etc/letsencrypt/live/jira.doublesharp.com/fullchain.pem;
  ssl_certificate_key /etc/letsencrypt/live/jira.doublesharp.com/privkey.pem;

  location / {
    # allow uploads up to 10MB
    client_max_body_size 10m;
    # set proxy headers for cloudflare/jira
    proxy_set_header  Host $host:$server_port;
    proxy_set_header  X-Real-IP $remote_addr;
    proxy_set_header  X-Forwarded-For $proxy_add_x_forwarded_for;
    proxy_set_header  X-Forwarded-Proto $scheme;
    # hand the request off to jira on non-ssl
    proxy_pass        http://jira;
  }
}

# redirect HTTP and handle let's encrypt requests
server {
  listen       80;
  server_name  jira.doublesharp.com;
  root         /var/lib/jira;

  # handle letsencrypt domain validation
  location ~ /.well-known {
    allow all;
  }

  # send everything else to HTTPS
  location / {
    return 302 https://jira.doublesharp.com;
  }
}
The post Using NGINX as an Atlassian JIRA Reverse Proxy appeared first on Justin Silver.
]]>The post Validate SSL Certificate & Private Key appeared first on Justin Silver.
]]>It’s not uncommon to need to validate if an SSL certificate / private key combination is valid. The easiest way to do this is with OpenSSL, an open source library that…
is a robust, commercial-grade, and full-featured toolkit for the Transport Layer Security (TLS) and Secure Sockets Layer (SSL) protocols. It is also a general-purpose cryptography library.
A an example use case commonly you will need to prepend intermediate certificates to your SSL certificate before installing it – for example in the case of GoDaddy certs – so it’s nice to have a way to check to make sure the pair will work correctly once it is deployed.
Using openssl we can generate an MD5 hash from both the certificate and keys, and the resulting MD5 hashes should match if the pair is valid. The private key was created when you generated the CSR for your SSL provider.
openssl x509 -noout -modulus -in CERTIFICATE.crt | openssl md5
openssl rsa -noout -modulus -in CERTIFICATE.key | openssl md5
If this is a task that you perform routinely you can use a bash script to further automate the process. In this example script, if your certificates and private keys have common prefixed names with different extensions then it will automatically calculate and compare the MD5 of each. You will likely want to expand the functionality from here – feel free to share any improvements you have made!
CERT=certificate_name
CERT_CRT=$(openssl x509 -noout -modulus -in $CERT.crt | openssl md5)
CERT_KEY=$(openssl rsa -noout -modulus -in $CERT.key | openssl md5)
if [[ "$CERT_CRT" = "$CERT_KEY" ]]; then echo "yes"; else echo "no"; fi
The post Validate SSL Certificate & Private Key appeared first on Justin Silver.
]]>The post Letsencrypt: Free SSL Certificates for NGINX appeared first on Justin Silver.
]]>I always wanted all of my sites to run over SSL, but it also didn’t seem worth the expense of buying certificates for all the domains I own. Enter Let’s Encrypt which offers free 90 day SSL certificates. This guide shows how to install and use letsencrypt to generate SSL certificates for NGINX running on CentOS 7, however it should be similar on other supported systems. A bit about Let’s Encrypt from their site:
Let’s Encrypt is a free, automated, and open certificate authority (CA), run for the public’s benefit. Let’s Encrypt is a service provided by the Internet Security Research Group (ISRG).
The key principles behind Let’s Encrypt are:
- Free: Anyone who owns a domain name can use Let’s Encrypt to obtain a trusted certificate at zero cost.
- Automatic: Software running on a web server can interact with Let’s Encrypt to painlessly obtain a certificate, securely configure it for use, and automatically take care of renewal.
- Secure: Let’s Encrypt will serve as a platform for advancing TLS security best practices, both on the CA side and by helping site operators properly secure their servers.
- Transparent: All certificates issued or revoked will be publicly recorded and available for anyone to inspect.
- Open: The automatic issuance and renewal protocol will be published as an open standard that others can adopt.
- Cooperative: Much like the underlying Internet protocols themselves, Let’s Encrypt is a joint effort to benefit the community, beyond the control of any one organization.
Install Letsencrypt
Install letsencrypt with yum. Next generate a strong Diffie-Hellman key – you can specify a different path but you need to change it in the Nginx server block.
yum -y install letsencrypt
openssl dhparam -out /etc/ssl/certs/dhparam.pem 2048
Update Nginx
Edit your Nginx configuration to listen on HTTP and HTTPS, and respond to Let’s Encrypt domain validation requests to /.well-known. Go ahead and add the SSL configuration, but no keys (since they don’t exist yet).
server {
	# Domain validation is on port 80, SSL is served on 443. If available include "http2", otherwise remove it.
	listen 80 443 ssl http2;

	# Hostnames to listen on, you will pass each of these to letsencrypt with "-w www.example.com"
	server_name www.example.com;

	# Your document root, you will pass this path to letsencrypt with "-w /var/www/www.example.com/html/"
	root /var/www/www.example.com/html/;

	# Add SSL Keys here once they are generated

	# Use TLS (so don't use old version of SSL)
	ssl_protocols                   TLSv1 TLSv1.1 TLSv1.2;
	ssl_prefer_server_ciphers       on;
	ssl_ciphers                     'ECDHE-RSA-AES128-GCM-SHA256:ECDHE-ECDSA-AES128-GCM-SHA256:ECDHE-RSA-AES256-GCM-SHA384:ECDHE-ECDSA-AES256-GCM-SHA384:DHE-RSA-AES128-GCM-SHA256:DHE-DSS-AES128-GCM-SHA256:kEDH+AESGCM:ECDHE-RSA-AES128-SHA256:ECDHE-ECDSA-AES128-SHA256:ECDHE-RSA-AES128-SHA:ECDHE-ECDSA-AES128-SHA:ECDHE-RSA-AES256-SHA384:ECDHE-ECDSA-AES256-SHA384:ECDHE-RSA-AES256-SHA:ECDHE-ECDSA-AES256-SHA:DHE-RSA-AES128-SHA256:DHE-RSA-AES128-SHA:DHE-DSS-AES128-SHA256:DHE-RSA-AES256-SHA256:DHE-DSS-AES256-SHA:DHE-RSA-AES256-SHA:AES128-GCM-SHA256:AES256-GCM-SHA384:AES128-SHA256:AES256-SHA256:AES128-SHA:AES256-SHA:AES:CAMELLIA:DES-CBC3-SHA:!aNULL:!eNULL:!EXPORT:!DES:!RC4:!MD5:!PSK:!aECDH:!EDH-DSS-DES-CBC3-SHA:!EDH-RSA-DES-CBC3-SHA:!KRB5-DES-CBC3-SHA';
	ssl_dhparam                     /etc/ssl/certs/dhparam.pem;
	ssl_session_timeout             1d;
	ssl_session_cache               shared:SSL:50m;
	ssl_stapling                    on;
	ssl_stapling_verify             on;

	# handle letsencrypt domain validation
	location ~ /.well-known {
		allow all;
	}

	# handle all requests...
	location / {

	}
}
Generate SSL Keys
Validate the configuration, and when it passes reload Nginx. You can then generate an SSL key with letencrypt using the --webroot method. With this method you need to pass your web root with “-w /path/to/your/webroot” and each domain you want an SSL for with “-d www.example.com -d example.com -d images.example.com“, and so on. The first time you run Let’s Encrypt you will need to accept some terms, enter your email, etc, but subsequent runs won’t ask for this.
# validate nginx configuration
nginx -t
# reload nginx configuration
service nginx reload
# generate SSL keys
letsencrypt certonly --webroot -w /var/www/www.example.com/html/ -d www.example.com
Add Certificate and Key to Nginx
Once the keys have generated, you will need to add the certificate and key to your Nginx configuration. Edit the server block and add the following – you may need to change the path for the letsencrypt location on your system. Don’t move them since you will need to be able to renew them every 90 days.
# ssl certs from letsencrypt
ssl_certificate /etc/letsencrypt/live/www.example.com/fullchain.pem;
ssl_certificate_key /etc/letsencrypt/live/www.example.com/privkey.pem;
Load Site Over SSL
Validate the Nginx configuration again, then reload the service. Once it is up, you can use curl to validate that it is serving requests over SSL.
# validate nginx configuration
nginx -t
# reload nginx configuration
service nginx reload
# see if you can load your site over SSL
curl -s https://www.example.com
If you have trouble validating your domain and get 403 errors and use SELinux, it’s possible that you will need to run the following command to give nginx permission to read the .well-known directory.
chcon -Rt httpd_sys_content_t /var/www/yoursite/.well-known
Auto Renew Certificates
Your certificate will expire every 90 days so it’s easiest to set up a cron job to automatically check for soon to expire certificates once per day so they can be renewed – this is why we don’t want to move the certs out of the /etc/letsencrypt/live/... directory. You may need to reload nginx as well if the certificate is updated but this should generally be transparent to clients. Edit your crontab by running crontab -e and adding the following to check for updates at 1AM.
# LetsEncrypt Renewals
0 1 * * * letsencrypt renew >/dev/null 2>&1 && service nginx reload
Note that your certificates will only be renewed if they are close to expiration, otherwise the system will skip it and continue using the currently installed cert. You want to update at least weekly although daily is prefered to make sure you everything is up to date.
[root@www ~]# letsencrypt renew
-------------------------------------------------------------------------------
Processing /etc/letsencrypt/renewal/justinsilver.com.conf
-------------------------------------------------------------------------------
Cert not yet due for renewal

The following certs are not due for renewal yet:
  /etc/letsencrypt/live/justinsilver.com/fullchain.pem (skipped)
The post Letsencrypt: Free SSL Certificates for NGINX appeared first on Justin Silver.
]]>The post Admin Columns Pro SSL Upgrade Fix appeared first on Justin Silver.
]]>I use the Admin Columns Pro plugin on several of my WordPress site to easily customize the layout in my admin tables. As it is a premium plugin updates to it are not hosted on the WordPress repository but rather come from their own private repository. This was working fine until a recently when I started getting errors during the upgrade process. It seems as though the SSL request was to www.admincolumns.com but for some reason the server was responding with a wildcard cert for *.wpengine.com – their hosting provider.
I opened a ticket on their support site and while helpful, unfortunately they were not able to come to a resolution. The error during the plugin update reads like the following.
Enabling Maintenance mode…
Updating Plugin Admin Columns Pro (1/1)
Downloading update from https://www.admincolumns.com?wc-api=software-licence-api&request=plugindownload&licence_key=XXXXXXXXXXX&plugin_name=admin-columns-pro…
An error occurred while updating Admin Columns Pro: Download failed. SSL: certificate subject name '*.wpengine.com' does not match target host name 'www.admincolumns.com'
Disabling Maintenance mode…
Root Issue
I was never able to determine the root issue other than it likely likes with WP Engine. The behavior is not consistent between environments, for example from my Mac running OSX Yosemite I can can use curl to load the Admin Columns Pro site via curl:
> curl -v https://www.admincolumns.com
* Adding handle: conn: 0x7fa2cc004000
* Adding handle: send: 0
* Adding handle: recv: 0
* Curl_addHandleToPipeline: length: 1
* - Conn 0 (0x7fa2cc004000) send_pipe: 1, recv_pipe: 0
* About to connect() to www.admincolumns.com port 443 (#0)
*   Trying 178.79.179.38...
* Connected to www.admincolumns.com (178.79.179.38) port 443 (#0)
* TLS 1.0 connection using TLS_RSA_WITH_AES_128_CBC_SHA
* Server certificate: www.admincolumns.com
* Server certificate: RapidSSL CA
* Server certificate: GeoTrust Global CA
> GET / HTTP/1.1
> User-Agent: curl/7.30.0
> Host: www.admincolumns.com
> Accept: */*
>
< HTTP/1.1 200 OK
But the same request did not work from my CentOS 5 servers:
[root@dev1 ~]# curl -v https://www.admincolumns.com
* About to connect() to www.admincolumns.com port 443 (#0)
*   Trying 178.79.179.38... connected
* Connected to www.admincolumns.com (178.79.179.38) port 443 (#0)
* successfully set certificate verify locations:
*   CAfile: /etc/pki/tls/certs/ca-bundle.crt
  CApath: none
* SSLv3, TLS handshake, Client hello (1):
* SSLv3, TLS handshake, Server hello (2):
* SSLv3, TLS handshake, CERT (11):
* SSLv3, TLS handshake, Server finished (14):
* SSLv3, TLS handshake, Client key exchange (16):
* SSLv3, TLS change cipher, Client hello (1):
* SSLv3, TLS handshake, Finished (20):
* SSLv3, TLS change cipher, Client hello (1):
* SSLv3, TLS handshake, Finished (20):
* SSL connection using AES256-SHA
* Server certificate:
* 	subject: serialNumber=dzc7avuEuqhZCEL82HF5aqoCQMgtwixa; OU=GT41552380; OU=See www.rapidssl.com/resources/cps (c)14; OU=Domain Control Validated - RapidSSL(R); CN=*.wpengine.com
* 	start date: 2014-04-17 12:42:18 GMT
* 	expire date: 2018-05-19 17:27:48 GMT
* 	subjectAltName does not match www.admincolumns.com
* Closing connection #0
* SSLv3, TLS alert, Client hello (1):
* SSL peer certificate or SSH remote key was not OK
curl: (51) SSL peer certificate or SSH remote key was not OK
I noticed that the CentOS machines were using SSLv3, whereas my Mac was using TLS. I was then able to recreate the issue on my Mac by forcing curl to use SSLv3.
> curl -v -sslv3 https://www.admincolumns.com
* Adding handle: conn: 0x7fae0b004000
* Adding handle: send: 0
* Adding handle: recv: 0
* Curl_addHandleToPipeline: length: 1
* - Conn 0 (0x7fae0b004000) send_pipe: 1, recv_pipe: 0
* About to connect() to www.admincolumns.com port 443 (#0)
*   Trying 178.79.179.38...
* Connected to www.admincolumns.com (178.79.179.38) port 443 (#0)
* SSL certificate problem: Invalid certificate chain
* Closing connection 0
curl: (60) SSL certificate problem: Invalid certificate chain
More details here: http://curl.haxx.se/docs/sslcerts.html
Disable SSL Certificate Verification in WP_Http
With the SSL certificate for the request being invalid and the server not being in my control, the only option is to disable the SSL certificate verification in WP_Http. This is accomplished by setting a key in its configuration array called sslverify to false. We can do this by hooking into the http_request_args filter, checking the URL that it is loading, and disabling the verification for Admin Columns Pro.
add_filter( 'http_request_args', 'fix_acp_plugin_update', 10, 2 );
function fix_acp_plugin_update( $r, $url ){
	$starts_with = 'https://www.admincolumns.com?wc-api=software-licence-api&request=plugindownload';
	// if the url starts with ^ then don't verify SSL
	if ( 0 === strpos( $url, $starts_with ) ){
		$r['sslverify'] = false;
	}
	return $r;
}
Successfully Updated!
Et voila! The plugin is now able to update successfully.
Enabling Maintenance mode…
Updating Plugin Admin Columns Pro (1/1)
Admin Columns Pro updated successfully. Show Details.
Disabling Maintenance mode…
All updates have been completed.
The post Admin Columns Pro SSL Upgrade Fix appeared first on Justin Silver.
]]>The post Upgrade wget on CentOS 5 appeared first on Justin Silver.
]]>As time progresses some of my VPS machines are starting to show their age running CentOS 5. As CentOS is based on Redhat, the yum repositories often contain older versions of binaries with bugs that have been fixed in newer version. I recently ran into this with wget when trying to download the latest WordPress zip file.
--2014-10-18 01:55:38-- http://wordpress.org/latest.zip
Resolving wordpress.org... 66.155.40.249, 66.155.40.250
Connecting to wordpress.org|66.155.40.250|:80... connected.
HTTP request sent, awaiting response... 302 Moved Temporarily
Location: https://wordpress.org/latest.zip [following]
--2014-10-18 01:55:38-- https://wordpress.org/latest.zip
Connecting to wordpress.org|66.155.40.250|:443... connected.
ERROR: certificate common name *.wordpress.org' doesn't match requested host name wordpress.org'.
To connect to wordpress.org insecurely, use `--no-check-certificate'.
Unable to establish SSL connection.
unzip: cannot find or open latest.zip, latest.zip.zip or latest.zip.ZIP
Turns out this is a bug in wget 1.11 that was fixed in 1.12, but the former is what is available via yum. There is a bug on the WordPress Trac #611 that is closed as wontfix – it has to do with the older version of wget not using the alternate name on the wildcard SSL certificate. If you want to upgrade wget on your system, you’ll need to first get the source, uninstall the existing wget with yum, and then build wget from source. You’ll probably want to jump to 1.16 since all previous versions are susceptible to CVE-2014-4877 as of this post.
Install wget from source
cd ~
wget http://ftp.gnu.org/gnu/wget/wget-1.16.tar.gz
yum -y remove wget
tar -xzvf wget-1.16.tar.gz
cd wget-1.16
./configure --with-ssl=openssl --with-libssl-prefix=/usr/lib64/openssl --prefix=/usr
make && make install
Note: If you don’t have wget on your system at all, you can also use curl to download the source with the command curl -O http://ftp.gnu.org/gnu/wget/wget-1.16.tar.gz.
The post Upgrade wget on CentOS 5 appeared first on Justin Silver.
]]>The post NGINX Reverse Proxy to Legacy Website appeared first on Justin Silver.
]]>NGINX reverse proxies can be a very powerful tool for many reasons and recently came to the rescue as I was at a loss as to how to provide access to a legacy website when launching the new one. The caveat in this case was that the legacy server is, well, old. It has many hard coded values throughout including URLs and only likes to listen on particular hostnames from time to time. Since I did not write this site and do not have access to the source code (it’s a DLL on a Windows box somewhere) I had to come up up with a solution to didn’t involve modifying the code.
Fake the DNS?
The first option I thought of was to just update the /etc/hosts file (or Windows equivalent) to point the domain name to the old server IP address when needed, but this is a bit cumbersome. Comparing data between the new and old systems – presumably the main reason you would want to see the old server – is pretty much out. Faking the DNS is a no go.
NGINX Reverse Proxy
An NGINX reverse proxy takes a request from a front-end NGINX server and passes it on to a back-end server in more traditional setup. In this situation the request is being made to the legacy server IP address and some special parameters are used to rewrite the domain information for redirects, cookies, and page content. We are also checking the port to determine if the request to the legacy server should be made via HTTP or HTTPS.
server {
        # listen on 80 and 443, ssl if the latter
        listen                          80;
        listen                          443 ssl;

        # this is the "new" url for the legacy site
        server_name                     gamma.example.com;

        # ssl config
        ssl                             on;
        ssl_certificate                 /etc/nginx/ssl/example.com.crt;
        ssl_certificate_key             /etc/nginx/ssl/example.com.key;

        # legacy server IP address
        set $legacy_ip 123.123.123.123;

        # proxy over which protocol?
        set $protocol http;
        if ( $server_port = 443 ){
                set $protocol https;
        }

        # pass everything through the proxy
        location / {
                # proxy all requests to the legacy server
                proxy_pass                      $protocol://$legacy_ip;

                # set the Host header on the request
                proxy_set_header                Host "www.example.com";

                # replace redirect strings
                proxy_redirect                  http://www.example.com/ /;
                proxy_redirect                  https://www.example.com/ https://gamma.example.com/;

                # replace cookie domains
                proxy_cookie_domain             'www.example.com' 'gamma.example.com';

                # replace page content
                sub_filter_once off;
                sub_filter                      'www.example.com' 'gamma.example.com';
        }
}
The post NGINX Reverse Proxy to Legacy Website appeared first on Justin Silver.
]]>The post GoDaddy SSL Certificates on NGINX appeared first on Justin Silver.
]]>To properly install a GoDaddy SSL certificate on an NGINX install, you will need to include the gd_intermediate.crt and gd_bundle.crt the SSL certificate file for your server. The location of this file can be found in the *.conf, usually in /etc/nginx/conf.d. In my case, the SSL certificate is located at /etc/nginx/ssl/server.crt but you should set it appropriately to CRT_FILE for your site.
The files to include can be found on https://certs.godaddy.com/anonymous/repository.pki, or use the following script.
[www.example.com]# curl -v -I https://www.example.com
* About to connect() to www.example.com port 443 (#0)
*   Trying 127.0.0.1... connected
* Connected to www.example.com (127.0.0.1) port 443 (#0)
* successfully set certificate verify locations:
*   CAfile: /etc/pki/tls/certs/ca-bundle.crt
  CApath: none
* SSLv3, TLS handshake, Client hello (1):
* SSLv3, TLS handshake, Server hello (2):
* SSLv3, TLS handshake, CERT (11):
* SSLv3, TLS alert, Server hello (2):
* SSL certificate problem, verify that the CA cert is OK. Details:
error:14090086:SSL routines:SSL3_GET_SERVER_CERTIFICATE:certificate verify failed
* Closing connection #0
curl: (60) SSL certificate problem, verify that the CA cert is OK. Details:
error:14090086:SSL routines:SSL3_GET_SERVER_CERTIFICATE:certificate verify failed
More details here: http://curl.haxx.se/docs/sslcerts.html
Append your site’s SSL certificate with the GoDaddy gd_intermediate.crt & gd_bundle.crt intermediate certificates. Use the following to backup/update this file based on the value set to CRT_FILE.
cp /etc/nginx/ssl/server.crt /etc/nginx/ssl/server.crt.bak
CRT_FILE=/etc/nginx/ssl/server.crt
GD_HOST="https://certs.godaddy.com"
GD_PATH="/anonymous/repository.pki?"
GD_ACTION="actionMethod=anonymous%2Frepository.xhtml%3Arepository.streamFile%28%27%27%29"
GD_CID="cid=88430"
GD_REPO="$GD_HOST$GD_PATH$GD_ACTION&$GD_CID"
curl "$GD_REPO&streamfilename=gd_intermediate.crt" >> $CRT_FILE
curl "$GD_REPO&streamfilename=gd_bundle.crt" >> $CRT_FILE
service nginx restart
After the update you should be able to fetch your site over SSL with no warnings.
[www.example.com]# curl -v -I https://www.example.com
* About to connect() to www.example.com port 443 (#0)
*   Trying 127.0.0.1... connected
* Connected to www.example.com (127.0.0.1) port 443 (#0)
* successfully set certificate verify locations:
*   CAfile: /etc/pki/tls/certs/ca-bundle.crt
  CApath: none
* SSLv3, TLS handshake, Client hello (1):
* SSLv3, TLS handshake, Server hello (2):
* SSLv3, TLS handshake, CERT (11):
* SSLv3, TLS handshake, Server key exchange (12):
* SSLv3, TLS handshake, Server finished (14):
* SSLv3, TLS handshake, Client key exchange (16):
* SSLv3, TLS change cipher, Client hello (1):
* SSLv3, TLS handshake, Finished (20):
* SSLv3, TLS change cipher, Client hello (1):
* SSLv3, TLS handshake, Finished (20):
* SSL connection using DHE-RSA-AES256-SHA
* Server certificate:
* 	 subject: OU=Domain Control Validated; CN=*.example.com
* 	 start date: 2014-02-03 16:44:03 GMT
* 	 expire date: 2015-03-04 22:23:49 GMT
* 	 subjectAltName: www.example.com matched
* 	 issuer: C=US; ST=Arizona; L=Scottsdale; O=GoDaddy.com, Inc.; OU=http://certificates.godaddy.com/repository; CN=Go Daddy Secure Certification Authority; serialNumber=12345678
* 	 SSL certificate verify ok.
> HEAD / HTTP/1.1
> User-Agent: curl/7.21.7 (x86_64-redhat-linux-gnu) libcurl/7.21.7 OpenSSL/0.9.8b zlib/1.2.3 libidn/0.6.5 libssh2/1.2.7
> Host: www.example.com
> Accept: */*
>
< HTTP/1.1 200 OK
HTTP/1.1 200 OK
< Server: nginx/1.4.7
Server: nginx/1.4.7
The post GoDaddy SSL Certificates on NGINX appeared first on Justin Silver.
]]>The post Create a Self-Signed Certificate for Apache SSL on CentOS appeared first on Justin Silver.
]]>A self-signed certificate can be used for many things, but in this case it is to provide HTTP over SSL from Apache, HTTPS. In many cases a CA signed certificate is not required – a self signed certificate offers the same level of encryption at no cost if you can live with the warnings (or install the cert in your keystore).
Install ModSSL and OpenSSL
Use yum to get OpenSSL and ModSSL plus dependencies.
yum -y install mod_ssl openssl
Generate the key, certificate signing request, and certificate.
This will generate a 2048 bit RSA key and certificate good for ~10 years (3650 days).
mkdir -p /etc/httpd/ssl
cd /etc/httpd/ssl
openssl genrsa -out ssl.key 2048
openssl req -new -key ssl.key -out ssl.csr
openssl x509 -req -days 3650 -in ssl.csr -signkey ssl.key -out ssl.crt
Use Self-Signed Certificate with Apache.
You can now use the key and crt files in apache, either in the general configuration included by default in /etc/httpd/conf.d/ssl.conf or in a VirtualHost as below.
<VirtualHost *:443>
	ServerName my.server.com
	DocumentRoot /var/www/html

	# Enable SSL and specify the certificate and key
	SSLEngine on
	SSLCertificateFile      /etc/httpd/ssl/ssl.crt
	SSLCertificateKeyFile   /etc/httpd/ssl/ssl.key

	# If you are reverse proxying from HTTP to HTTPS make sure to include a header rewrite
	#Header edit Location ^http: https:
</VirtualHost>
The post Create a Self-Signed Certificate for Apache SSL on CentOS appeared first on Justin Silver.
]]>The post SVN COPY 502 Bad Gateway Error appeared first on Justin Silver.
]]>There is a lot of info to be found on the Internet about the “502 Bad Gateway Error” when trying trying to move a directory or files when your repository is hosted on Apache using SSL and WEBDAV. In a nutshell Apache is confused by the COPY command and things you are trying to make a move between HTTP and HTTPS, or in other words, a different host. You can read up on the problem here: http://www.science.uva.nl/research/air/wiki/Subversion502BadGateway
The problem that I ran into was with my HTTP server on the same host. Why do I need an HTTP server you may ask? Well, mainly to redirect requests from http://svn.example.com to https://svn.example.com. Most of the documentation I was able to find on this suggested simply adding a line to the VirtualHost to update the header, like so:
RequestHeader edit Destination ^https http early
In my case, this just wasn’t working. What did fix it is a bit counter-intuitive – I had to enable the SSLEngine on my HTTP VirtualHost, as well as my HTTPS VirtualHost. My configuration now looks like the following, and I am able to move files again.
SSLCertificateFile /etc/httpd/ssl/self-signed.crt
SSLCertificateKeyFile /etc/httpd/ssl/self-signed.key

<VirtualHost *:80>
        ServerName svn.example.com
        RequestHeader edit Destination ^https http early

        # Turn mod_ssl on even though we are on 80
        SSLEngine on

        # Rewrite HTTP to HTTPS
        RewriteEngine On
        RewriteCond %{HTTPS} off
        RewriteRule (.*) https://%{HTTP_HOST}%{REQUEST_URI}
</VirtualHost>

<VirtualHost *:443>
        ServerName svn.example.com

        # Turn mod_ssl on
        SSLEngine on

        <Location "/">
                DAV svn
                SVNPath /var/svn/repository
                AuthzSVNAccessFile /var/svn/repository/conf/authz

                AuthType Basic
                AuthName "example.com"
                AuthUserFile /var/svn/.htauthfile
                Require valid-user
        </Location>
</VirtualHost>
The post SVN COPY 502 Bad Gateway Error appeared first on Justin Silver.
]]>