The post Fantom Lachesis Full Node RPC appeared first on Justin Silver.
]]>Create an Alpine Linux image to run the lachesis node for the Fantom cryptocurrency.
FROM alpine:latest as build-stage

ARG LACHESIS_VERSION=release/1.0.0-rc.0

ENV GOROOT=/usr/lib/go
ENV GOPATH=/go
ENV PATH=$GOROOT/bin:$GOPATH/bin:/build:$PATH

RUN set -xe; \
  apk add --no-cache --virtual .build-deps \
  # get the build dependencies for go
  git make musl-dev go linux-headers; \
  # install fantom lachesis from github
  mkdir -p ${GOPATH}; cd ${GOPATH}; \
  git clone --single-branch --branch ${LACHESIS_VERSION} https://github.com/Fantom-foundation/go-lachesis.git; \
  cd go-lachesis; \
  make build -j$(nproc); \
  mv build/lachesis /usr/local/bin; \
  rm -rf /go; \
  # remove our build dependencies
  apk del .build-deps;

FROM alpine:latest as lachesis

# copy the binary
COPY --from=build-stage /usr/local/bin/lachesis /usr/local/bin/lachesis

COPY run.sh /usr/local/bin

WORKDIR /root

ENV LACHESIS_PORT=5050
ENV LACHESIS_HTTP=18545
ENV LACHESIS_API=eth,ftm,debug,admin,web3,personal,net,txpool
ENV LACHESIS_VERBOSITY=2

EXPOSE ${LACHESIS_PORT}
EXPOSE ${LACHESIS_HTTP}

VOLUME [ "/root/.lachesis" ]

CMD ["run.sh"]
The run.sh just starts the nodes with the ports you set in the environment.
#!/usr/bin/env sh

set -xe

lachesis \
  --port ${LACHESIS_PORT} \
  --http \
  --http.addr "0.0.0.0" \
  --http.port ${LACHESIS_HTTP} \
  --http.api "${LACHESIS_API}" \
  --nousb \
  --verbosity ${LACHESIS_VERBOSITY}
Use docker-compose to define the TCP/UDP ports to expose as well as a data volume to persist the blockchain data.
version: '3.4'

services:
  lachesis:
    image: doublesharp/fantom-lachesis:latest
    restart: always
    ports:
      - '5050:5050'
      - '5050:5050/udp'
      - '18545:18545'
    volumes:
      - lachesis:/root/.lachesis
    environment:
      LACHESIS_VERBOSITY: 2

volumes:
  lachesis: {}
The post Fantom Lachesis Full Node RPC appeared first on Justin Silver.
]]>The post Alpine Linux PHP + iconv fix appeared first on Justin Silver.
]]>To use PHP with iconv on Alpine Linux – in a Docker container for example – you need to use the preloadable iconv library, which was previously provided with the gnu-libiconv package, but was removed after Alpine v3.13. After recently rebuilding an Alpine image and running a PHP script that required iconv, I saw the following error:
Notice: iconv(): Wrong charset, conversion from `UTF-8' to `UTF-8//IGNORE' is not allowed
To work around it I installed the gnu-libiconv package from the v3.13 repo. For my projects I went ahead and exported the preloadable binary once it was built as well so that I could just COPY it into the image instead of building it – in my case it’s only for Alpine after all.
You can do this by using an Alpine image tag of alpine:3.13 to add gnu-libiconv and compile /usr/lib/preloadable_libiconv.so, then copy it to a volume to save the binary once the container exits – the output folder is called ./out in this example.
% docker run -v $(pwd)/out:/out -it alpine:3.13 \
/bin/sh -c 'apk add --no-cache gnu-libiconv && cp -f /usr/lib/preloadable_libiconv.so /out/preloadable_libiconv.so'

fetch https://dl-cdn.alpinelinux.org/alpine/v3.13/main/x86_64/APKINDEX.tar.gz
fetch https://dl-cdn.alpinelinux.org/alpine/v3.13/community/x86_64/APKINDEX.tar.gz
(1/1) Installing gnu-libiconv (1.15-r3)
Executing busybox-1.32.1-r6.trigger
OK: 8 MiB in 15 packages

% ls -la out/preloadable_libiconv.so
-rw-r--r--  1 justin  staff  1005216 Apr 23 14:32 out/preloadable_libiconv.so
Once you have the prebuilt binary you can use COPY in your Dockerfile to use it without needing to build it.
# copy preloadable_libiconv.so from prebuilt
COPY /rootfs/usr/lib/preloadable_libiconv.so /usr/lib/preloadable_libiconv.so
ENV LD_PRELOAD /usr/lib/preloadable_libiconv.so php
If you prefer to install the older package that includes the preloadable binary in a different Alpine Dockerfile you can specify an older repository in a RUN command, like so:
FROM wordpress:5.7.1-php7.4-fpm-alpine
# ... some config
RUN apk add --no-cache \
    --repository http://dl-cdn.alpinelinux.org/alpine/v3.13/community/ \
    --allow-untrusted \
    gnu-libiconv
ENV LD_PRELOAD /usr/lib/preloadable_libiconv.so php
The post Alpine Linux PHP + iconv fix appeared first on Justin Silver.
]]>The post Using APK for Alpine Linux with Docker appeared first on Justin Silver.
]]>Some quick tips on how to use apk for Alpine Linux in a Docker environment. Some common use cases might be to install command line tools you will use in scripts, or to compile a PHP extension. In the former you will often be able to access a binary, and not need to worry about polluting much of your Docker layer with extra files. When you need to compile something however – like a PHP extension – you may need several build tools as well as libraries that you don’t need to keep around after you compile the module.
This first example is common for installing command line tools:
RUN apk add --no-cache --update \
  bash curl findutils sed sudo
The next example shows how to compile PHP modules and remove their dependencies after compilation.
RUN set -xe; \
    apk add --no-cache --virtual .build-deps $PHPIZE_DEPS \
      # build tools
      autoconf g++ gcc make \
      # lib tools
      bzip2-dev freetype-dev gettext-dev icu-dev imagemagick-dev libintl libjpeg-turbo-dev \
      #  libmcrypt-dev
      libpng-dev libxslt-dev libzip-dev \
      ; \
    docker-php-ext-configure \
      gd --with-freetype-dir=/usr/include/ --with-jpeg-dir=/usr/include/ --with-png-dir=/usr/include/ \
      ; \
    docker-php-ext-install -j$(nproc) \
      bcmath bz2 calendar exif gettext gd intl mysqli opcache pcntl pdo_mysql soap xsl zip \
      ; \
    pecl channel-update pecl.php.net && \
    pecl install -o -f \
      redis \
      ; \
    docker-php-ext-enable \
      redis \
      ; \
    runDeps="$( \
      scanelf --needed --nobanner --format '%n#p' --recursive /usr/local/lib/php/extensions \
        | tr ',' '\n' \
        | sort -u \
        | awk 'system("[ -e /usr/local/lib/" $1 " ]") == 0 { next } { print "so:" $1 }' \
    )"; \
      apk add --virtual .phpexts-rundeps $runDeps; \
      apk del .build-deps
The post Using APK for Alpine Linux with Docker appeared first on Justin Silver.
]]>The post Docker-CE on CentOS 7 appeared first on Justin Silver.
]]>Install Docker-CE (not just “docker) to get the latest version on CentOS.
yum install -y yum-utils device-mapper-persistent-data lvm2
yum-config-manager --add-repo https://download.docker.com/linux/centos/docker-ce.repo
yum makecache fast
yum install -y docker-ce
chkconfig docker on
service docker start
Update firewalld to allow host/container traffic.
Restart firewalld to pick up the changes.
# trust the docker interface
firewall-cmd --permanent --zone=trusted --change-interface=docker0
# accept IPv4 traffic
firewall-cmd --permanent --direct --add-rule ipv4 filter INPUT 4 -i docker0 -j ACCEPT
# any ports on the host you want to access from the containers (strapi port 1337 here)
firewall-cmd --permanent --zone=trusted --add-port=1337/tcp
firewall-cmd --reload
service docker restart
Create a group named “docker” and add any users that are allowed to create containers.
groupadd docker
# allow users to access docker by adding them to the docker group
# usermod -aG docker $USER
Use an entrypoint file to create an entry in /etc/hosts to point to the host. Requires ping and ip on the machine, on Debian these are found in the apt packages inetutils-ping and iproute.
#!/bin/bash

# fix for linux hosts
HOST_DOMAIN="host.docker.internal"
ping -q -c1 $HOST_DOMAIN > /dev/null 2>&1
if [ $? -ne 0 ]; then
  HOST_IP=$(ip route | awk 'NR==1 {print $3}')
  echo -e "$HOST_IP\t$HOST_DOMAIN" >> /etc/hosts
fi

exec "$@"
The post Docker-CE on CentOS 7 appeared first on Justin Silver.
]]>The post Wildcard SSL Certs: Let’s Encrypt & Cloudflare appeared first on Justin Silver.
]]>My servers have been using free Let’s Encrypt SSL certificates for some time now, but I was really excited to hear about support for wildcard SSL certificates in 2018. Wildcards are now available thus I am now using Let’s Encrypt Wildcard SSL Certificates with Cloudflare DNS-01 challenges from my Jenkins CI/CD server. The wildcard ssl cert is generated manually the first time, afterwards it uses a root user cron job to check for certificate renewals. After the certbot tool is finished with the renewal request it calls a “post hook” script that copies the wildcard SSL certificates (as needed) to the Jenkins home directory. From there they can be deployed via SSH to the servers.
The SSH user does not have root access, rather the wildcard SSL certificates are symlinked from a user account to the Nginx configuration. Nginx is scheduled to gracefully reload approximately 30 minutes after the SSL certificate renewals are processed, therefore new any new certificate will be served shortly after it is generated.
Generate Wildcard SSL Certs
# configuration for cloudflare
CLOUDFLARE_EMAIL="[email protected]"
CLOUDFLARE_API_KEY="put-your-key-here"
DOMAIN="your-domain.com"

# as root configure your cloudflare secrets
mkdir -p /root/.secrets
cat <<CLOUDFLARE_CONFIG > /root/.secrets/cloudflare.ini
dns_cloudflare_email="$CLOUDFLARE_EMAIL"
dns_cloudflare_api_key="$CLOUDFLARE_API_KEY"
CLOUDFLARE_CONFIG

# make sure they are hidden, the api key is more powerful than a password!
chmod 0700 /root/.secrets/
chmod 0400 /root/.secrets/cloudflare.ini

# install pip, upgrade, then install the cloudflare/certbot tool
yum install -y python-pip
pip install --upgrade pip
pip install certbot-dns-cloudflare

# generate a wildcard cert for the domain using a dns challenge
#
# --quiet, suppress output
# --non-interactive, avoid user input
# --agree-tos, agree to tos on first run
# --keep-until-expiring, keep existing certs
# --preferred-challenges, specify to use dns-01 challenge
# --dns-cloudflare, use the cloudflare dns plugin
# --dns-cloudflare-credentials, path to ini config
# -d, domains to generate keys for, you can add additional ones if needed
certbot certonly \
  --quiet \
  --non-interactive \
  --agree-tos \
  --keep-until-expiring \
  --preferred-challenges dns-01 \
  --dns-cloudflare \
  --dns-cloudflare-credentials /root/.secrets/cloudflare.ini \
  -d $DOMAIN,*.$DOMAIN
Ubuntu / Debian
apt-get update -y
apt-get install -y python3-pip
pip install --upgrade acme pip
pip install certbot-dns-cloudflare
Certbot Post Hook for Jenkins
This bash script will be run after certbot renewals are processed to make the SSL certs available to Jenkins for distribution to the servers.
# where we are going to store the SSL certs for deployment
JENKINS_SSL="/home/jenkins/secrets/ssl"
DOMAIN="your-domain.com"

# run this after the certbot renewal to copy keys to jenkins
POST_HOOK_PATH="/usr/local/bin/certbot-post-hook"
cat <<CERTBOT_POST_HOOK > "$POST_HOOK_PATH"
# copy ssl certs and keys
cp /etc/letsencrypt/live/$DOMAIN/fullchain.pem "$JENKINS_SSL/$DOMAIN-fullchain.pem"
cp /etc/letsencrypt/live/$DOMAIN/privkey.pem "$JENKINS_SSL/$DOMAIN-privkey.pem"

# make sure the jenkins user can read them
chown -R jenkins.jenkins "$JENKINS_SSL"
CERTBOT_POST_HOOK

# make post hook executable
chmod +x "$POST_HOOK_PATH"
SSL Certificate Renewals
On the Jenkins server add a crontab entry for the root user to process SSL certificate renewals. Note the path to $POST_HOOK_PATH above is used here, so adjust as needed. The same credentials used to generate the cert will be used here as well, as a result they do not need to be included again.
# process let's encrypt renewals at 3:30am
30 3 * * * /usr/bin/certbot renew --quiet --post-hook /usr/local/bin/certbot-post-hook > /dev/null 2>&1
Certbot Post Hook for Jenkins
Jenkins is used to handle the SSL certificate deployment to the app servers because it is already set up to deploy files to my servers via SSH. First the required certificates are copied to the workspace, then uploaded using an SSH transfer set to each server. These certificates are then symlinked by the root user to the Nginx configuration for user. A cron job on each app server gracefully restarts nginx nightly to pick up any new certificates.
In the example below the certificates end up in a user home directory like so /home/username/ssl/your-domain.com-fullchain.pem therefore you will need to adjust for your username and domain.
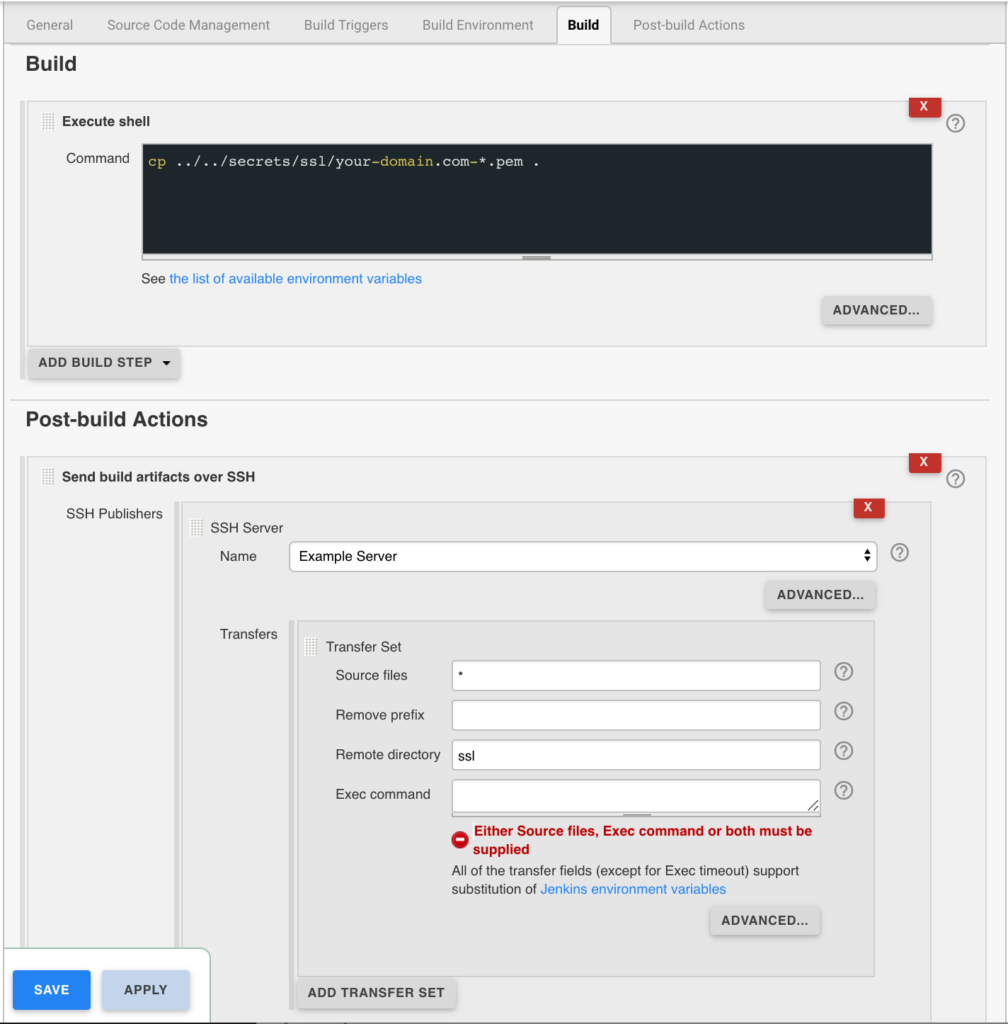
Gracefully Reload Nginx
Pick up new certificates from renewals by gracefully reloading Nginx via a root cron job due to Nginx not seeing the change otherwise.
# reload nginx gracefully at 4:00am
0 4 * * * /usr/sbin/service nginx reload
The post Wildcard SSL Certs: Let’s Encrypt & Cloudflare appeared first on Justin Silver.
]]>The post MongoDB Clustering for CentOS 7 appeared first on Justin Silver.
]]>A quick guide to installing a MongoDB cluster on CentOS 7 hosts.
Network Configuration
10.0.10.1 config01
10.0.20.1 shard01
10.0.20.2 shard02
10.0.30.1 app01
Install MongoDB
First make sure the system is up to date and install the MongoDB binaries via the Mongo yum repository:
# update via yum
yum update -y

# install the mongodb repository
cat <<REPO > /etc/yum.repos.d/mongodb.repo
[mongodb]
name=MongoDB Repository
baseurl=http://downloads-distro.mongodb.org/repo/redhat/os/x86_64/
gpgcheck=0
enabled=1
REPO

# install mongodb
yum install -y mongodb-org

# change the block side - NOTE: use the /dev that hosts the mongo data
blockdev --setra 256 /dev/xvda1

# disable access times
sed -rn 's/( \/ \s*(ext[[:digit:]]|xfs)\s*defaults) /\1,noatime /p' -i /etc/fstab

# remount
mount -o remount /
Configure MongoDB Configuration Server
# mongod.conf: config server(s)

# use as config server, changes port to 27019
configsvr=true

# data directory
dbpath=/var/lib/mongo

####### STANDARD CONFIG #######

# fork and run in background
fork=true

# location of pidfile
pidfilepath=/var/run/mongodb/mongod.pid

# where to log
logpath=/var/log/mongodb/mongod.log

# append to log, don't create a new one on restart
logappend=true
Configure MongoDB Nodes
# mongod.conf: shard server(s)

# shard server, changes the port number to 27018
shardsvr=true

# data directory
dbpath=/var/lib/mongo

####### STANDARD CONFIG #######

# fork and run in background
fork=true

# location of pidfile
pidfilepath=/var/run/mongodb/mongod.pid

# where to log
logpath=/var/log/mongodb/mongod.log

# append to log, don't create a new one on restart
logappend=true
Configure MongoDB Query Router(s)
# mongos.conf: query server(s)

# config server IP and port, comma delimited if there is more than one
#configdb=config01:27019,config02:27019,...
configdb=config01:27019

####### STANDARD CONFIG #######

# fork and run in background
fork=true

# location of pidfile
pidfilepath=/var/run/mongodb/mongos.pid

# where to log
logpath=/var/log/mongodb/mongos.log

# append to log, don't create a new one on restart
logappend=true
We need to make a few more changes to make sure that the Query Router uses mongos – not mongod – when the MongoDB service starts. We also never want this server to start as a MongoDB node by accident, so we will rename the initialization script and make a few edits.
mv /etc/init.d/mongod /etc/init.d/mongos
vi /etc/init.d/mongos
In the mongos script you want to look for and replace the following lines
# Old - uses mongod.conf
CONFIGFILE="/etc/mongod.conf"

# New - uses mongos.conf
CONFIGFILE="/etc/mongos.conf"
# Old - uses mongod SYSCONFIG="/etc/sysconfig/mongod" # New - uses mongos SYSCONFIG="/etc/sysconfig/mongos" # replace in vi/vim with: :%s/sysconfig\/mongod/sysconfig\/mongos/gBelow this I placed a new variable for the lockfile and updated all the instances of the hard coded values.
# replace in vi/vim with:
:%s/\var\/lock\/subsys\/mongod/"$LOCKFILE"/g

# now add this, so the variable value isn't overwritten by the regex above
LOCKFILE="/var/lock/subsys/mongos"
Next we want to change the $mongod to $mongos.
# Old - uses mongod
mongod=${MONGOD-/usr/bin/mongod}

# New - uses mongos
mongos=${MONGOD-/usr/bin/mongos}

# replace in vi/vim using
:%s/\$mongod/$mongos/g

# replace the status text in vi/vim with:
:%s/mongod: "/mongos: "/g
Leave the MONGO_USER and MONGO_GROUP as mongod to prevent permissions issues.
There is also a bug in the script where the path to the binary is used directly instead of the variable for
stop), called byservice mongod stop, so we need to fix it as well.# Old - uses path killproc -p "$PIDFILE" -d 300 /usr/bin/mongod # New - uses variable killproc -p "$PIDFILE" -d 300 $mongos # replace the status text in vi/vim with: :%s/\/usr/bin\/mongod/$mongos/gThe full customized mongos startup script follows.
#!/bin/bash

# mongos - Startup script for mongos

# chkconfig: 35 85 15
# description: Mongo is a scalable, document-oriented database.
# processname: mongos
# config: /etc/mongos.conf
# pidfile: /var/run/mongodb/mongos.pid

. /etc/rc.d/init.d/functions

# things from mongos.conf get there by mongos reading it

# NOTE: if you change any OPTIONS here, you get what you pay for:
# this script assumes all options are in the config file.
CONFIGFILE="/etc/mongos.conf"
OPTIONS=" -f $CONFIGFILE"
SYSCONFIG="/etc/sysconfig/mongos"
LOCKFILE="/var/lock/subsys/mongos"

# FIXME: 1.9.x has a --shutdown flag that parses the config file and
# shuts down the correct running pid, but that's unavailable in 1.8
# for now.  This can go away when this script stops supporting 1.8.
DBPATH=`awk -F'[:=]' -v IGNORECASE=1 '/^[[:blank:]]*dbpath[[:blank:]]*[:=][[:blank:]]*/{print $2}' "$CONFIGFILE" | tr -d '[:blank:]'`
PIDFILE=`awk -F'[:=]' -v IGNORECASE=1 '/^[[:blank:]]*pidfilepath[[:blank:]]*[:=][[:blank:]]*/{print $2}' "$CONFIGFILE" | tr -d '[:blank:]'`
PIDDIR=`dirname $PIDFILE`

mongos=${MONGOD-/usr/bin/mongos}

MONGO_USER=mongod
MONGO_GROUP=mongod

if [ -f "$SYSCONFIG" ]; then
    . "$SYSCONFIG"
fi

# Handle NUMA access to CPUs (SERVER-3574)
# This verifies the existence of numactl as well as testing that the command works
NUMACTL_ARGS="--interleave=all"
if which numactl >/dev/null 2>/dev/null && numactl $NUMACTL_ARGS ls / >/dev/null 2>/dev/null
then
    NUMACTL="numactl $NUMACTL_ARGS"
else
    NUMACTL=""
fi

start()
{
  # Make sure the default pidfile directory exists
  if [ ! -d $PIDDIR ]; then
    install -d -m 0755 -o $MONGO_USER -g $MONGO_GROUP $PIDDIR
  fi

  # Recommended ulimit values for mongod or mongos
  # See http://docs.mongodb.org/manual/reference/ulimit/#recommended-settings
  #
  ulimit -f unlimited
  ulimit -t unlimited
  ulimit -v unlimited
  ulimit -n 64000
  ulimit -m unlimited
  ulimit -u 64000

  echo -n $"Starting mongos: "
  daemon --user "$MONGO_USER" --check $mongos "$NUMACTL $mongos $OPTIONS >/dev/null 2>&1"
  RETVAL=$?
  echo
  [ $RETVAL -eq 0 ] && touch "$LOCKFILE"
}

stop()
{
  echo -n $"Stopping mongos: "
  killproc -p "$PIDFILE" -d 300 $mongos
  RETVAL=$?
  echo
  [ $RETVAL -eq 0 ] && rm -f "$LOCKFILE"
}

restart () {
        stop
        start
}


RETVAL=0

case "$1" in
  start)
    start
    ;;
  stop)
    stop
    ;;
  restart|reload|force-reload)
    restart
    ;;
  condrestart)
    [ -f "$LOCKFILE" ] && restart || :
    ;;
  status)
    status $mongos
    RETVAL=$?
    ;;
  *)
    echo "Usage: $0 {start|stop|status|restart|reload|force-reload|condrestart}"
    RETVAL=1
esac

exit $RETVAL
Now we’re ready to add the shards, which we do from the Query Router. So either log on to MongoDB using mongo from the command line, or from a different server use mongo --host app01.
use admin;
db.runCommand( { addShard: "shard01:27018", name: "shard01" } );
{ "shardAdded" : "shard01", "ok" : 1 }
db.runCommand( { addShard: "shard02:27018", name: "shard02" } );
{ "shardAdded" : "shard02", "ok" : 1 }
db.runCommand( { listShards: 1 } ); { "shards" : [ { "_id" : "shard01", "host" : "shard01:27018" }, { "_id" : "shard02", "host" : "shard02:27018" } ], "ok" : 1 }
use sharded_db;

sh.enableSharding( "sharded_db" );
{ "ok" : 1 }

db.sharded_db.ensureIndex( { _id : "hashed" } );
{
	"raw" : {
		"shard01:27018" : {
			"createdCollectionAutomatically" : true,
			"numIndexesBefore" : 1,
			"numIndexesAfter" : 2,
			"ok" : 1
		}
	},
	"ok" : 1
}

sh.shardCollection( "sharded_db.sharded_collection", { "_id": "hashed" } );
{ "collectionsharded" : "sharded_db.sharded_collection", "ok" : 1 }
for ( var i=0; i<=100; i++ ) db.sharded_collection.insert( { x : i } ); WriteResult({ "nInserted" : 1 }) db.sharded_collection.find() { "_id" : ObjectId("571ac1ded785cd0adda63b59"), "x" : 1 } { "_id" : ObjectId("571ac1ded785cd0adda63b5b"), "x" : 3 } { "_id" : ObjectId("571ac1ded785cd0adda63b5a"), "x" : 2 } { "_id" : ObjectId("571ac1ded785cd0adda63b5d"), "x" : 5 } { "_id" : ObjectId("571ac1ded785cd0adda63b5c"), "x" : 4 } { "_id" : ObjectId("571ac1ded785cd0adda63b5e"), "x" : 6 } { "_id" : ObjectId("571ac1ded785cd0adda63b60"), "x" : 8 } { "_id" : ObjectId("571ac1ded785cd0adda63b5f"), "x" : 7 } { "_id" : ObjectId("571ac1ded785cd0adda63b62"), "x" : 10 } { "_id" : ObjectId("571ac1ded785cd0adda63b61"), "x" : 9 } { "_id" : ObjectId("571ac1ded785cd0adda63b69"), "x" : 17 } { "_id" : ObjectId("571ac1ded785cd0adda63b63"), "x" : 11 } { "_id" : ObjectId("571ac1ded785cd0adda63b6a"), "x" : 18 } { "_id" : ObjectId("571ac1ded785cd0adda63b64"), "x" : 12 } { "_id" : ObjectId("571ac1ded785cd0adda63b6d"), "x" : 21 } { "_id" : ObjectId("571ac1ded785cd0adda63b65"), "x" : 13 } { "_id" : ObjectId("571ac1ded785cd0adda63b6e"), "x" : 22 } { "_id" : ObjectId("571ac1ded785cd0adda63b66"), "x" : 14 } { "_id" : ObjectId("571ac1ded785cd0adda63b70"), "x" : 24 } { "_id" : ObjectId("571ac1ded785cd0adda63b67"), "x" : 15 } Type "it" for more
sh.status();
--- Sharding Status ---
  sharding version: {
	"_id" : 1,
	"version" : 4,
	"minCompatibleVersion" : 4,
	"currentVersion" : 5,
	"clusterId" : ObjectId("571a019ce3c89d90cb6e1715")
  }
  shards:
	{  "_id" : "shard01",  "host" : "shard01:27018" }
	{  "_id" : "shard02",  "host" : "shard02:27018" }
  databases:
	{  "_id" : "admin",  "partitioned" : false,  "primary" : "config" }
	{  "_id" : "sharded_db",  "partitioned" : true,  "primary" : "shard01" }
		sharded_db.sharded_collection
			shard key: { "_id" : "hashed" }
			chunks:
				shard01	2
				shard02	2
			{ "_id" : { "$minKey" : 1 } } -->> { "_id" : NumberLong("-4611686018427387902") } on : shard01 Timestamp(2, 2)
			{ "_id" : NumberLong("-4611686018427387902") } -->> { "_id" : NumberLong(0) } on : shard01 Timestamp(2, 3)
			{ "_id" : NumberLong(0) } -->> { "_id" : NumberLong("4611686018427387902") } on : shard02 Timestamp(2, 4)
			{ "_id" : NumberLong("4611686018427387902") } -->> { "_id" : { "$maxKey" : 1 } } on : shard02 Timestamp(2, 5)
db.dropDatabase();
{ "dropped" : "sharded_db", "ok" : 1 }
The post MongoDB Clustering for CentOS 7 appeared first on Justin Silver.
]]>The post Syscoin Core 3.0 Build Scripts appeared first on Justin Silver.
]]>Build Scripts
Use the following commands to compile Syscoin 3.0 on a variety of operating systems. These scripts will prepare your system with the proper build tools and install the necessary libraries and source code to compile binaries on and for your system.
OSX
# xcode command line tools
xcode-select --install

# update
brew update

# build tools
brew install git automake libtool miniupnpc openssl pkg-config protobuf python qt libevent qrencode librsvg

# boost
brew install boost

# berkeleydb 4.8
brew install berkeley-db@4

# miniupnpc
brew install miniupnpc

# zmq
brew install czmq

# syscoin
git clone https://github.com/syscoin/syscoin.git
cd syscoin
./autogen.sh
./configure
make -j$(sysctl -n hw.ncpu) -pipe
sudo make install
Ubuntu 16.04 LTS x64 Xenial
#!/bin/bash

# required for libdb4.8
sudo apt install -y software-properties-common
sudo add-apt-repository ppa:bitcoin/bitcoin

# update
sudo apt update -y

# build tools
sudo apt install -y git build-essential libtool autotools-dev automake pkg-config libssl-dev libevent-dev bsdmainutils python3

# boost
sudo apt install -y libboost-all-dev

# berkeleydb 4.8
sudo apt install -y libdb4.8-dev libdb4.8++-dev

# miniupnpc
sudo apt install -y libminiupnpc-dev

# zmq
sudo apt install -y libzmq3-dev

# syscoin
git clone https://github.com/syscoin/syscoin.git
cd syscoin
./autogen.sh
./configure
make -j$(nproc) -pipe
sudo make install
Ubuntu 14.04 LTS x64 Trusty
#!/bin/bash

# required for libdb4.8
sudo apt install -y software-properties-common
sudo add-apt-repository ppa:bitcoin/bitcoin

# update
sudo apt update -y

# build tools
sudo apt install -y git build-essential libtool autotools-dev automake pkg-config libssl-dev libevent-dev bsdmainutils python3 python-dev

# boost 1.65
curl -sL https://dl.bintray.com/boostorg/release/1.65.1/source/boost_1_65_1.tar.gz -o boost_1_65_1.tar.gz
tar -xvf boost_1_65_1.tar.gz && pushd boost_1_65_1
./bootstrap.sh
sudo ./b2 cxxflags=-fPIC -a --with=all -j$(nproc) toolset=gcc install
popd

# berkeleydb 4.8
sudo apt install -y libdb4.8-dev libdb4.8++-dev

# miniupnpc
sudo apt install -y libminiupnpc-dev

# zmq
sudo apt install -y libzmq3-dev

# syscoin
git clone https://github.com/syscoin/syscoin.git
cd syscoin
./autogen.sh
# must point to newer boost to prevent conflicts!
./configure --with-boost-libdir="/usr/local/lib/"
make -j$(nproc) -pipe
sudo make install
Debian Stretch
#!/bin/bash

# update
sudo apt update -y

# build tools
sudo apt install -y git build-essential libtool autotools-dev automake pkg-config libssl-dev libevent-dev bsdmainutils python3

# boost
sudo apt install -y libboost-all-dev

# berkeleydb 4.8 via syscoin contrib
source <(curl https://raw.githubusercontent.com/syscoin/syscoin/master/contrib/install_db4.sh) "$(pwd)"
export BDB_PREFIX="$(pwd)/db4"

# miniupnpc
sudo apt install -y libminiupnpc-dev

# zmq
sudo apt install -y libzmq3-dev

# syscoin
git clone https://github.com/syscoin/syscoin.git
cd syscoin
./autogen.sh
./configure BDB_LIBS="-L${BDB_PREFIX}/lib -ldb_cxx-4.8" BDB_CFLAGS="-I${BDB_PREFIX}/include"
make -j$(nproc) -pipe
sudo make install
Fedora 22
#!/bin/bash

# update
sudo dnf update -y

# build tools
sudo dnf install -y git gcc-c++ libtool make autoconf automake openssl-devel libevent-devel python3

# boost
sudo dnf install -y boost-devel

# berkeleydb 4.8
sudo dnf install -y libdb4-devel libdb4-cxx-devel

# miniupnpc
sudo dnf install -y miniupnpc-devel

# zmq
sudo dnf install -y czmq-devel

# syscoin
git clone https://github.com/syscoin/syscoin.git
cd syscoin
./autogen.sh
./configure
make -j$(nproc) -pipe
sudo make install
CentOS 7
#!/bin/bash

# update
sudo yum update -y

# build tools
sudo yum install -y git gcc-c++ libtool make autoconf automake epel-release openssl-devel libevent-devel python3 python-devel patch

# boost 1.65
curl -sL https://dl.bintray.com/boostorg/release/1.65.1/source/boost_1_65_1.tar.gz -o boost_1_65_1.tar.gz
tar -xvf boost_1_65_1.tar.gz && pushd boost_1_65_1
./bootstrap.sh
sudo ./b2 cxxflags=-fPIC -a --with=all -j$(nproc) toolset=gcc link=static runtime-link=static install
popd

# berkeleydb 4.8 (requires epel-release)
sudo yum install -y libdb4-devel libdb4-cxx-devel

# upnp (requires epel-release)
sudo yum install -y miniupnpc-devel

# zmq  (requires epel-release)
sudo yum install -y czmq-devel

# syscoin
git clone https://github.com/syscoin/syscoin.git
cd syscoin
./autogen.sh
./configure
make -j$(nproc) -pipe
sudo make install
The post Syscoin Core 3.0 Build Scripts appeared first on Justin Silver.
]]>The post Syscoin Masternode Hot Wallet to Syscoin-Qt appeared first on Justin Silver.
]]>Oh no! If you set up your Syscoin masternode with a hot wallet (by importing a private key for your collateral transaction) then you have put your syscoins at great risk! A flaw in an of the software running on your server could allow a hacker to break in to your system and transfer out the funds associated with your collateral transactions. What to do?
You can correct this problem in a few steps. Make sure to create backups of any wallet.dat files (especially the one on the server).
# if you installed with the automated script
syscoin-cli dumpprivkey YOUR_COLLATERAL_ADDRESS
# if you did NOT install with the automated script
~/syscoin/src/syscoin-cli dumpprivkey YOUR_COLLATERAL_ADDRESS
Now in Syscoin-Qt open the console and enter importprivkey YOUR_COLLATERAL_PRIVATE_KEY. If you haven’t already done so go to Settings/Preferences and enable Masternodes on the Wallet tab. You will need to restart Qt. Now select Tools > Masternode configuration (you may need to navigate to this file manually on a Mac at ~/Library/Application Support/SyscoinCore/masternode.conf. This should look exactly like the masternode.conf file on your server – either copy the contents from there or recreate if you backup copy (you should!).
Next go back to your server and and run the automated install bash script – Masternode Configuration for more info – or run it directly with bash <(curl -sL doublesharp.com/sysmasternode). Follow the prompts to setup up your node under a different user.
# stop syscoind
syscoin-cli stop && killall syscoind
# remove cron jobs
crontab -r
# run automated install
bash <(curl -sL doublesharp.com/sysmasternode)
Once you have run this install wait approximately 30 minutes to make sure your node remains active. If everything worked you will now want to remove the .syscoincore folder for your user to make sure you private keys aren't easily accessible. After you have verified that the node is active (and you have backups!) delete the folder by entering rm -rf ~/.syscoincore
All done!
The post Syscoin Masternode Hot Wallet to Syscoin-Qt appeared first on Justin Silver.
]]>The post Syscoin 3.0 Masternode Configuration appeared first on Justin Silver.
]]>This is a setup guide for creating a Syscoin 3.0 Masternode. You will need a Virtual Private Server (VPS) from hosting providers such as Amazon EC2, DigitalOcean Droplets, Google Compute Engine, Microsoft Azure, Choopa, OVH, or Vultr that meets the following specifications:
- Ubuntu 16.04 LTS x64
- 1+ CPU
- 2GB+ memory
- 40GB+ SSD hard drive
- Static IP Address – Elastic IP, etc
Guide: Masternode VPS Setup
If you need help setting up your VPS see this guide by Syscoin community member JohnP, but be sure to return here before running any commands on your server!
Before You Start
It’s a good idea to read through any script you find on the Internet before running it on a server with root privileges, including this one. Note that to make it easier for beginners this script automatically installs additional firewall and DDOS protection that may interfere with other services if this is not a “fresh” Ubuntu 16.04 LTS VPS.
SCRIPT: https://gist.github.com/doublesharp/bacf7f9ac1ff15dccc1acffe49f989e9#file-masternode-sh
All steps in Syscoin Core Qt should be performed on your local computer, only the automated script should be run on your server. Do not transfer funds to the wallet on your masternode.
Network Configuration
You will need to allocate a static IP to your Syscoin masternode. If your hosting provider implements a firewall (such as Security Groups for Amazon EC2) you will need to allow access to your masternode on TCP port 8369 from everywhere (inbound 0.0.0.0/0). Since we will be using SSH (Putty) to access to server you will need to allow TCP port 22 from everywhere as well.
Upgrading from 2.x to 3.x?
If you are upgrading your wallet from Syscoin 2.x to Syscoin 3.x you MUST run dumpwallet "/full/path/to/dump.txt" and then importwallet "/full/path/to/dump.txt". You will likely want to delete “/full/path/to/dump.txt” after this process as it contains unprotected private keys.
If you are unable to open your wallet.dat with Syscoin-Qt 3.x with an error that your wallet is corrupted you will need to open the wallet using Syscoin-Qt 2.1.6 and call dumpwallet then open Syscoin-Qt 3.x to run importwallet.
WARNING: Your wallet dump file contains unprotected private keys. Please delete it after completing this step!
Windows users will need to take an additional step to open Syscoin-Qt 2.x correctly. Locate the shortcut for Syscoin-Qt 2.x and right click it to select “Properties”, then in the “Target” field add a space and then -datadir=%HOMEPATH%\AppData\Roaming\Syscoin to the end of the value and click “Ok”. This will tell it to open using the legacy “Syscoin” directory instead of the new “SyscoinCore” directory.
PRO TIP: Backing up and encrypting your wallet is out of scope for this guide but if they are new concepts to you please look into how to do them!
Prepare & Send 100k SYS Collateral
To stake your masternode you will need to provide exactly 100,000SYS in your masternode address. Use Syscoin Core Qt for your system to process this transaction.
To get started open Syscoin Core Qt on your computer and from the menu select “Settings > Options” on Windows or “Syscoin Core > Preferences..” on a Mac. Select the “Wallet” tab and click the checkbox to “Enable coin control features” and “Show Masternodes Tab”. Click the “Ok” button to save your settings, close Syscoin Core Qt then re-open it to view the new options, then wait for the blockchain to fully sync with the network.
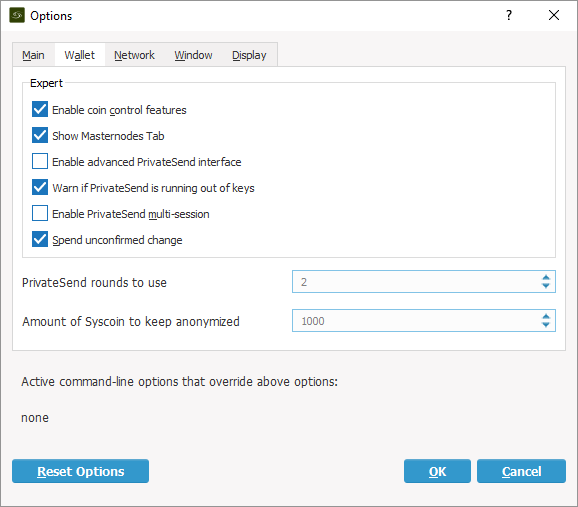
Masternode Private Key & Address
Once your local Syscoin Core Qt has fully synced select “Tools > Debug” and enter masternode genkey to generate your masternode private key. Copy this value as you will need it later, it will look similar to the following:
7ra1rhngvNkhkiFE8STrmvH3LvYTCzLyRFHFsZvrJUBV6ZmWnc
Next type getnewaddress to generate an address to use for collateral. Copy down this address as well as you will need to send your collateral to it in the next step. Note that using an alias is out of scope here, but if you create an alias you may use its address as well.
Multiple Masternodes?
If you are configuring multiple masternodes you will need to create a unique masternode private key and unique collateral address for each masternode using the steps above. Once the address is created for each masternode send a collateral transaction of exactly 100,000SYS to the address for each masternode using the next steps.
WARNING: If you use the same address for multiple masternodes your reward payouts cannot be completed.
Send Collateral to Address
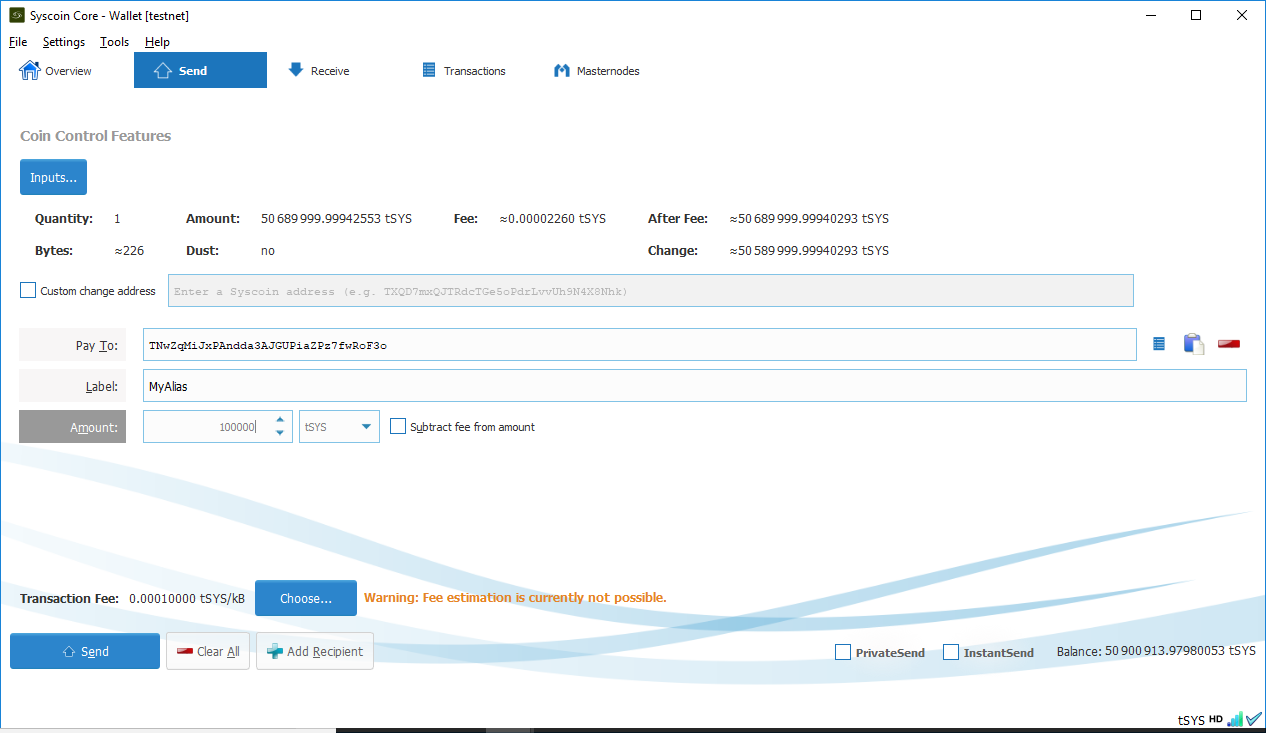
Use Coin Control to ensure that you send your collateral from the correct address. Go to “Send” and then “Inputs” to select the input that you would like to send from. In the example below using tSYS, the “Main” input will be selected. Click “Ok” to return to the “Send” screen.
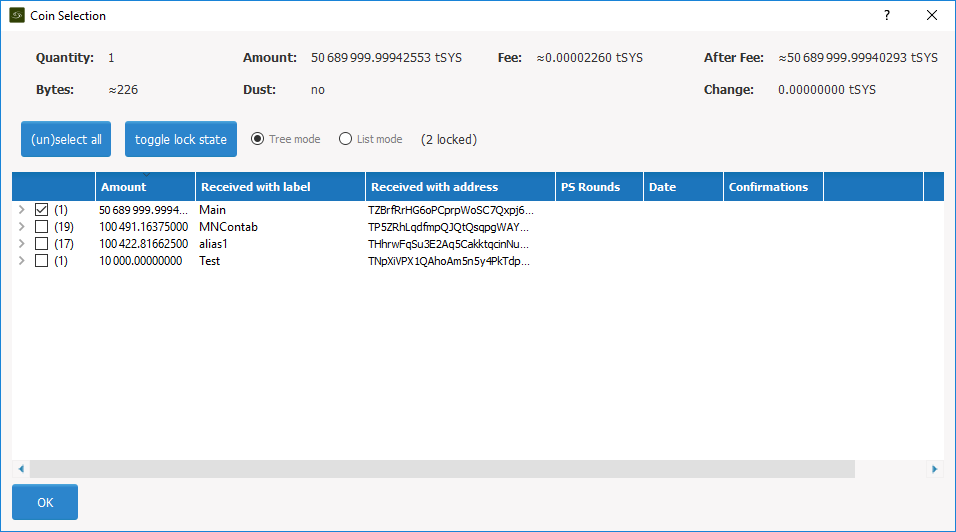
Next enter your masternode collateral address from the previous step into the “Pay To” field. Enter “100,000” exactly into the “Amount” field and do NOT subtract fees from the amount as it will reduce your collateral total.
Press “Send” to send your Syscoin to your masternode collateral address. You will need to wait 1 block – approximately 1 minute – for the transaction to confirm.
Next you will need to get the transaction id for the collateral by selecting the “Transactions” tab to see the 100,000SYS sent to yourself. Right click this transaction to view the id, and copy it down as well for later use.
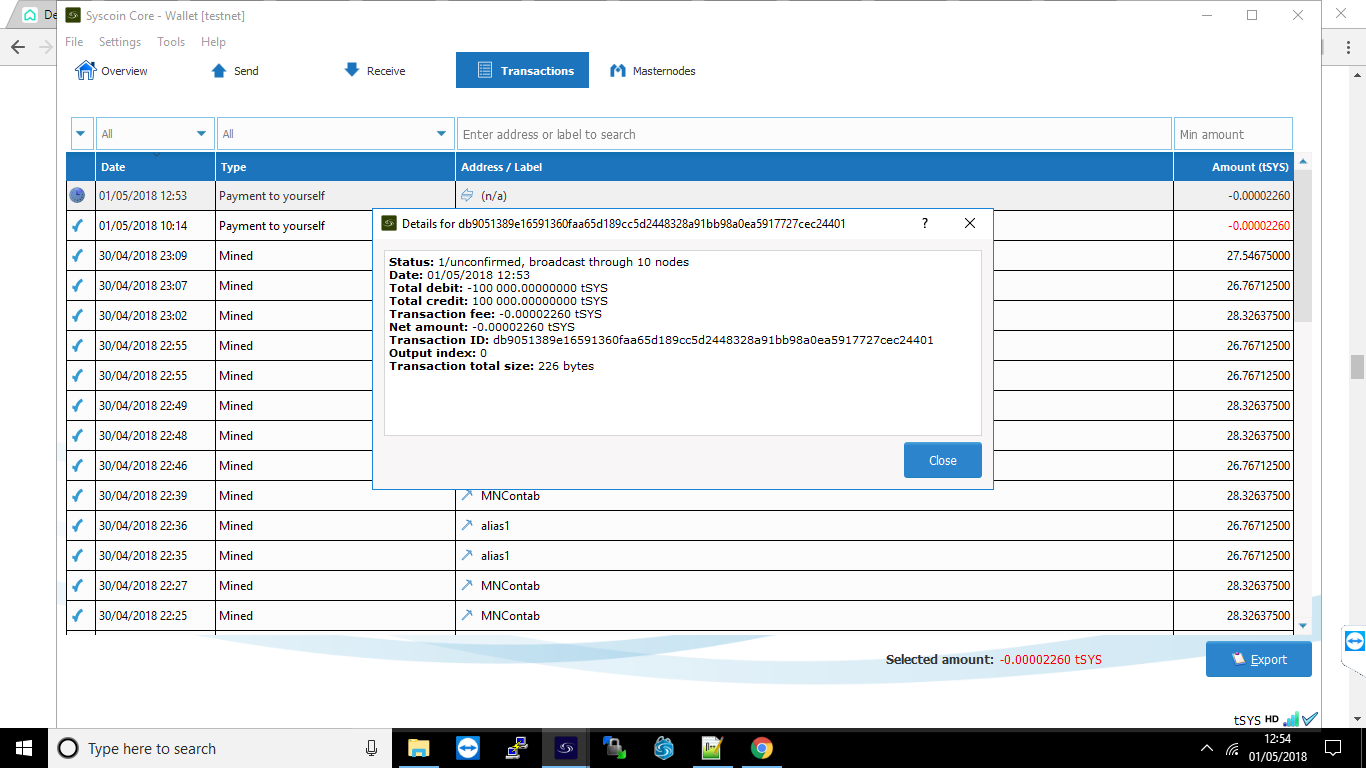
Get Masternode Outputs
In Syscoin Core Qt again open the “Tools > Debug” menu and enter masternode outputs. You will get a long string that is a hash of the transaction id from the previous step followed by a “0” or “1” to indicate the output index. The result should resemble the following:
{
“06e38868bb8f9958e34d5155437d009b72dff33fc87fd42e51c0f74fdb” : “0”,
}
Configure Masternode via Syscoin Core Qt
From the Syscoin-Qt menu select “Tools > Open Masternode Configuration File”. You will need to enter your masternode information using a text editor in the following format and use the public IP address of your server not your local computer. Make sure that the line does not start with a # as this will comment out the line! If you don’t see your masternode listed in the “Masternode” tab please double check this configuration.
# Masternode config file
# Format: alias IP:port masternodeprivkey collateral_output_txid collateral_output_index
mn1 123.123.123.123:8369 7ra1rhngvNkhkiFE8STrmvH3LvYTCzLyRFHFsZvrJUBV6ZmWnc 06e38868bb8f9958e34d5155437d009b72dff33fc87fd42e51c0f74fdb 0
Save this file and close Syscoin-Qt.
Configure Masternode
Finally we are ready to work on your server. Connect to your VPS via SSH (Putty) and enter the following command to start the automated install:
bash <(curl -sL doublesharp.com/sysmasternode)
Default values are found in brackets and pressing enter will selected the [default] value. For entries with a [Y/n] the capital letter is the default. Enter [Y] to choose “yes” or [N] to choose “no”. Likely the only value you will need to enter is your masternode private key.
Syscoin Core Github Branch [master]:
Masternode Private Key []: 7ra1rhngvNkhkiFE8STrmvH3LvYTCzLyRFHFsZvrJUBV6ZmWnc
External IP Address [123.123.123.123]:
Masternode Port [8369]:

Press any key to continue or Ctrl+C to exit...
Once the build process and configuration have completed type source ~/.bashrc to access the syscoind and syscoin-cli executables via the new syscoin user.
Enable Masternode
Back on your local computer restart Syscoin Core Qt and wait for it to sync up to the network. Choose the “Masternodes” tab, select your masternode, then click “Initialize alias”. Only click this button once and if your “Status” ever changes it’s recommended to confer with the #masternodes Slack channel before restarting your node – if you restart you will need to re-qualify for rewards and won’t receive any rewards during this time. Read on for more information.
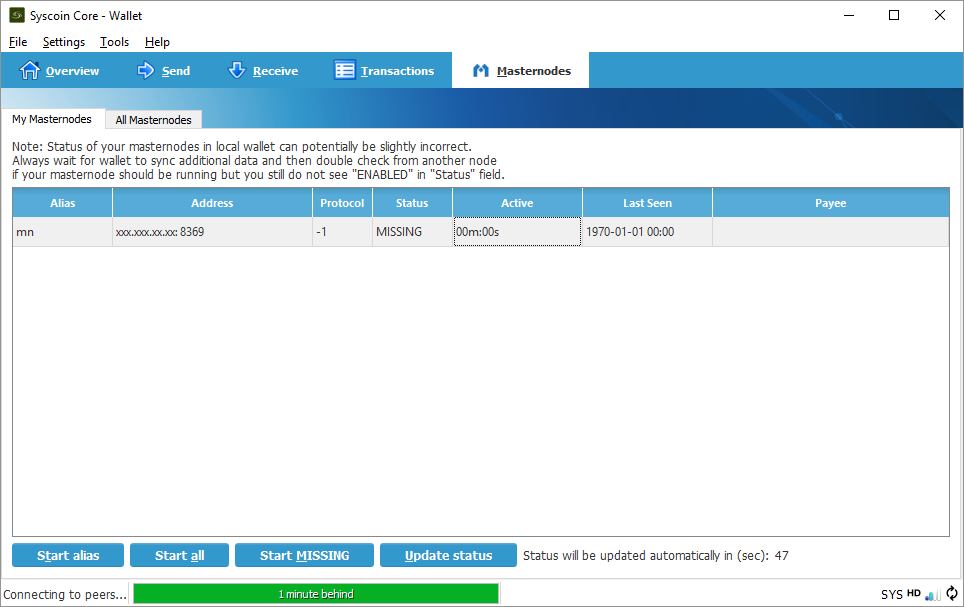
Eligibility for Rewards
Keep in mind that your masternode will not immediately be eligible for rewards. The eligibility period is determined by the formula [number of masternodes] * 2.6 * 60 seconds.
Note, if you restart your masternode by pressing “Initialize” in Qt this counter will reset and you will not receive rewards until your masternode is eligible again.
Masternode Server Commands
Now that syscoind is running under the syscoin user you will need to access it differently. The cron job for sentinel ping is also installed under this user. The following commands may be useful to run on your server.
# view your syscoin.conf
sudo cat /home/syscoin/.syscoincore/syscoin.conf

# view your sentinel.conf
sudo cat /home/syscoin/sentinel/sentinel.conf

# view the syscoin user crontab which should contain:
# */10 * * * * /usr/local/bin/sentinel-ping
sudo crontab -u syscoin -l

# run a sentinel ping to speed up Qt syncing? why not!
sudo su -c "sentinel-ping" syscoin

# view the sentinel-ping cron log, look for errors
sudo less /home/syscoin/sentinel/sentinel-cron.log

# view the syscoind debug log, look for errors
sudo less /home/syscoin/.syscoincore/debug.log

# start and stop the syscoind systemd service
sudo service syscoind stop
sudo service syscoind start
sudo service syscoind restart

# check that the syscoind process is running at the proper user
ps aux | grep [s]yscoind

# log out and back in or run the following to alias syscoind and syscoin-cli
source ~/.bashrc

# now the commands run as the syscoin user
syscoin-cli getinfo
syscoin-cli mnsync status
syscoin-cli masternode status

# it is aliased to this shorter function
syscli getinfo
syscli mnsync status
syscli masternode status

# if you really want to log in as the syscoin user
sudo su - syscoin
Summary
This script installs the necessary dependencies to build the Syscoin Core from source. It creates a user named “syscoin” and uses a systemd service to start the syscoind process as the “syscoin” user, and it set to start on boot after the necessary networking services have started.
Updates and reconfigurations can be performed by entering the command sysmasternode or the initial auto install command bash <(curl -sL doublesharp.com/sysmasternode).
Tips!
This automated install script was written by demesm and doublesharp. If it saved you time setting you your masternode please consider sending a tip. Thanks!
doublesharp @ alias doublesharp / address SjaXL2hXfpiuoPZrRFEPawUSHVjwkdu5az”
demesm @ address SkSsc5DDejrXq2HfRf9B9QDqHrNiuUvA9Y
The post Syscoin 3.0 Masternode Configuration appeared first on Justin Silver.
]]>The post NGINX Configuration Monitor appeared first on Justin Silver.
]]>I wanted a way to quickly distribute configuration files to my servers and have NGINX automatically reload. I found a solution for Debian servers and adapted it for CentOS 7 here. You will first create a bash script, make it executable, then call it from a systemd service. The script uses inotifywait to monitor the /etc/nginx/sites-enabled directory for changes and reloads NGINX if the configuration is valid.
Bash Script
#!/bin/bash
# Check inotify-tools is installed or not
rpm -qa | grep -q inotify-tools &> /dev/null
if [ $? -ne 0 ]
then
  echo "Installing inotify-tools, please wait..."
  yum -y install inotify-tools
fi
while true
do
  inotifywait --exclude .swp -e create -e modify -e delete -e move /etc/nginx/sites-enabled
  # Check NGINX Configuration Test
  # Only Reload NGINX If NGINX Configuration Test Pass
  nginx -t
  if [ $? -eq 0 ]
  then
    echo "Reloading Nginx Configuration"
    service nginx reload
  fi
done
Make Executable
chmod +x /usr/local/bin/nginx-monitor
Systemd Service
[Unit]
Description=Nginx Config Monitor Service
After=nginx.service

[Service]
Type=simple
ExecStart=/usr/local/bin/nginx-monitor
Restart=on-abort

[Install]
WantedBy=multi-user.target
Start Service
chmod 755 /etc/systemd/system/nginx-monitor.service
# reload systemd services
systemctl daemon-reload
# start the service
service nginx-monitor start
# load after reboot
chkconfig nginx-monitor on
Adapted for CentOS from Auto Reload NGINX.
The post NGINX Configuration Monitor appeared first on Justin Silver.
]]>