The post Reinstall All Homebrew Packages appeared first on Justin Silver.
]]>After upgrading to OS X Sierra I was unable to start MariaDB (or MySQL). Long story short, I ended up rebuilding openssl which fixed the signal 4 error, likely due to changes in the compiler. I decided that recompiling all the packages would be a good idea to prevent any future issues, and after some digging found this script which I modifying slightly.
#!/bin/bash

# Reinstall all brew packages and dependencies in the correct order
# - list all installed packages
# - print the package followed by its dependencies
# - print the package and a single depenency on each line
# - perform a topographical sort
# - use tail to reverse the order
# - print out each package in the correct order on a single line
# - pass to brew reinstall
brew list \
  | while read package; do echo -n "$package "; echo $(brew deps $package); done \
  | awk 'NF == 1 {print $1, $1} NF > 1 {for (dep=1; dep<=NF; dep++) print $1, $dep}' \
  | tsort \
  | tail -r \
  | REINSTALL_LIST=$(while read package; do echo -n "$package "; done) \
  | brew reinstall $REINSTALL_LIST
The post Reinstall All Homebrew Packages appeared first on Justin Silver.
]]>The post Send Emails on Mac OS X with Postfix and a Gmail Relay appeared first on Justin Silver.
]]>A quick howto setup Mac OS X and Postfix to use Gmail as a relay. Everything will need to be executed as root using sudo. If you just need to send emails try running sudo postfix start, and make sure to check your spam for emails – they will likely be flagged as they originate from a local mail server.
SASL Authentication
Connecting to the Gmail SMTP server requires both SSL and authentication. To set up authentication you will need to edit the /etc/postfix/sasl_passwd file.
sudu vi /etc/postfix/sasl_passwd
Update the contents to include the following. Note that enclosing hostnames with square brackets – [] – tells Postfix to avoid doing an MX lookup. Make sure to replace EMAIL with your email address, and PASSWORD with your Gmail password, properly escaping any colons in it.
[smtp.gmail.com]:587 [email protected]:PASSWORD
Use the postmap command to update the SASL credentials in Postfix.
sudo postmap /etc/postfix/sasl_passwd
Postfix Relay Configuration
Next we need to edit the Postfix configuration found in /etc/postfix/main.cf.
sudo vi /etc/postfix/main.cf
I was not able to route mail to the Gmail SMTP servers over IPv6, so force only IPv4 connections by searching for the inet_protocols key and updating the value.
inet_protocols = ipv4
If any of the following keys already exist in your configuration comment them out, and include the following at the bottom of the config file.
# Gmail SMTP relay
relayhost = [smtp.gmail.com]:587

# Enable SASL authentication in the Postfix SMTP client.
smtpd_sasl_auth_enable = yes
smtp_sasl_auth_enable = yes
smtp_sasl_password_maps = hash:/etc/postfix/sasl_passwd
smtp_sasl_security_options =
smtp_sasl_mechanism_filter = AUTH LOGIN

# Enable Transport Layer Security (TLS), i.e. SSL.
smtp_use_tls = yes
smtp_tls_security_level = encrypt
tls_random_source = dev:/dev/urandom
Restart Postfix & Test
Restart Postfix as root, then send a test email.
sudo postfix stop && sudo postfix start
date | mail -s "Test Email" [email protected]
If you don’t receive the test email, check the Postfix queue by running mailq or looking at the contents of /var/log/mail.log. Any errors that mention “SASL authentication failed” indicate that you may have entered an incorrect email/password combination, forgot to run postmap after updating the credentials, or need to Turn On Access for less secure apps in Gmail for your account.
The post Send Emails on Mac OS X with Postfix and a Gmail Relay appeared first on Justin Silver.
]]>The post Ignore node_modules in Dropbox appeared first on Justin Silver.
]]>Node is notorious for generating a rather large number of files in the node_modules when running and npm install. I like to start my projects in Dropbox, which presents a problem with my computer tries to sync tens of thousands of files, sometimes every few minutes if I’m working on a new module for example.
The solution for this problem is to the the “selective sync” feature of Dropbox, however it’s easiest if you haven’t already installed all the module dependencies. First, you want to create your project folder – either a directory followed by npm init, or possibly an existing project from a git or other source code repository.
In this example I will clone my node developer-tools module, which installs binaries and other tools for development work. This module can be found on Github here: https://github.com/doublesharp/node-developer-tools. It will be cloned into the path ~/Dropbox/Workspaces/node-developer-tools. After the directory has been created, we will manually create a node_modules folder inside it.
mkdir -p ~/Dropbox/Workspaces
cd ~/Dropbox/Workspaces
git clone https://github.com/doublesharp/node-developer-tools.git
mkdir -p ./node-developer-tools/node_modules
Now we can exclude this folder from Dropbox sync before filling it up with thousands of tiny files.
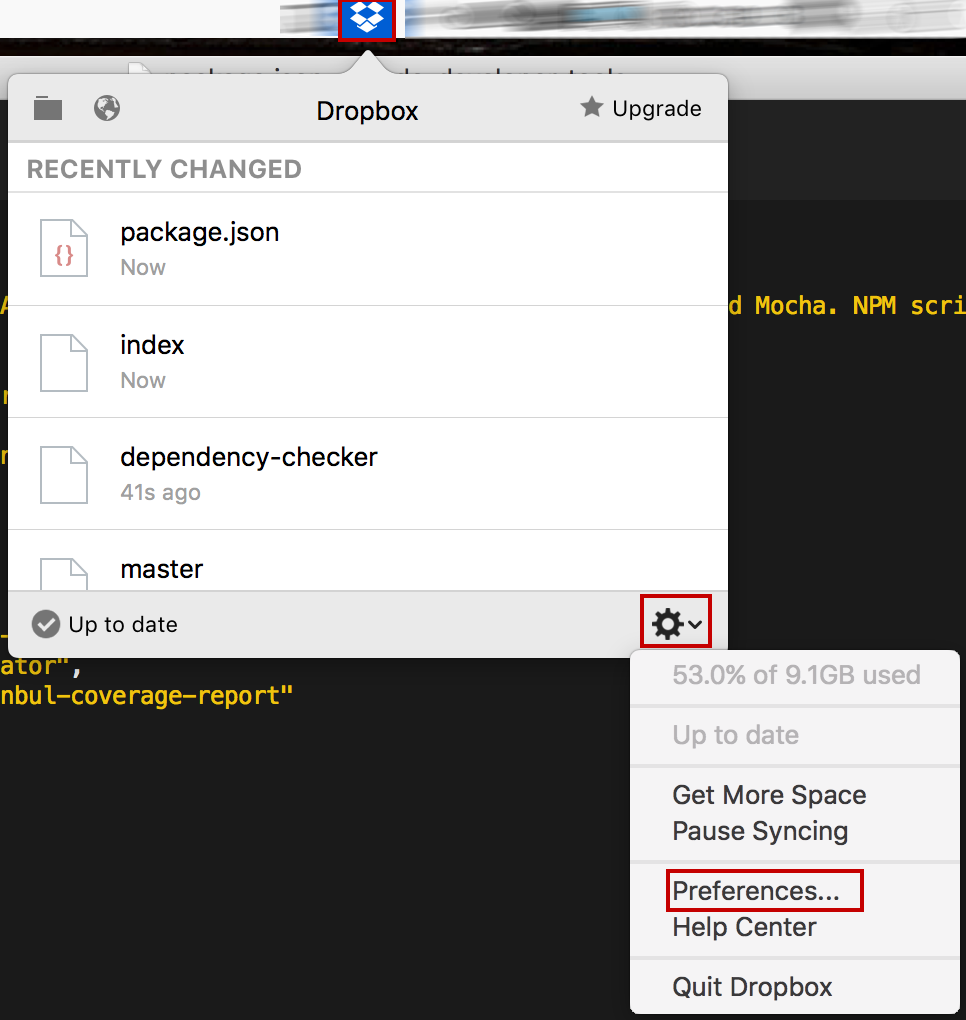
1. Select the dropbox icon from you system bar
2. Select the gear icon, followed by Preferences…
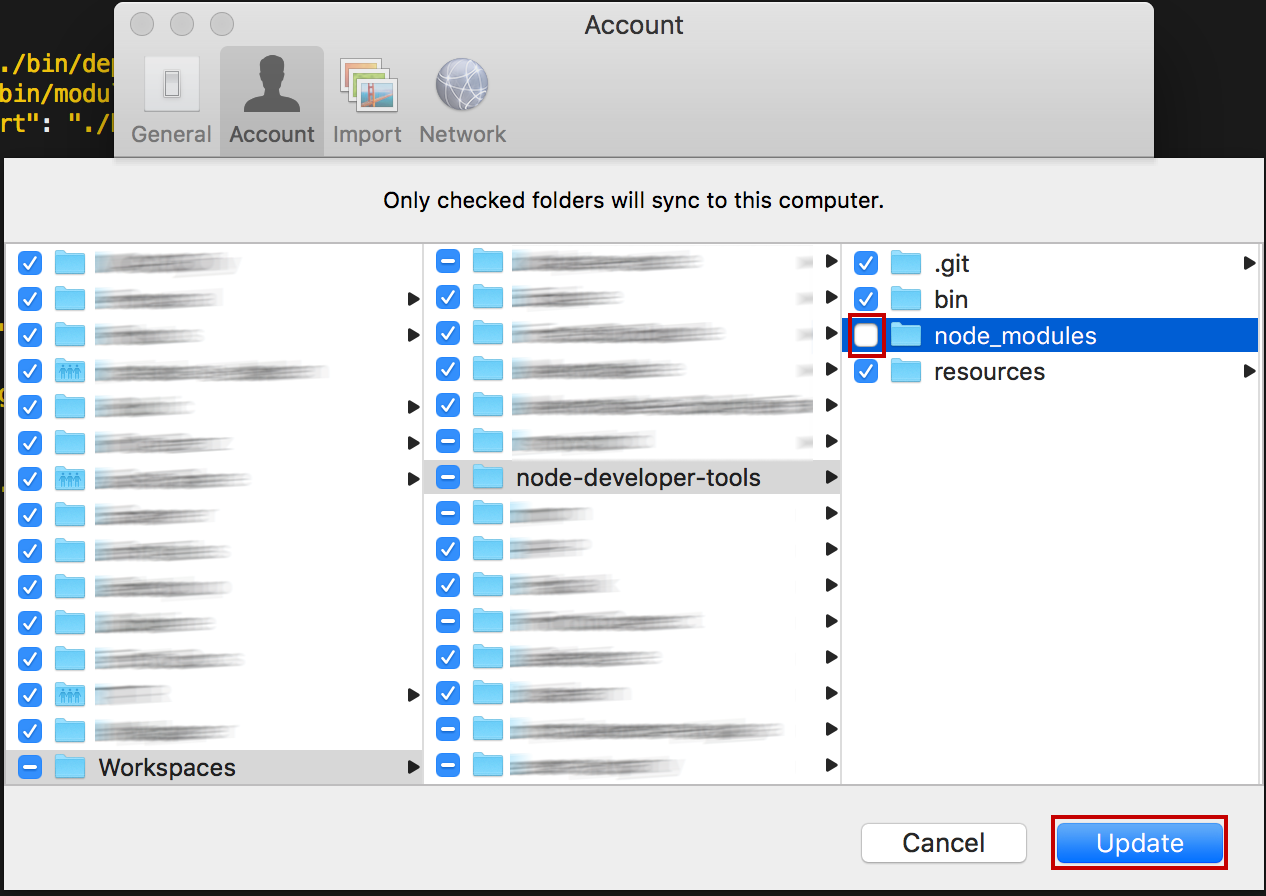
3. Choose the Account tab
4. Find the Selective Sync option and click Change Settings…
5. Navigate to
Workspaces/node-developer-toolsand un-selectnode_modules6. Click the Update button

Now you can install the node modules without having the sync to Dropbox.
Unfortunately this needs to be set up for each Node project you want to work with, but the up front investment will save time down the road. Plus a little storage space.
The post Ignore node_modules in Dropbox appeared first on Justin Silver.
]]>The post Update Onagofly Firmware on Mac OS X appeared first on Justin Silver.
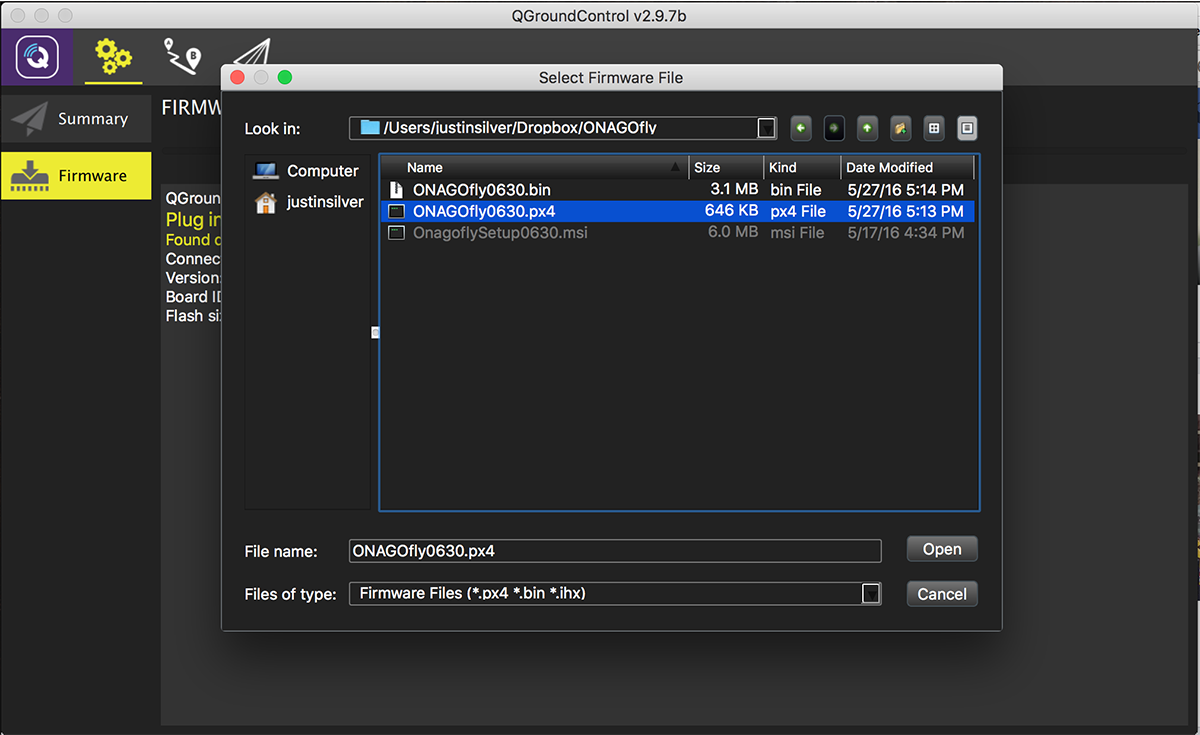
]]>It is possible to update the firmware on an Onagofly micro drone on Mac OS X using the QGroundControl software. The download for the software can be found here: http://qgroundcontrol.org/downloads.
You will also need the firmware provided by Onagofly, which is currently version 630. The firmware (with modified file extension) can be found here: https://www.dropbox.com/s/7kwutj5dnbycr0k/ONAGOfly0630.px4?dl=1
Step 1: Change firmware extension to px4
This step is not necessary if you downloaded the firmware using the link in this post, but by default the firmware file is named ONAGOfly0630.ong. This means you will need to rename it to ONAGOfly0630.px4 as the QGroundControl app will only allow you to select *.hex, *.bin, and *.px4 files, and since we are uploading firmware to the Pixhawk PX4 FMU…
Step 2: Prepare Drone
Leave the drone powered off, or disconnect the battery entirely if you are able, and connect a micro USB cable.
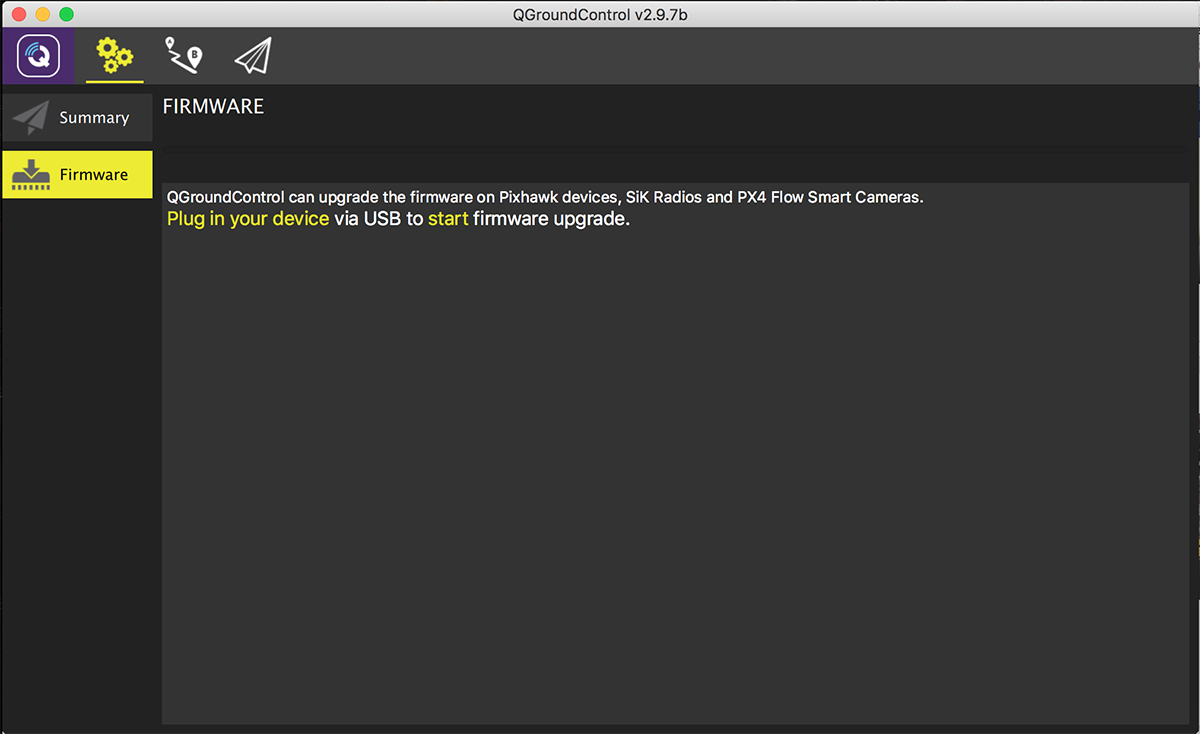
Step 3: Open QGroundControl
Without connecting it to your computer, start up QGroundControl.

Step 4: Select “Firmware”
This is mode allows QGroundControl to update the firmware on the Onagofly. Plug in (or unplug and re-plug in) the USB cable to detect the Pixhawk flight controller.
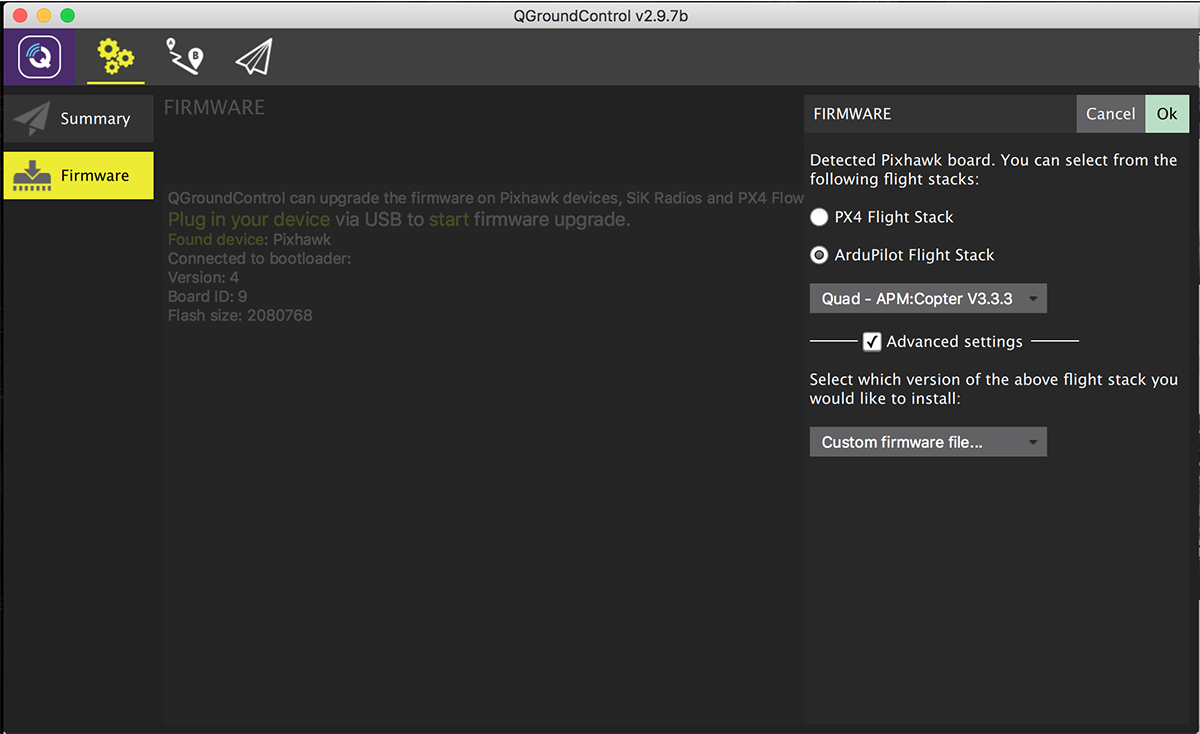
Step 5: Configure firmware update
Once your device is detected, you will need to change the firmware settings to properly update using the Onagofly firmware, rather than the default PX4 or ArduPilot stack.
- Select “ArduPilot Flight Stack”
- Quad – APM:Copter V3.3.3
- Check the “Advanced settings” box
- Choose “Custom firmware file…”
- Click OK.
Step 6: Select firmware file
Navigate to the location of the ONAGOfly0630.px4 firmware file and select it.
Step 7: Update Complete
You should see some status updates followed by a message saying “Upgrade complete”. A few seconds later you should hear the startup noise, and the device will be detected by QGroundControl.

It took several attempts to get the firmware to properly upload, so if it is unsuccessful, try again. When I was finally able to load the firmware, I first loaded the Beta ArduCopter stack, then the Onagofly. Good luck!
The post Update Onagofly Firmware on Mac OS X appeared first on Justin Silver.
]]>The post Reconnect Bluetooth Devices After Waking From Sleep appeared first on Justin Silver.
]]>My Macbook goes to sleep when I leave it idle for a few minutes which saves energy and locks the screen. Quite annoyingly – for a long time – upon waking up from sleep my Bluetooth devices would no longer be connected, and I was unable to reconnect them without rebooting. This was true for my headphones, my Jambox, and my cordless mouse.
OS X Bluetooth fixes I tried (that didn’t work)
After searching Google I found a few suggestions but none provided a permanent solution. A couple of things I tried –
- Turning the BT radio off – this didn’t seem to do anything.
- Unpair and re-pairing the device – unpairing would succeed, but it couldn’t see any of the devices to re-pair them.
- Rebooting – this would work but I had to…. reboot.
- Deleting the <code>/Library/Preferences/com.apple.Bluetooth.plist</code> preferences file – this would work but I think it had more to do with the fact that I had to reboot after.
I was finally able to determine that the underlying cause is a conflict between the WiFi and the Bluetooth radios – and it’s possible to fix without rebooting!
Did you turn it off and back on again?
- First select the Bluetooth icon in your system tray and choose “Turn Bluetooth Off”.
- Next select the WiFi icon in your system tray and choose “Turn Wi-Fi Off”.
- Now you can turn your BT radio back on via the same icon, but choosing “Turn Bluetooth On”.
- You should now be able to reconnect your devices.
- Re-enable your Internet connection by selecting the WiFi icon and choosing “Turn Wi-Fi On”.
You should be good to go! Enjoy your rediscovered cordless freedom.
The post Reconnect Bluetooth Devices After Waking From Sleep appeared first on Justin Silver.
]]>The post Install WSDL2Apex on OS X El Capitan appeared first on Justin Silver.
]]>The WSDL2Apex generates the Apex classes necessary to implement a SOAP callout from the Force.com platform using the WSDL for the service you are trying to implement. In 2014 it was split out of the Force.com IDE codebase and was made open source , available on it’s own as an open source project.
This means that you can clone the GitHub project, build the JAR, and then use it to consume a WSDL and generate your Apex classes. There is one caveat for OS X El Capitan (and Yosemite as well) in that the operating system ships with Java 1.8, however WSDL2Apex requires Java 1.7 or earlier. If you try to run the build using a later version of Java, you will get 12-15 test errors (I got 12, other people reported 15).
Results :

Failed tests:   testAsyncFalse(com.salesforce.ide.wsdl2apex.core.WSDL2ApexTest): Test 8 doesn't match expected:<...rmationByAirportCode[Response_element {(..)
  testNewClassNames(com.salesforce.ide.wsdl2apex.core.WSDL2ApexTest): testNewClassNames doesn't match expected:<... }(..)
  testNoOperation(com.salesforce.ide.wsdl2apex.core.WSDL2ApexTest): Test noOperation failed expected:<...   public class Echo[Date_element {(..)
  testExchange(com.salesforce.ide.wsdl2apex.core.WSDL2ApexTest): Test testExchange failed expected:<...{(..)
  testAmazonGood(com.salesforce.ide.wsdl2apex.core.WSDL2ApexTest): Test testAmazonGood failed expected:<... {(..)
  testBigFile(com.salesforce.ide.wsdl2apex.core.WSDL2ApexTest): Test testBigFile failed expected:<... {(..)
  testNamespaceDependencies(com.salesforce.ide.wsdl2apex.core.WSDL2ApexTest): Test testNamespaceDependencies failed expected:<... {(..)
  testTwoNamespaces(com.salesforce.ide.wsdl2apex.core.WSDL2ApexTest): testTwoNamespaces a doesn't match, Async class expected:<...mple.com/stockquote.[wsdl', 'exampleComStockquoteWsdl', 'http://example.com/stockquote.xsd', 'exampleComStockquoteXsd]'};(..)
  testSqlMutations(com.salesforce.ide.wsdl2apex.core.WSDL2ApexTest): Test sqlMutations failed expected:<...lic class getMutants[CompressedResponse_element {(..)
  testMultipleNamespace(com.salesforce.ide.wsdl2apex.core.WSDL2ApexTest): Test testMultipleNamespace failed expected:<...   public class Echo[Date_element {(..)
  testLargeFile(com.salesforce.ide.wsdl2apex.core.WSDL2ApexTest): testLargeFile a doesn't match expected:<...m/spectrum/services/[EOLS_PSAPLookupUS', 'wwwPbComSpectrumServicesEolsPsaplo', 'http://spectrum.pb.com/', 'spectrumPbCom', 'http://www.mapinfo.com/midev/service/geometries/v1', 'wwwMapinfoComMidevServiceGeometries', 'http://www.mapinfo.com/midev/service/units/v1', 'wwwMapinfoComMidevServiceUnitsV1', 'http://www.pb.com/spectrum/services/', 'wwwPbComSpectrumServic]es'};(..)
  testSimple(com.salesforce.ide.wsdl2apex.core.WSDL2ApexTest): testSimple doesn't match expected:<...rmationByAirportCode[Response_element {(..)

Tests run: 47, Failures: 12, Errors: 0, Skipped: 0

[INFO] ------------------------------------------------------------------------
[INFO] BUILD FAILURE
[INFO] ------------------------------------------------------------------------
[INFO] Total time: 2.230 s
[INFO] Finished at: 2015-11-23T20:30:10-08:00
[INFO] Final Memory: 8M/245M
[INFO] ------------------------------------------------------------------------
[ERROR] Failed to execute goal org.apache.maven.plugins:maven-surefire-plugin:2.12.4:test (default-test) on project WSDL2Apex: There are test failures.
Requirements
- Homebrew
- git
- Apache Maven
- Java 1.6
We’ll use Homebrew to install git (to fetch the project), Apache Maven (to build the project), and Java 1.6 from Apple to meet the version requirements.
Homebrew, Git, and Maven
ruby -e "$(curl -fsSL https://raw.githubusercontent.com/Homebrew/install/master/install)"
brew install maven git
Clone WSDL2Apex
mkdir ~/SalesforceDev && cd ~/SalesforceDev
git clone https://github.com/forcedotcom/WSDL2Apex
cd WSDL2Apex
Java 1.6 for OS X
Visit the Apple support site to download and install Java 1.6 for OS X. It will be installed to your /Library/Java/JavaVirtualMachines/1.6.0.jdk/ directory.
Build WSDL2Apex
We need to set the JAVA_HOME directory to point to the 1.6 JDK so that Maven will use it for the build. To do this just set it before the actual mvn execution. If you have Java 1.7 on your machine, feel free to substitute it for 1.6 – just check your JavaVirtualMachines directory to see what’s available.
JAVA_HOME=/Library/Java/JavaVirtualMachines/j1.6.0.jdk/Contents/Home/ \
mvn install package
Bask in the glory that are your newly generated Apex SOAP classes.
The post Install WSDL2Apex on OS X El Capitan appeared first on Justin Silver.
]]>The post OS X El Capitan / Sierra / High Sierra Hanging on Boot [FIXED] appeared first on Justin Silver.
]]>If your OS X El Capitan/Sierra/High Sierra update won’t reboot you can skip to the fix or check here for the (mostly) automated fix script. Otherwise feel free to read the saga below!
Update 3/23/2016 – It happened again when I updated to 10.11.4! Even fewer clues this time, additional details and an updated script to remove non-default kext files at the very bottom.
Update 5/14/2017 – This has been an issue for myself and others running OS X Sierra as well.
Update 8/01/2017 – I updated to 10.12.6 and once again was unable to boot. This time I had to remove kexts from
/System/Library/Extensions. Removed everything older than 2016 after runningls -lat.
Update 1/18/2018 – I updated to 10.13.3 High Sierra Beta 5 and once again was unable to boot. I am using the Beta version because 10.13.2 had very high CPU usage by the
WindowServerprocess that was fixed in 10.13.3. Before I knew this I installed Malwarebytes to check for spyware/adware causing the CPU usage, then uninstalled it after installing the OS X beta. It seems to have left behind a kext namedcom.malwarebytes.mbam.rtprotection.kextand once I deleted it, things work again.
After Update, OS X Won’t Reboot
After upgrading to OS X El Capitan (10.11) when it was released, I had been generally pleased with the new version but there were a few quirks – like random beach ball pauses – that made me think the 10.11.1 update would address some of them. Thus when I was notified that it was available, I dutifully upgraded… and then my MacBook Pro Retina wouldn’t reboot. I reset the SMC (Shft+Ctrl+Opt+Pwr while off, then Pwr), I reset the PRAM (Cmd+Opt+P+R+Pwr while booting, then hold until the chime sounds again), I tried to boot into Safe Mode (Shft+Pwr). Nothing.
Single User and Verbose Mode
I was unable to boot into Single User Mode (Cmd+S+Pwr), but it and Verbose Mode (Cmd+V+Pwr) did show that the boot process was hanging and the last message it displayed was:
pci pause: SDXC
This seemed to be meaningful, but was ultimately a wild goose chase.
Recovery Mode Reinstall
I could boot into Recovery Mode (Cmd+R+Pwr) and used this to access Disk Utility to run First Aid (no errors were found), and then used Terminal to run resetpassword which was then used to reset permissions on my user folder. Nope.
I reinstalled the operating system over the Internet. No dice.
Using Terminal accessible in Recovery Mode I found several crash logs located in /Volumes/Macintosh HD/Library/Logs/DiagnosticReports/. I took a look at the latest one and it had the following details about the crash. Spoiler alert, this also ended up being a dead end, but I’m posting it because the only other place on the Internet it exists is a deleted Apple Developer Forum post that I was able to view using the Google Cache.
Process:               ctkd [220]
Path:                  /System/Library/Frameworks/CryptoTokenKit.framework/ctkd
Identifier:            ctkd
Version:               79.1.1
Code Type:             X86-64 (Native)
Parent Process:        launchd [1]
Responsible:           ctkd [220]
User ID:               0

Date/Time:             2015-10-22 11:04:40.949 -0700
OS Version:            Mac OS X 10.11.1 (15B42)
Report Version:        11
Anonymous UUID:        F17F633A-3BDD-90AB-37F3-86B22856B7C6


Time Awake Since Boot: 14 seconds

System Integrity Protection: enabled

Crashed Thread:        0  Dispatch queue: com.apple.main-thread

Exception Type:        EXC_BAD_INSTRUCTION (SIGILL)
Exception Codes:       0x0000000000000001, 0x0000000000000000
Exception Note:        EXC_CORPSE_NOTIFY

Application Specific Information:
Sandbox creation failed: AppSandboxUtilRealPathForPath(self.userAccountHomeDirectoryPath) failed
open() for F_GETPATH failed.
NSPOSIXErrorDomain:2 No such file or directory

WR/DST: /var/root
  0 lstat() errno: 2
 -1  o:0 (User) m:120755 f:restricted,hidden
    fs: hfs, fsid: 1000004/11, mf: 0480d000 avail:13621070

Application Specific Signatures:
AppSandboxUtilRealPathForPath(self.userAccountHomeDirectoryPath) faile

Thread 0 Crashed:: Dispatch queue: com.apple.main-thread
0   libsystem_secinit.dylib       	0x000000010ade3193 _libsecinit_setup_secinitd_client + 1543
1   libsystem_secinit.dylib       	0x000000010ade2b2a _libsecinit_initialize_once + 13
2   libdispatch.dylib             	0x000000010aa393c3 _dispatch_client_callout + 8
3   libdispatch.dylib             	0x000000010aa392bb dispatch_once_f + 67
4   libSystem.B.dylib             	0x000000010962aa0c libSystem_initializer + 131
5   dyld                          	0x00007fff6005cf1b ImageLoaderMachO::doModInitFunctions(ImageLoader::LinkContext const&) + 265
6   dyld                          	0x00007fff6005d094 ImageLoaderMachO::doInitialization(ImageLoader::LinkContext const&) + 40
7   dyld                          	0x00007fff600596cd ImageLoader::recursiveInitialization(ImageLoader::LinkContext const&, unsigned int, ImageLoader::InitializerTimingList&, ImageLoader::UninitedUpwards&) + 305
8   dyld                          	0x00007fff60059662 ImageLoader::recursiveInitialization(ImageLoader::LinkContext const&, unsigned int, ImageLoader::InitializerTimingList&, ImageLoader::UninitedUpwards&) + 198
9   dyld                          	0x00007fff60059662 ImageLoader::recursiveInitialization(ImageLoader::LinkContext const&, unsigned int, ImageLoader::InitializerTimingList&, ImageLoader::UninitedUpwards&) + 198
10  dyld                          	0x00007fff60059662 ImageLoader::recursiveInitialization(ImageLoader::LinkContext const&, unsigned int, ImageLoader::InitializerTimingList&, ImageLoader::UninitedUpwards&) + 198
11  dyld                          	0x00007fff60059662 ImageLoader::recursiveInitialization(ImageLoader::LinkContext const&, unsigned int, ImageLoader::InitializerTimingList&, ImageLoader::UninitedUpwards&) + 198
12  dyld                          	0x00007fff60059662 ImageLoader::recursiveInitialization(ImageLoader::LinkContext const&, unsigned int, ImageLoader::InitializerTimingList&, ImageLoader::UninitedUpwards&) + 198
13  dyld                          	0x00007fff60059662 ImageLoader::recursiveInitialization(ImageLoader::LinkContext const&, unsigned int, ImageLoader::InitializerTimingList&, ImageLoader::UninitedUpwards&) + 198
14  dyld                          	0x00007fff60059553 ImageLoader::processInitializers(ImageLoader::LinkContext const&, unsigned int, ImageLoader::InitializerTimingList&, ImageLoader::UninitedUpwards&) + 127
15  dyld                          	0x00007fff600597c3 ImageLoader::runInitializers(ImageLoader::LinkContext const&, ImageLoader::InitializerTimingList&) + 75
16  dyld                          	0x00007fff6004c0f1 dyld::initializeMainExecutable() + 208
17  dyld                          	0x00007fff6004fd47 dyld::_main(macho_header const*, unsigned long, int, char const**, char const**, char const**, unsigned long*) + 3515
18  dyld                          	0x00007fff6004b276 dyldbootstrap::start(macho_header const*, int, char const**, long, macho_header const*, unsigned long*) + 512
19  dyld                          	0x00007fff6004b036 _dyld_start + 54

Thread 0 crashed with X86 Thread State (64-bit):
  rax: 0x000000000000013c  rbx: 0x00007fff57441810  rcx: 0x4300ee869eb237d3  rdx: 0x000000010ade3bd5
  rdi: 0x0000000000000000  rsi: 0x00007fb8718129bb  rbp: 0x00007fff57442090  rsp: 0x00007fff574417f0
   r8: 0x0000000000000002   r9: 0x000000010ade3bf0  r10: 0x000000010aba9201  r11: 0x00000046e5c2ef75
  r12: 0x00007fb871700060  r13: 0x00007fb8718128b4  r14: 0x00007fb8718128b4  r15: 0x00007fb871812a0c
  rip: 0x000000010ade3193  rfl: 0x0000000000010206  cr2: 0x00007fb873000000

Logical CPU:     4
Error Code:      0x00000000
Trap Number:     6
The OS X Fix You’ve Been Looking For
I was ultimately able to surmise that the issue was an incompatible kernel extension (kext file). After booting into Recovery Mode, I opened Terminal. First I mounted the filesystem as read write, then navigated to /Volumes/Macintosh HD/Library/Extensions, created a new folder named “Unsupported” and moved all the kext files into it, then rebooted.
Note: see the updated script at the very bottom of this post to automatically remove non-default kexts. If you have renamed your hard drive to something other than “Macintosh HD” use the new name in the following commands.
mount -rw /
cd /Volumes/Macintosh\ HD/Library/Extensions/
mkdir Unsupported
mv *.kext Unsupported
reboot
Voila! I was able to reboot.
It ended up being my Logitech Control Center kext files, as best I could determine. The full list of kext files on my system is below. Note that the 360Controller.kext, Wireless360Controller.kext and WirelessGamingReceiver.kext later caused problems with 10.11.4, see bottom.
/Volumes/Macintosh HD/Library/Extensions
> ls -1
360Controller.kext
ACS6x.kext
ATTOCelerityFC8.kext
ATTOExpressSASHBA2.kext
ATTOExpressSASRAID2.kext
ArcMSR.kext
CalDigitHDProDrv.kext
HighPointIOP.kext
HighPointRR.kext
LogiMgrDriver.kext
LogitechHIDDevices.kext
LogitechUnifying.kext
PromiseSTEX.kext
SoftRAID.kext
Wireless360Controller.kext
WirelessGamingReceiver.kext
After moving them all to Unsupported I ended up moving them all back except for LogiMgrDriver.kext, LogitechHIDDevices.kext, and LogitechUnifying.kext and am posting this from the previously unbootable machine. These may not be the same incompatible kext files you have (VirtualBox and Evernote also seem to be offenders), but hopefully sets you on the right track. Good luck!
Failed Update to El Capitan 10.11.4
Once again my El Capitan upgrade didn’t go very smoothly. Same as last time, my laptop failed to reboot after the install seemed to complete, however this time there were even fewer clues – no crash logs, etc. Luckily I had fixed this once before so I booted into Recovery mode (Cmd+R while booting), selected Utilities > Terminal to access the command line. The script below creates a Library/ExtensionsDisabled folder and moves and of the non-default kext files into it by comparing against the /Library/Extensions directory on the recovery partition. You may need to move some kext files back to their original location if they aren’t the cause of the problem. Keep in mind that the default name for your hard drive will be “Macintosh HD” which means you need to escape the space on the command line, so it becomes “Macintosh\ HD”. If you have renamed your hard drive, use whatever name you selected instead.
Open Safari from Terminal in Recovery Mode
If you want to access Safari to browse the web (this post?) once you have Terminal open enter /Applications/Safari.app/Contents/MacOS/Safari & to open a browser window. Once the process is completed close the Safari and Terminal windows and reboot.
Script to Disable Non-Default Kext Files
This script will look for any extensions on your system that aren’t part of the “default” extension installed by Apple. If they are found they are moved into a directory named “/Volumes/Macintosh\ HD/Library/ExtensionsDisabled/” so that they will not be loaded when you reboot. Make sure that your hard drive is named correctly in the commands, by default it’s “Macintosh HD” unless it was changed. If you’re new to the command line the easiest way to do this is to launch Safari from Terminal and then cut and paste from this post. Good luck!
# mount the drive as read/write
mount -rw /

# create a directory for "disabled" extensions
mkdir /Volumes/Macintosh\ HD/Library/ExtensionsDisabled

# view files that exist in your Extensions folder but not the recovery partition
kexts=`comm -23 <(ls /Volumes/Macintosh\ HD/Library/Extensions|sort) <(ls /Library/Extensions|sort)`
echo $kexts

# move "extra" kext files to the "disabled" directory
for kext in $kexts; do
    mv /Volumes/Macintosh\ HD/Library/Extensions/$kext /Volumes/Macintosh\ HD/Library/ExtensionsDisabled/$kext;
done

exit
Incompatible OS X Sierra Kexts
When I upgraded to OS X Sierra 10.12.6 my system wouldn’t reboot. As I had seen this before I removed the kexts in /Volumes/Macintosh HD/Library/Extensions but it still wouldn’t boot. I was in a hurry to get my system up again so in a rush I removed everything older than 2016 from /System/Library/Extensions and was able to start up again. I don’t use the software/hardware related to these kexts so I just left them all off, I’m not sure which was the actual culprit(s). I did keep a backup and my system has been stable since I moved them – note that you cannot modify the `/System` path so you will need to back them up somewhere else.
mkdir /Volumes/Macintosh\ HD/Library/ExtensionsSystemDisabled
mv /System/Library/Extensions/VeryOldKernelExtension.kext /Volumes/Macintosh\ HD/Library/ExtensionsSystemDisabled
> ls -lat /Volumes/Macintosh HD/Library/ExtensionsSystemDisabled
total 0
drwxr-xr-x+ 71 root  wheel  2414 Jul 28 14:28 ..
drwxr-xrwx  32 root  wheel  1088 Jul 28 14:19 .
drwxr-xr-x   3 root  wheel   102 Nov 15  2014 NoSleep.kext
drwxr-xr-x   3 root  wheel   102 Jul  8  2013 EnergyDriver.kext
drwxr-xr-x   3 root  wheel   102 Jun  6  2013 CUDA.kext
drwxr-xr-x   3 root  wheel   102 Apr 19  2013 PdaNetDrv.kext
drwxr-xr-x   3 root  wheel   102 Oct 26  2012 hp_Inkjet7_io_enabler.kext
drwxr-xr-x   3 root  wheel   102 Oct 26  2012 hp_Deskjet_io_enabler.kext
drwxr-xr-x   3 root  wheel   102 Aug  8  2012 FTDIUSBSerialDriver.kext
drwxr-xr-x   3 root  wheel   102 Jun 29  2012 hp_fax_io.kext
drwxr-xr-x   3 root  wheel   102 May 22  2012 JMicronATA.kext
drwxr-xr-x   3 root  wheel   102 May 18  2012 jawbone.kext
drwxr-xr-x   3 root  wheel   102 Mar  7  2012 SiLabsUSBDriver.kext
drwxr-xr-x   3 root  wheel   102 Oct 12  2011 MindWave.kext
drwxr-xr-x   3 root  wheel   102 Aug 17  2011 LGEMobileSolutionFamily.kext
drwxr-xr-x   3 root  wheel   102 Aug 17  2011 PTRayUSBFamily.kext
drwxr-xr-x   3 root  wheel   102 Aug 17  2011 RIMBBUSB.kext
drwxr-xr-x   3 root  wheel   102 Aug 17  2011 RIMBBVSP.kext
drwxr-xr-x   3 root  wheel   102 Aug 17  2011 ZTEUSBCDCACMData.kext
drwxr-xr-x   3 root  wheel   102 Aug 17  2011 NovatelWirelessWWAN.kext
drwxr-xr-x   3 root  wheel   102 Aug 17  2011 PTUMWDrv.kext
drwxr-xr-x   3 root  wheel   102 Aug 17  2011 SierraDevSupport.kext
drwxr-xr-x   3 root  wheel   102 Aug 17  2011 SierraFSCSupport.kext
drwxr-xr-x   3 root  wheel   102 Aug 17  2011 SierraFSRSupport.kext
drwxr-xr-x   3 root  wheel   102 Aug 17  2011 SierraHSRSupport.kext
drwxr-xr-x   3 root  wheel   102 Aug 17  2011 SMSIWirelessModem.kext
drwxr-xr-x   3 root  wheel   102 Nov 21  2010 BJUSBLoad.kext
drwxr-xr-x   3 root  wheel   102 Sep 25  2010 HuaweiDataCardDriver.kext
drwxr-xr-x   3 root  wheel   102 Oct 28  2007 USBExpressCardCantWake_Huawei.kext
drwxr-xr-x   3 root  wheel   102 Jun  6  2007 RemoteControl.USBLAN_usbpart.kext
drwxr-xr-x   3 root  wheel   102 Jun  6  2007 Belcarra.USBLAN_netpart.kext
drwxr-xr-x   3 root  wheel   102 Jun  6  2007 Belcarra.USBLAN_usbpart.kext
The post OS X El Capitan / Sierra / High Sierra Hanging on Boot [FIXED] appeared first on Justin Silver.
]]>The post Install PHP 7.0 (phpng) on Mac OS X appeared first on Justin Silver.
]]>This guide will show how to install PHP 7.0 on on Mac OS X. This version of PHP is also known as PHPNG to indicate it is the “next generation” of PHP. Many fundamental improvements have been made – for example WordPress sites should see a 100% performance increase switching from PHP 5.6 to PHP 7.0.
Install Brew
To start you will need to install Brew so that we can use it to install additional dependencies. Open Terminal and at the prompt enter the following.
ruby -e "$(curl -fsSL https://raw.githubusercontent.com/Homebrew/install/master/install)"
Install Dependencies
Once Brew is installed, install the dependencies we’ll need using the following command. Make sure you have tapped homebrew/versions to access all dependencies (it won’t hurt to run it again if you’ve think you’ve tapped it, but aren’t sure).
brew tap homebrew/versions
brew install \
    autoconf \
    automake \
    bison27 \
    freetype \
    gd \
    gettext \
    git \
    mariadb \
    mcrypt \
    t1lib \
    zlib
Build PHPNG From Source
Now we need to clone the PHP-7.0.0 branch of the PHP source and compile it using the built in scripts.
git clone -b PHP-7.0.0 https://github.com/php/php-src.git
cd php-src
./buildconf --force
env YACC=`brew --prefix bison27`/bin/bison ./configure \
    --prefix="/usr/local/opt/phpng" \
    --with-config-file-path="/usr/local/etc/phpng" \
    --enable-bcmath \
    --enable-calendar \
    --enable-exif \
    --enable-ftp \
    --enable-gd-native-ttf \
    --enable-gd-jis-conv \
    --enable-mbstring \
    --enable-pcntl \
    --enable-sysvmsg \
    --enable-sysvsem \
    --enable-sysvshm \
    --enable-wddx \
    --enable-zip \
    --with-bz2 \
    --with-curl \
    --with-iconv \
    --with-freetype-dir=`brew --prefix freetype` \
    --with-gd \
    --with-gettext=`brew --prefix gettext` \
    --with-gmp \
    --with-jpeg-dir=`brew --prefix gd` \
    --with-mcrypt=`brew --prefix mcrypt` \
    --with-mysqli=`brew --prefix`/bin/mysql_config \
    --with-openssl \
    --with-pdo-mysql=`brew --prefix mariadb` \
    --with-png-dir=`brew --prefix gd` \
    --with-zlib=`brew --prefix zlib`
make -j`sysctl -n hw.logicalcpu_max`
Create Package Installer
Now create the package installer and complete the installation via the GUI.
env INSTALL_ROOT=$PWD/phpng-pkg make install
pkgbuild \
    --root phpng-pkg \
    --identifier net.php.phpng \
    --version 7.0.0-dev \
    --ownership recommended \
    phpng-dev.pkg
open phpng-dev.pkg
Use PHPNG
By default OS X will use the PHP binary located at /usr/bin/php, which as of this writing is PHP 5.5. To have PHPNG take precedence, will need to symlink to the /usr/local/bin directory. Run php -v to make sure you have the correct version, and if it’s not what you expected try which php to see the location that is being selected based on your $PATH.
ln -s /usr/local/opt/phpng/bin/php /usr/local/bin
php -v

PHP 7.0.0beta2 (cli) (built: Aug  3 2015 13:22:21)
Copyright (c) 1997-2015 The PHP Group
Zend Engine v3.0.0-dev, Copyright (c) 1998-2015 Zend Technologies
The post Install PHP 7.0 (phpng) on Mac OS X appeared first on Justin Silver.
]]>The post Memcached with MAMP 2.0.5 and Brew appeared first on Justin Silver.
]]>Requires that you have brew installed which is pretty easy, info here, but run:
/usr/bin/ruby -e "$(/usr/bin/curl -fsSL \
https://raw.github.com/mxcl/homebrew/master/Library/Contributions/install_homebrew.rb)"
We ultimately want to install memcached-php, and since libmemcached and memcached are both dependencies for it we can get them all at once. First we need to access the proper repository with “brew tap josegonzalez/php”
Io:/ $ brew tap josegonzalez/php
Cloning into /usr/local/Library/Taps/josegonzalez-php...
remote: Counting objects: 757, done.
remote: Compressing objects: 100% (386/386), done.
remote: Total 757 (delta 308), reused 703 (delta 267)
Receiving objects: 100% (757/757), 105.33 KiB, done.
Resolving deltas: 100% (308/308), done.
Tapped 26 formula
Now we can access the memcached-php with “brew install memcached-php”
Io:/ $ brew install memcached-php
==> Installing memcached-php dependency: memcached
==> Downloading http://memcached.googlecode.com/files/memcached-1.4.13.tar.gz
==> ./configure --prefix=/usr/local/Cellar/memcached/1.4.13
==> make install
==> Caveats
You can enable memcached to automatically load on login with:
mkdir -p ~/Library/LaunchAgents
cp /usr/local/Cellar/memcached/1.4.13/homebrew.mxcl.memcached.plist ~/Library/LaunchAgents/
launchctl load -w ~/Library/LaunchAgents/homebrew.mxcl.memcached.plist
If this is an upgrade and you already have the homebrew.mxcl.memcached.plist loaded:
launchctl unload -w ~/Library/LaunchAgents/homebrew.mxcl.memcached.plist
cp /usr/local/Cellar/memcached/1.4.13/homebrew.mxcl.memcached.plist ~/Library/LaunchAgents/
launchctl load -w ~/Library/LaunchAgents/homebrew.mxcl.memcached.plist
Or start it manually:
/usr/local/bin/memcached
Add "-d" to start it as a daemon.
==> Summary
/usr/local/Cellar/memcached/1.4.13: 9 files, 168K, built in 5 seconds
==> Installing memcached-php dependency: libmemcached
==> Downloading http://launchpad.net/libmemcached/1.0/1.0.4/+download/libmemcached-1.0.4.tar.gz
==> ./configure --prefix=/usr/local/Cellar/libmemcached/1.0.4
==> make install
/usr/local/Cellar/libmemcached/1.0.4: 224 files, 3.1M, built in 33 seconds
==> Installing memcached-php
==> Downloading http://pecl.php.net/get/memcached-2.0.1.tgz
######################################################################## 100.0%
==> phpize
==> ./configure --prefix=/usr/local/Cellar/memcached-php/2.0.1 --with-libmemcached-dir=/usr/local/Cellar/libmemcached/1.0.4
==> make
==> Caveats
To finish installing memcached-php:
* Add the following line to /usr/local/etc/php.ini:
extension="/usr/local/Cellar/memcached-php/2.0.1/memcached.so"
* Restart your webserver.
* Write a PHP page that calls "phpinfo();"
* Load it in a browser and look for the info on the memcached module.
* If you see it, you have been successful!
==> Summary
/usr/local/Cellar/memcached-php/2.0.1: 4 files, 100K, built in 6 seconds
The rest of the process is actually spelled out in the brew output. You can memcached manually as a daemon by running the following.
memcached -d
Alternatively you can start memcached up every time you log in by running these commands.
mkdir -p ~/Library/LaunchAgents
cp /usr/local/Cellar/memcached/1.4.13/homebrew.mxcl.memcached.plist ~/Library/LaunchAgents/
launchctl load -w ~/Library/LaunchAgents/homebrew.mxcl.memcached.plist
Next we need to install the extension in MAMP, so copy the following into the section labeled “; Extensions” in your php.ini file. Mine is located at /Applications/MAMP/bin/php/php5.3.6/conf/php.ini.
extension="/usr/local/Cellar/memcached-php/2.0.1/memcached.so
Restart the Apache service via the MAMP console and you should be good to go. You can check by making a file called phpinfo.php in your root that contains ““. Loading http://localhost:PORT/phpinfo.php will have a section titled “memcached” if the module loaded successfully.
PS – don’t forget to actually start the memcached server via “memcached -d” or you won’t actually be using it even if the module is enabled :/
The post Memcached with MAMP 2.0.5 and Brew appeared first on Justin Silver.
]]>