The post NGINX Feature Flag Reverse Proxy appeared first on Justin Silver.
]]>Use NGINX as a reverse proxy to different back-end servers based on feature-flags set in the ngx_http_auth_request_module add-on. In my implementation for Secret Party the subdomain is used to determine which event/party a Note that this is a template file and some variables are set from the environment – $DOMAIN, $PROXY_*_HOST, $PROXY_*_PORT, etc.
Upstream Servers
First create the upstream servers that we can proxy the request to. Here we will use “green”, “blue”, and “red”.
# this is the server that handles the "auth" request
upstream upstream_auth {
  server $PROXY_AUTH_HOST:$PROXY_AUTH_PORT;
}

# backend app server "green"
upstream upstream_green {
  server $PROXY_GREEN_HOST:$PROXY_GREEN_PORT;
}

# backend app server "blue"
upstream upstream_blue {
  server $PROXY_BLUE_HOST:$PROXY_BLUE_PORT;
}

# backend app server "red"
upstream upstream_red {
  server $PROXY_RED_HOST:$PROXY_RED_PORT;
}
Mappings
Next we create a mapping of route name to upstream server. This will let us choose the backend/upstream server without an evil if.
# map service names from auth header to upstream service
map $wildcard_feature_route $wildcard_service_route {
  default upstream_green;
  'green' upstream_green;
  'blue' upstream_blue;
  'red' upstream_red;
}
Optionally we can also support arbitrary response codes in this mapping – note that they will be strings not numbers. This uses the auth response code to choose the route that is used for the proxy from the mapping above – so the HTTP Status Code to string to Upstream Server.
# map http codes from auth response (as string!) to upstream service
map $wildcard_backend_status $wildcard_mapped_route {
  default 'green';
  '480' 'green';
  '481' 'blue';
  '482' 'red';
}
Auth Handler
The Auth Handler is where NGINX sends the auth request so we assume we are handling something like http://upstream_auth/feature-flags/$host. This endpoint chooses the route that we use either by setting a header called X-Feature-Route with a string name that matches the mapping above, or can respond with a 4xx error code to also specify a route from the other mapping above. You get the gist.
function handleFeatureFlag(req, res) {
    // use the param/header data to choose the backend route
    // const hostname = req.params.hostname;
    const route = someFlag? 'green' : 'blue';
    // this header is used to figure out a proxy route
    res.header('X-Feature-Route', route);
    return res.status(200).send();
}
function handleFeatureFlag(req, res) {
    // this http response code can be used to figure out a proxy route too!
    const status = someFlag ? 481 : 482; // blue, red
    return res.status(status).send();
}
Server Configuration
To tie it together create a server that uses an auth request to http://upstream_auth/feature-flags/$host. This API endpoint uses the hostname to choose the upstream service to use to fulfill the request, either by setting a header of X-Feature-Route or returning an error code other than 200 or 401 – anything else will be returned as a 500 to NGINX which can then use the string value of this code as a route hint.
server {
  listen 80;

  # listen on wildcard subdomains
  server_name *.$DOMAIN;

  # internal feature flags route to upstream_auth
  location = /feature-flags {
    internal;
    # make an api request for the feature flags, pass the hostname
    rewrite .* /feature-flags/$host? break;
    proxy_pass http://upstream_auth;
    proxy_pass_request_body off;
    proxy_set_header Content-Length "";
    proxy_set_header X-Original-URI $request_uri;
    proxy_set_header X-Original-Remote-Addr $remote_addr;
    proxy_set_header X-Original-Host $host;
  }

  # handle all requests for the wildcard
  location / {
    # get routing from feature flags
    auth_request /feature-flags;
    # set Status Code response to variable
    auth_request_set $wildcard_backend_status $upstream_status;
    # set X-Feature-Route header to variable
    auth_request_set $wildcard_feature_route $upstream_http_x_feature_route;

    # this is a 401 response
    error_page 401 = @process_backend;

    # anything not a 200 or 401 returns a 500 error
    error_page 500 = @process_backend;

    # this is a 200 response
    try_files @ @process_request;
  }

  # handle 500 errors to get the underlying code
  location @process_backend {
    # set the status code as a string mapped to a service name
    set $wildcard_feature_route $wildcard_mapped_route;

    # now process the request as normal
    try_files @ @process_request;
  }

  # send the request to the correct backend server
  location @process_request {
    proxy_read_timeout 10s;
    proxy_cache off;
    proxy_set_header Host $host;
    proxy_set_header X-Forwarded-Host $host;
    proxy_set_header X-Real-IP $remote_addr;
    proxy_set_header X-Forwarded-For $proxy_add_x_forwarded_for;
    proxy_set_header X-Forwarded-Proto $scheme;

    # use the mapping to determine which service to route the request to
    proxy_pass http://$wildcard_service_route;
  }
}
The post NGINX Feature Flag Reverse Proxy appeared first on Justin Silver.
]]>The post Wildcard SSL Certs: Let’s Encrypt & Cloudflare appeared first on Justin Silver.
]]>My servers have been using free Let’s Encrypt SSL certificates for some time now, but I was really excited to hear about support for wildcard SSL certificates in 2018. Wildcards are now available thus I am now using Let’s Encrypt Wildcard SSL Certificates with Cloudflare DNS-01 challenges from my Jenkins CI/CD server. The wildcard ssl cert is generated manually the first time, afterwards it uses a root user cron job to check for certificate renewals. After the certbot tool is finished with the renewal request it calls a “post hook” script that copies the wildcard SSL certificates (as needed) to the Jenkins home directory. From there they can be deployed via SSH to the servers.
The SSH user does not have root access, rather the wildcard SSL certificates are symlinked from a user account to the Nginx configuration. Nginx is scheduled to gracefully reload approximately 30 minutes after the SSL certificate renewals are processed, therefore new any new certificate will be served shortly after it is generated.
Generate Wildcard SSL Certs
# configuration for cloudflare
CLOUDFLARE_EMAIL="[email protected]"
CLOUDFLARE_API_KEY="put-your-key-here"
DOMAIN="your-domain.com"

# as root configure your cloudflare secrets
mkdir -p /root/.secrets
cat <<CLOUDFLARE_CONFIG > /root/.secrets/cloudflare.ini
dns_cloudflare_email="$CLOUDFLARE_EMAIL"
dns_cloudflare_api_key="$CLOUDFLARE_API_KEY"
CLOUDFLARE_CONFIG

# make sure they are hidden, the api key is more powerful than a password!
chmod 0700 /root/.secrets/
chmod 0400 /root/.secrets/cloudflare.ini

# install pip, upgrade, then install the cloudflare/certbot tool
yum install -y python-pip
pip install --upgrade pip
pip install certbot-dns-cloudflare

# generate a wildcard cert for the domain using a dns challenge
#
# --quiet, suppress output
# --non-interactive, avoid user input
# --agree-tos, agree to tos on first run
# --keep-until-expiring, keep existing certs
# --preferred-challenges, specify to use dns-01 challenge
# --dns-cloudflare, use the cloudflare dns plugin
# --dns-cloudflare-credentials, path to ini config
# -d, domains to generate keys for, you can add additional ones if needed
certbot certonly \
  --quiet \
  --non-interactive \
  --agree-tos \
  --keep-until-expiring \
  --preferred-challenges dns-01 \
  --dns-cloudflare \
  --dns-cloudflare-credentials /root/.secrets/cloudflare.ini \
  -d $DOMAIN,*.$DOMAIN
Ubuntu / Debian
apt-get update -y
apt-get install -y python3-pip
pip install --upgrade acme pip
pip install certbot-dns-cloudflare
Certbot Post Hook for Jenkins
This bash script will be run after certbot renewals are processed to make the SSL certs available to Jenkins for distribution to the servers.
# where we are going to store the SSL certs for deployment
JENKINS_SSL="/home/jenkins/secrets/ssl"
DOMAIN="your-domain.com"

# run this after the certbot renewal to copy keys to jenkins
POST_HOOK_PATH="/usr/local/bin/certbot-post-hook"
cat <<CERTBOT_POST_HOOK > "$POST_HOOK_PATH"
# copy ssl certs and keys
cp /etc/letsencrypt/live/$DOMAIN/fullchain.pem "$JENKINS_SSL/$DOMAIN-fullchain.pem"
cp /etc/letsencrypt/live/$DOMAIN/privkey.pem "$JENKINS_SSL/$DOMAIN-privkey.pem"

# make sure the jenkins user can read them
chown -R jenkins.jenkins "$JENKINS_SSL"
CERTBOT_POST_HOOK

# make post hook executable
chmod +x "$POST_HOOK_PATH"
SSL Certificate Renewals
On the Jenkins server add a crontab entry for the root user to process SSL certificate renewals. Note the path to $POST_HOOK_PATH above is used here, so adjust as needed. The same credentials used to generate the cert will be used here as well, as a result they do not need to be included again.
# process let's encrypt renewals at 3:30am
30 3 * * * /usr/bin/certbot renew --quiet --post-hook /usr/local/bin/certbot-post-hook > /dev/null 2>&1
Certbot Post Hook for Jenkins
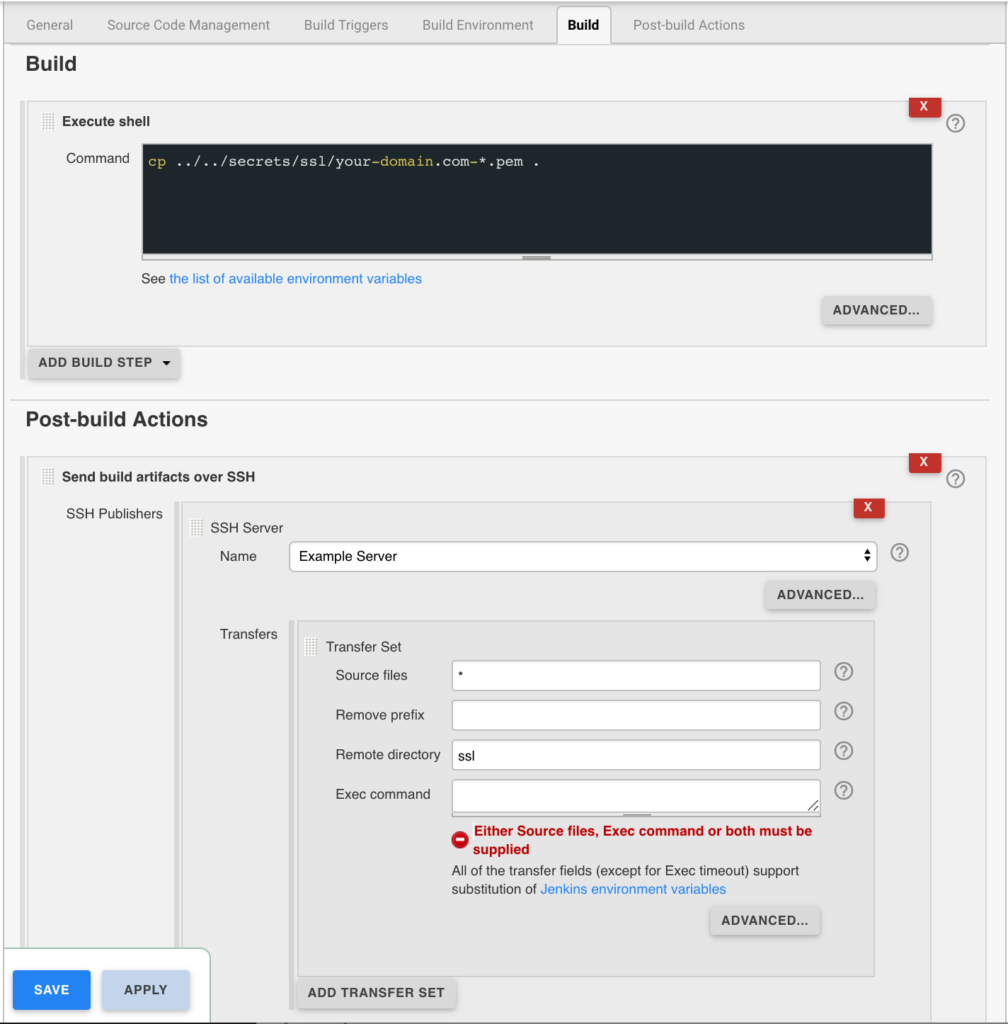
Jenkins is used to handle the SSL certificate deployment to the app servers because it is already set up to deploy files to my servers via SSH. First the required certificates are copied to the workspace, then uploaded using an SSH transfer set to each server. These certificates are then symlinked by the root user to the Nginx configuration for user. A cron job on each app server gracefully restarts nginx nightly to pick up any new certificates.
In the example below the certificates end up in a user home directory like so /home/username/ssl/your-domain.com-fullchain.pem therefore you will need to adjust for your username and domain.
Gracefully Reload Nginx
Pick up new certificates from renewals by gracefully reloading Nginx via a root cron job due to Nginx not seeing the change otherwise.
# reload nginx gracefully at 4:00am
0 4 * * * /usr/sbin/service nginx reload
The post Wildcard SSL Certs: Let’s Encrypt & Cloudflare appeared first on Justin Silver.
]]>The post Using NGINX as an Atlassian JIRA Reverse Proxy appeared first on Justin Silver.
]]>I use JIRA in a cloud infrastructure where it’s obviously desirable to serve the contents over SSL, therefore I set up an NGINX as a JIRA reverse proxy for unencrypted requests to the JIRA backend service and handle the SSL on the front end with Let’s Encrypt. We need to let JIRA know that we are proxying it over HTTPS however by setting some values in server.xml first.
Notice that my Let’s Encrypt SSL certificates are in the /etc/letsencrypt/live/jira.doublesharp.com directory, but yours will be specific to the hostname you create them for. The certs are created via the letsencrypt command and use Nginx to process the validation request. Once created the generated PEM files can be used in your Nginx config. Note that you will need to comment out this line in the SSL config if they don’t yet exist, start Nginx to create the certs, uncomment the lines to enable SSL, and then restart Nginx once again (whew!).
JIRA Reverse Proxy Configuration
Configure JIRA to add proxyName, proxyPort, scheme, and secure parameters to the Tomcat Connector in server.xml.
<Connector port="8081"
           maxThreads="150"
           minSpareThreads="25"
           connectionTimeout="20000"
           enableLookups="false"
           maxHttpHeaderSize="8192"
           protocol="HTTP/1.1"
           useBodyEncodingForURI="true"
           redirectPort="8443"
           acceptCount="100"
           disableUploadTimeout="true"
           bindOnInit="false"

           proxyName="jira.doublesharp.com"
           proxyPort="443"
           scheme="https"
           secure="true"
/>
Don’t forget to copy the database driver to $JIRA_INSTALL/lib.
Nginx Reverse Proxy Configuration
Note use of “jira.doublesharp.com” in config and change as needed. This configuration uses a subdomain specific certificate from Let’s Encrypt, but you could also use a Wildcard Certificate for your JIRA reverse proxy setup as well which can help to consolidate your key generation.
# Upstream JIRA server on port 8081. Use 127.0.0.1 and not localhost to force IPv4.
upstream jira {
  server       127.0.0.1:8081 fail_timeout=0;
}

# listen on HTTP2/SSL
server {
  listen       443 ssl http2;
  server_name  jira.doublesharp.com;

  # ssl certs from letsencrypt
  ssl_certificate /etc/letsencrypt/live/jira.doublesharp.com/fullchain.pem;
  ssl_certificate_key /etc/letsencrypt/live/jira.doublesharp.com/privkey.pem;

  location / {
    # allow uploads up to 10MB
    client_max_body_size 10m;
    # set proxy headers for cloudflare/jira
    proxy_set_header  Host $host:$server_port;
    proxy_set_header  X-Real-IP $remote_addr;
    proxy_set_header  X-Forwarded-For $proxy_add_x_forwarded_for;
    proxy_set_header  X-Forwarded-Proto $scheme;
    # hand the request off to jira on non-ssl
    proxy_pass        http://jira;
  }
}

# redirect HTTP and handle let's encrypt requests
server {
  listen       80;
  server_name  jira.doublesharp.com;
  root         /var/lib/jira;

  # handle letsencrypt domain validation
  location ~ /.well-known {
    allow all;
  }

  # send everything else to HTTPS
  location / {
    return 302 https://jira.doublesharp.com;
  }
}
The post Using NGINX as an Atlassian JIRA Reverse Proxy appeared first on Justin Silver.
]]>The post NGINX Configuration Monitor appeared first on Justin Silver.
]]>I wanted a way to quickly distribute configuration files to my servers and have NGINX automatically reload. I found a solution for Debian servers and adapted it for CentOS 7 here. You will first create a bash script, make it executable, then call it from a systemd service. The script uses inotifywait to monitor the /etc/nginx/sites-enabled directory for changes and reloads NGINX if the configuration is valid.
Bash Script
#!/bin/bash
# Check inotify-tools is installed or not
rpm -qa | grep -q inotify-tools &> /dev/null
if [ $? -ne 0 ]
then
  echo "Installing inotify-tools, please wait..."
  yum -y install inotify-tools
fi
while true
do
  inotifywait --exclude .swp -e create -e modify -e delete -e move /etc/nginx/sites-enabled
  # Check NGINX Configuration Test
  # Only Reload NGINX If NGINX Configuration Test Pass
  nginx -t
  if [ $? -eq 0 ]
  then
    echo "Reloading Nginx Configuration"
    service nginx reload
  fi
done
Make Executable
chmod +x /usr/local/bin/nginx-monitor
Systemd Service
[Unit]
Description=Nginx Config Monitor Service
After=nginx.service

[Service]
Type=simple
ExecStart=/usr/local/bin/nginx-monitor
Restart=on-abort

[Install]
WantedBy=multi-user.target
Start Service
chmod 755 /etc/systemd/system/nginx-monitor.service
# reload systemd services
systemctl daemon-reload
# start the service
service nginx-monitor start
# load after reboot
chkconfig nginx-monitor on
Adapted for CentOS from Auto Reload NGINX.
The post NGINX Configuration Monitor appeared first on Justin Silver.
]]>The post LEMP: CentOS 7, NGINX, PHP7, and Redis for WordPress appeared first on Justin Silver.
]]>Scripts to setup a WordPress server on CentOS 7 with NGINX, PHP/PHP-FPM 7, Redis and more.
- Firewalld – allow only HTTP/S and SSH traffic
- Letsencrypt – free SSL certificates
- Yum Cron – keep system up to date automatically
- Redis – persistent, in-memory data store
- PHP7 + PHP-FPM – PHP Next Generation with php-fpm for compatibility with Nginx
- NGINX – event based web server
- NGINX configurations – blacklisted referers, Cloudflare IP forwarding, MIME types, Security features, SSL, WordPress configuration
Firewalld
Enable the firewalld service and only allow http/s traffic to the server – in addition to the default of just ssh.
systemctl enable firewalld
service firewalld start
firewall-cmd --permanent --zone=public --add-service=http
firewall-cmd --permanent --zone=public --add-service=https
firewall-cmd --reload
Letsencrypt
Use Letsencrypt for free SSL certificates.
yum -y install letsencrypt
openssl dhparam -out /etc/ssl/certs/dhparam.pem 2048
Yum Cron
#!/bin/bash

# make sure the YUM_CRON_EMAIL is set
if [[ -z $YUM_CRON_EMAIL ]]; then
  echo "You must specify an email using \$YUM_CRON_EMAIL";
else
  # install and enable, plus patch for bug fixing
  yum -y install yum-cron patch
  chkconfig yum-cron on

  # configure via sed replacements
  sed -i "s|^email_to = root|email_to = ${YUM_CRON_EMAIL}|" /etc/yum/yum-cron.conf
  sed -i 's|^update_messages = no|update_messages = yes|' /etc/yum/yum-cron.conf
  sed -i 's|^download_updates = no|download_updates = yes|' /etc/yum/yum-cron.conf
  sed -i 's|^apply_updates = no|apply_updates = yes|' /etc/yum/yum-cron.conf
  sed -i 's|^emit_via = stdio|emit_via = email|' /etc/yum/yum-cron.conf

  sed -i "s|^email_to = root|email_to = ${YUM_CRON_EMAIL}|" /etc/yum/yum-cron-hourly.conf
  sed -i 's|^update_cmd = default|update_cmd = security|' /etc/yum/yum-cron-hourly.conf
  sed -i 's|^update_messages = no|update_messages = yes|' /etc/yum/yum-cron-hourly.conf
  sed -i 's|^download_updates = no|download_updates = yes|' /etc/yum/yum-cron-hourly.conf
  sed -i 's|^apply_updates = no|apply_updates = yes|' /etc/yum/yum-cron-hourly.conf
  sed -i 's|^emit_via = stdio|emit_via = email|' /etc/yum/yum-cron-hourly.conf

  egrep '^email_to|^update_messages|^download_updates|^apply_updates|^emit_via' /etc/yum/yum-cron.conf
  egrep '^email_to|^update_cmd|^update_messages|^download_updates|^apply_updates|^emit_via' /etc/yum/yum-cron-hourly.conf

  # fix bug in yum-cron nightly updates
  if [[ $(grep -q "# success, dependencies resolved" /usr/sbin/yum-cron) -ne 0 ]]; then
    patch /usr/sbin/yum-cron <<PATCHFILE
--- yum-cron.orig 2016-10-23 19:24:57.099859931 +0000
+++ yum-cron  2016-10-23 19:27:58.048784006 +0000
@@ -504,7 +504,13 @@
     except yum.Errors.RepoError, e:
       self.emitCheckFailed("%s" %(e,))
       sys.exit()
-        if res != 2:
+        if res == 0:
+            # success, empty transaction
+            sys.exit(0)
+        elif res == 2:
+            # success, dependencies resolved
+            pass
+        else:
       self.emitCheckFailed("Failed to build transaction: %s" %(str.join("\n", resmsg),))
       sys.exit(1)
PATCHFILE
  fi
  # (re)start the yum-cron service
  (service yum-cron status > /dev/null && service yum-cron restart) || service yum-cron start
fi
Redis / EPEL
Redis is available via EPEL and provides a great in memory cache.
#!/bin/bash

# install the EPEL repo to access Redis
yum install -y epel-release
yum install -y redis

# fix redis background saves on low memory
sysctl vm.overcommit_memory=1 && cat <<SYSCTL_MEM > /etc/sysctl.d/88-vm.overcommit_memory.conf
vm.overcommit_memory = 1
SYSCTL_MEM

# increase max connections
sysctl -w net.core.somaxconn=65535 && cat <<SYSCTL_CONN > /etc/sysctl.d/88-net.core.somaxconn.conf
net.core.somaxconn = 65535
SYSCTL_CONN

sysctl -w fs.file-max=100000 && cat <<SYSCTL_FILEMAX > /etc/sysctl.d/88-fs.file-max.conf
fs.file-max = 100000
SYSCTL_FILEMAX

sed -i "s|^tcp-backlog [[:digit:]]\+|tcp-backlog 65535|" /etc/redis.conf

# enable redis service on reboot
systemctl enable redis

# start service
(service redis status > /dev/null && service redis restart) || service redis start
#!/bin/bash

# Create Service to disable THP
cat <<DISABLE_THP > /etc/systemd/system/disable-thp.service
[Unit]
Description=Disable Transparent Huge Pages (THP)

[Service]
Type=simple
ExecStart=/bin/sh -c "echo 'never' > /sys/kernel/mm/transparent_hugepage/enabled && echo 'never' > /sys/kernel/mm/transparent_hugepage/defrag"

[Install]
WantedBy=multi-user.target
DISABLE_THP

sudo systemctl daemon-reload
sudo systemctl start disable-thp
sudo systemctl enable disable-thp
PHP / PHP-FPM
Install PHP and PHP-FPM from the Remi Safe Repo. Some config files and binaries will need to be symlinked for compatibility.
# install the remi-safe.repo
cat <<REMISAFE > /etc/yum.repos.d/remi-safe.repo
# This repository is safe to use with RHEL/CentOS base repository
# it only provides additional packages for the PHP stack
# all dependencies are in base repository or in EPEL

[remi-safe]
name=Safe Remi's RPM repository for Enterprise Linux \$releasever - \$basearch
#baseurl=http://rpms.remirepo.net/enterprise/\$releasever/safe/\$basearch/
mirrorlist=http://rpms.remirepo.net/enterprise/\$releasever/safe/mirror
enabled=1
gpgcheck=1
gpgkey=http://rpms.remirepo.net/RPM-GPG-KEY-remi
REMISAFE

# install php7 and modules
yum install -y \
  php70 \
  php70-php-fpm \
  php70-php-gd \
  php70-php-json \
  php70-php-mbstring \
  php70-php-mysqlnd \
  php70-php-pdo \
  php70-php-pecl-apcu \
  php70-php-pecl-apcu-bc \
  php70-php-pecl-igbinary \
  php70-php-pecl-imagick \
  php70-php-pecl-redis \
  php70-php-xml

# start php-fpm at boot
systemctl enable php70-php-fpm

# link the systemd service to "php-fpm"
[[ -f /usr/lib/systemd/system/php-fpm.service ]] || ln -s /usr/lib/systemd/system/php70-php-fpm.service /usr/lib/systemd/system/php-fpm.service

# link the binaries
[[ -f /usr/bin/php ]] || ln -s `which php70` /usr/bin/php
[[ -f /usr/bin/php-cgi ]] || ln -s `which php70-cgi` /usr/bin/php-cgi
[[ -f /usr/bin/php-phar ]] || ln -s `which php70-phar` /usr/bin/php-phar

# link the php-fpm configs
[[ -f /etc/php-fpm.conf ]] || ln -s /etc/opt/remi/php70/php-fpm.conf /etc/php-fpm.conf
[[ -d /etc/php-fpm.d ]] || ln -s /etc/opt/remi/php70/php-fpm.d /etc/php-fpm.d

mkdir -p /var/log/php-fpm && chown -R nginx.nginx /var/log/php-fpm
mkdir -p /var/lib/php/session && mkdir -p /var/lib/php/wsdlcache && mkdir -p /var/lib/php/opcache
chown -R nginx.nginx /var/lib/php/*
sed -i -e 's/user = apache/user = nginx/' /etc/php-fpm.d/www.conf
sed -i -e 's/group = apache/group = nginx/' /etc/php-fpm.d/www.conf
sed -i -e 's|/var/opt/remi/php70/log/php-fpm/www-error.log|/var/log/php-fpm/www-error.log|' /etc/php-fpm.d/www.conf
sed -i -e 's|/var/opt/remi/php70/lib/php/session|/var/lib/php/session|' /etc/php-fpm.d/www.conf
sed -i -e 's|/var/opt/remi/php70/lib/php/wsdlcache|/var/lib/php/wsdlcache|' /etc/php-fpm.d/www.conf
sed -i -e 's|/var/opt/remi/php70/lib/php/opcache|/var/lib/php/opcache|' /etc/php-fpm.d/www.conf
NGINX
Install NGINX with HTTP2 support.
# install nginx repo
cat <<REPO > /etc/yum.repos.d/nginx.repo
[nginx]
name=nginx repo
# default repo
#baseurl=http://nginx.org/packages/centos/\$releasever/\$basearch/
# mainline "dev" repo for http2 support
baseurl=http://nginx.org/packages/mainline/centos/\$releasever/\$basearch/
gpgcheck=0
enabled=1
REPO

# install and enable nginx
yum install -y nginx
systemctl enable nginx

# enable httpd in selinux
semanage permissive -a httpd_t

# test your configuration and reload
nginx -t && service nginx start
Included via symlink in conf.d
Add a bunch of config files for Nginx.
# includes for nginx configurations
mkdir -p /etc/nginx/includes

# ssl settings for virtual hosts
cat <<BLACKLIST > /etc/nginx/includes/blacklist.conf
#  ██████╗ ██╗      █████╗  ██████╗██╗  ██╗██╗     ██╗███████╗████████╗
#  ██╔══██╗██║     ██╔══██╗██╔════╝██║ ██╔╝██║     ██║██╔════╝╚══██╔══╝
#  ██████╔╝██║     ███████║██║     █████╔╝ ██║     ██║███████╗   ██║
#  ██╔══██╗██║     ██╔══██║██║     ██╔═██╗ ██║     ██║╚════██║   ██║
#  ██████╔╝███████╗██║  ██║╚██████╗██║  ██╗███████╗██║███████║   ██║
#  ╚═════╝ ╚══════╝╚═╝  ╚═╝ ╚═════╝╚═╝  ╚═╝╚══════╝╚═╝╚══════╝   ╚═╝

#-*- mode: nginx; mode: flyspell-prog; ispell-local-dictionary: "american" -*-
### This file implements a blacklist for certain user agents and
### referrers. It's a first line of defense. It must be included
### inside a http block.

## Add here all user agents that are to be blocked.
map \$http_user_agent \$bad_bot {
    default 0;
    ~*^Lynx 0; # Let Lynx go through
    libwww-perl                      1;
    ~*(?i)(httrack|htmlparser|libwww|JikeSpider|proximic|Sosospider|Baiduspider|msnbot|BBBike|WWWOFFLE|Widow|SuperHTTP|BlackWidow|HTTrack|Java|Pixray|CPython|Spinn3r|Abonti|MSIECrawler|Baiduspider|Yandex|Siteimprove|Aboundex|80legs|360Spider|^Java|Cogentbot|^Alexibot|^asterias|^attach|^BackDoorBot|^BackWeb|Bandit|^BatchFTP|^Bigfoot|^Black.Hole|^BlackWidow|^BlowFish|^BotALot|Buddy|^BuiltBotTough|^Bullseye|^BunnySlippers|^Cegbfeieh|^CheeseBot|^CherryPicker|^ChinaClaw|Collector|Copier|^CopyRightCheck|^cosmos|^Crescent|^Custo|^AIBOT) 1;
}

## Add here all referrers that are to blocked.
map \$http_referer \$bad_referer {
  default 0;
  ~*(?i)(adult|babes|click|diamond|forsale|girl|jewelry|love|nudit|organic|poker|porn|poweroversoftware|sex|teen|webcam|zippo|casino|replica|en.savefrom.net|7makemoneyonline.com|acunetix-referrer.com|adcash.com|bithack.ru|buttons-for-website.com|cenokos.ru|cenoval.ru|cityadspix.com|darodar.com|econom.co|edakgfvwql.ru|gobongo.info|iedit.ilovevitaly.com|ilovevitaly.com|ilovevitaly.co|ilovevitaly.info|ilovevitaly.org|ilovevitaly.ru|iskalko.ru|luxup.ru|make-money-online.7makemoneyonline.com|maps.ilovevitaly.com|myftpupload.com|savefrom.net|savetubevideo.com|screentoolkit.com|semalt.com|seoexperimenty.ru|shopping.ilovevitaly.ru|slftsdybbg.ru|socialseet.ru|srecorder.com|st3.cwl.yahoo.com|superiends.org|vodkoved.ru|websocial.me|ykecwqlixx.ru|yougetsignal.com|priceg.com|responsinator.com|o-o-6-o-o.ru|o-o-8-o-o.ru|12masterov.com|4webmasters.org|acads.net|adviceforum.info|affordablewebsitesandmobileapps.com|anal-acrobats.hol.es|anticrawler.org|bard-real.com.ua|best-seo-offer.com|best-seo-solution.com|bestwebsitesawards.com|billiard-classic.com.ua|blackhatworth.com|brakehawk.com|buttons-for-your-website.com|buy-cheap-online.info|buy-forum.ru|cardiosport.com.ua|ci.ua|customsua.com.ua|delfin-aqua.com.ua|dipstar.org|domination.ml|drupa.com|dvr.biz.ua|e-kwiaciarz.pl|este-line.com.ua|europages.com.ru|event-tracking.com|forum20.smailik.org|forum69.info|free-share-buttons.com|free-social-buttons.com|generalporn.org|get-free-traffic-now.com|ghazel.ru|googlsucks.com|guardlink.org|hulfingtonpost.com|humanorightswatch.org|ico.re|iloveitaly.ro|iloveitaly.ru|iminent.com|it-max.com.ua|kabbalah-red-bracelets.com|kambasoft.com|makemoneyonline.com|maridan.com.ua|masterseek.com|mebeldekor.com.ua|med-zdorovie.com.ua|mirobuvi.com.ua|ok.ru|onlywoman.org|o-o-6-o-o.com|palvira.com.ua|pornhub-forum.ga|pornhub-forum.uni.me|prodvigator.ua|ranksonic.info|ranksonic.org|rapidgator-porn.ga|resellerclub.com|sanjosestartups.com|search-error.com|sexyteens.hol.es|shop.xz618.com|simple-share-buttons.com|social-buttons.com|theguardlan.com|trion.od.ua|webmaster-traffic.com|websites-reviews.com|youporn-forum.ga|youporn-forum.uni.me|наркомания.лечениенаркомании.com|непереводимая.рф|floating-share-buttons.com|traffic2money.com|site7.free-floating-buttons.com|sexyali.com|get-free-social-traffic.com|site2.free-floating-buttons.com|success-seo.com|trafficmonetizer.org|chinese-amezon.com|free-social-buttons.com) 1;
}

## Add here all hosts that should be spared any referrer checking.
geo \$bad_referer {
  127.0.0.1 0;
  192.168.1.0/24 0;
  217.23.7.130 0;
  78.110.60.230 0;
  193.227.240.37 0;
  193.227.240.38 0;
}

map \$http_user_agent \$limit_bots {
  default 0;
  ~*(google|bing|yandex|msnbot) 1;
  ~*(AltaVista|Googlebot|Slurp|BlackWidow|Bot|ChinaClaw|Custo|DISCo|Download|Demon|eCatch|EirGrabber|EmailSiphon|EmailWolf|SuperHTTP|Surfbot|WebWhacker) 2;
  ~*(Express|WebPictures|ExtractorPro|EyeNetIE|FlashGet|GetRight|GetWeb!|Go!Zilla|Go-Ahead-Got-It|GrabNet|Grafula|HMView|Go!Zilla|Go-Ahead-Got-It) 2;
  ~*(rafula|HMView|HTTrack|Stripper|Sucker|Indy|InterGET|Ninja|JetCar|Spider|larbin|LeechFTP|Downloader|tool|Navroad|NearSite|NetAnts|tAkeOut|WWWOFFLE) 2;
  ~*(GrabNet|NetSpider|Vampire|NetZIP|Octopus|Offline|PageGrabber|Foto|pavuk|pcBrowser|RealDownload|ReGet|SiteSnagger|SmartDownload|SuperBot|WebSpider) 2;
  ~*(Teleport|VoidEYE|Collector|WebAuto|WebCopier|WebFetch|WebGo|WebLeacher|WebReaper|WebSauger|eXtractor|Quester|WebStripper|WebZIP|Wget|Widow|Zeus) 2;
  ~*(Twengabot|htmlparser|libwww|Python|perl|urllib|scan|Curl|email|PycURL|Pyth|PyQ|WebCollector|WebCopy|webcraw) 2;
}
BLACKLIST

cat <<CLOUDFLARECONF > /etc/nginx/includes/cloudflare.conf
#   ██████╗██╗      ██████╗ ██╗   ██╗██████╗ ███████╗██╗      █████╗ ██████╗ ███████╗
#  ██╔════╝██║     ██╔═══██╗██║   ██║██╔══██╗██╔════╝██║     ██╔══██╗██╔══██╗██╔════╝
#  ██║     ██║     ██║   ██║██║   ██║██║  ██║█████╗  ██║     ███████║██████╔╝█████╗
#  ██║     ██║     ██║   ██║██║   ██║██║  ██║██╔══╝  ██║     ██╔══██║██╔══██╗██╔══╝
#  ╚██████╗███████╗╚██████╔╝╚██████╔╝██████╔╝██║     ███████╗██║  ██║██║  ██║███████╗
#   ╚═════╝╚══════╝ ╚═════╝  ╚═════╝ ╚═════╝ ╚═╝     ╚══════╝╚═╝  ╚═╝╚═╝  ╚═╝╚══════╝

set_real_ip_from 199.27.128.0/21;
set_real_ip_from 173.245.48.0/20;
set_real_ip_from 103.21.244.0/22;
set_real_ip_from 103.22.200.0/22;
set_real_ip_from 103.31.4.0/22;
set_real_ip_from 141.101.64.0/18;
set_real_ip_from 108.162.192.0/18;
set_real_ip_from 190.93.240.0/20;
set_real_ip_from 188.114.96.0/20;
set_real_ip_from 197.234.240.0/22;
set_real_ip_from 198.41.128.0/17;
set_real_ip_from 162.158.0.0/15;
set_real_ip_from 104.16.0.0/12;
set_real_ip_from 172.64.0.0/13;
set_real_ip_from 2400:cb00::/32;
set_real_ip_from 2606:4700::/32;
set_real_ip_from 2803:f800::/32;
set_real_ip_from 2405:b500::/32;
set_real_ip_from 2405:8100::/32;

set_real_ip_from 127.0.0.1;
real_ip_header X-Forwarded-For;
CLOUDFLARECONF

cat <<MIMETYPESCONF > /etc/nginx/includes/mime.types.conf
#  ███╗   ███╗██╗███╗   ███╗███████╗    ████████╗██╗   ██╗██████╗ ███████╗███████╗
#  ████╗ ████║██║████╗ ████║██╔════╝    ╚══██╔══╝╚██╗ ██╔╝██╔══██╗██╔════╝██╔════╝
#  ██╔████╔██║██║██╔████╔██║█████╗         ██║    ╚████╔╝ ██████╔╝█████╗  ███████╗
#  ██║╚██╔╝██║██║██║╚██╔╝██║██╔══╝         ██║     ╚██╔╝  ██╔═══╝ ██╔══╝  ╚════██║
#  ██║ ╚═╝ ██║██║██║ ╚═╝ ██║███████╗       ██║      ██║   ██║     ███████╗███████║
#  ╚═╝     ╚═╝╚═╝╚═╝     ╚═╝╚══════╝       ╚═╝      ╚═╝   ╚═╝     ╚══════╝╚══════╝

types {
  application/x-font-ttf ttf;
  font/opentype otf;
}
MIMETYPESCONF


# use a conf file to include our sites-enabled conf files
mkdir -p /etc/nginx/sites-available
mkdir -p /etc/nginx/sites-enabled
cat <<SITESENABLED > /etc/nginx/includes/sites-enabled.conf
#  ██╗    ██╗███████╗██████╗ ███████╗██╗████████╗███████╗███████╗
#  ██║    ██║██╔════╝██╔══██╗██╔════╝██║╚══██╔══╝██╔════╝██╔════╝
#  ██║ █╗ ██║█████╗  ██████╔╝███████╗██║   ██║   █████╗  ███████╗
#  ██║███╗██║██╔══╝  ██╔══██╗╚════██║██║   ██║   ██╔══╝  ╚════██║
#  ╚███╔███╔╝███████╗██████╔╝███████║██║   ██║   ███████╗███████║
#   ╚══╝╚══╝ ╚══════╝╚═════╝ ╚══════╝╚═╝   ╚═╝   ╚══════╝╚══════╝

include /etc/nginx/sites-enabled/*.conf;
SITESENABLED

ln -s /etc/nginx/includes/blacklist.conf /etc/nginx/conf.d/_.blacklist.conf
ln -s /etc/nginx/includes/cloudflare.conf /etc/nginx/conf.d/_.cloudflare.conf
ln -s /etc/nginx/includes/mime.types.conf /etc/nginx/conf.d/_.mime.types.conf
ln -s /etc/nginx/includes/sites-enabled.conf /etc/nginx/conf.d/_.sites-enabled.conf
Included in server block
These Nginx include files are meant to be using inside virtual server blocks.
# ssl settings for virtual hosts
cat <<SSLCONF > /etc/nginx/includes/ssl.conf
#  ███████╗███████╗██╗
#  ██╔════╝██╔════╝██║
#  ███████╗███████╗██║
#  ╚════██║╚════██║██║
#  ███████║███████║███████╗
#  ╚══════╝╚══════╝╚══════╝

# Use TLS (so don't use old version of SSL)
ssl_protocols TLSv3 TLSv1.1 TLSv1.2;
ssl_prefer_server_ciphers on;
ssl_ciphers 'ECDHE-RSA-AES128-GCM-SHA256:ECDHE-ECDSA-AES128-GCM-SHA256:ECDHE-RSA-AES256-GCM-SHA384:ECDHE-ECDSA-AES256-GCM-SHA384:DHE-RSA-AES128-GCM-SHA256:DHE-DSS-AES128-GCM-SHA256:kEDH+AESGCM:ECDHE-RSA-AES128-SHA256:ECDHE-ECDSA-AES128-SHA256:ECDHE-RSA-AES128-SHA:ECDHE-ECDSA-AES128-SHA:ECDHE-RSA-AES256-SHA384:ECDHE-ECDSA-AES256-SHA384:ECDHE-RSA-AES256-SHA:ECDHE-ECDSA-AES256-SHA:DHE-RSA-AES128-SHA256:DHE-RSA-AES128-SHA:DHE-DSS-AES128-SHA256:DHE-RSA-AES256-SHA256:DHE-DSS-AES256-SHA:DHE-RSA-AES256-SHA:AES128-GCM-SHA256:AES256-GCM-SHA384:AES128-SHA256:AES256-SHA256:AES128-SHA:AES256-SHA:AES:CAMELLIA:DES-CBC3-SHA:!aNULL:!eNULL:!EXPORT:!DES:!RC4:!MD5:!PSK:!aECDH:!EDH-DSS-DES-CBC3-SHA:!EDH-RSA-DES-CBC3-SHA:!KRB5-DES-CBC3-SHA';
ssl_dhparam /etc/ssl/certs/dhparam.pem;
ssl_session_timeout 1d;
ssl_session_cache shared:SSL:50m;
ssl_stapling on;
ssl_stapling_verify on;
SSLCONF

# use a conf file to include our sites-enabled conf files
cat <<SECURITY > /etc/nginx/includes/security.conf
#  ███████╗███████╗ ██████╗██╗   ██╗██████╗ ██╗████████╗██╗   ██╗
#  ██╔════╝██╔════╝██╔════╝██║   ██║██╔══██╗██║╚══██╔══╝╚██╗ ██╔╝
#  ███████╗█████╗  ██║     ██║   ██║██████╔╝██║   ██║    ╚████╔╝
#  ╚════██║██╔══╝  ██║     ██║   ██║██╔══██╗██║   ██║     ╚██╔╝
#  ███████║███████╗╚██████╗╚██████╔╝██║  ██║██║   ██║      ██║
#  ╚══════╝╚══════╝ ╚═════╝ ╚═════╝ ╚═╝  ╚═╝╚═╝   ╚═╝      ╚═╝

if (\$bad_referer){
  return 444;
}

location ~* (readme|changelog)\\.txt\$ {
  return 444;
}

# don't show this as it can leak info
location ~* /(\\.|(wp-config|xmlrpc)\\.php|(readme|license|changelog)\\.(html|txt)) {
  return 444;
}

location ~ /mu-plugins/ {
  return 444;
}

# no PHP execution in uploads/files
location ~* /(?:uploads|files)/.*\\.php\$ {
  deny all;
}

# hide contents of sensitive files
location ~* \\.(conf|engine|inc|info|install|make|module|profile|test|po|sh|.*sql|theme|tpl(\\.php)?|xtmpl)\$|^(\\..*|Entries.*|Repository|Root|Tag|Template)\$|\\.php_ {
  return 444;
}

# don't allow other executable file types
location ~* \\.(pl|cgi|py|sh|lua)\$ {
  return 444;
}

location = /robots.txt {
  if ( \$limit_bots != 1 ) {
    return 444;
  }
  expires 30d;
  add_header Cache-Control public;
  try_files /robots.txt @shared;
}

location @shared {
  root /var/www/shared;
}
SECURITY

# use a conf file to include our sites-enabled conf files
cat <<WORDPRESSCONF > /etc/nginx/includes/wordpress.conf
#  ██╗    ██╗ ██████╗ ██████╗ ██████╗ ██████╗ ██████╗ ███████╗███████╗███████╗
#  ██║    ██║██╔═══██╗██╔══██╗██╔══██╗██╔══██╗██╔══██╗██╔════╝██╔════╝██╔════╝
#  ██║ █╗ ██║██║   ██║██████╔╝██║  ██║██████╔╝██████╔╝█████╗  ███████╗███████╗
#  ██║███╗██║██║   ██║██╔══██╗██║  ██║██╔═══╝ ██╔══██╗██╔══╝  ╚════██║╚════██║
#  ╚███╔███╔╝╚██████╔╝██║  ██║██████╔╝██║     ██║  ██║███████╗███████║███████║
#   ╚══╝╚══╝  ╚═════╝ ╚═╝  ╚═╝╚═════╝ ╚═╝     ╚═╝  ╚═╝╚══════╝╚══════╝╚══════╝

# include standard security file
include /etc/nginx/includes/security.conf;

# allow CORS for fonts
location ~* \\.(ttf|ttc|otf|eot|woff2?|font.css|css|svg)\$ {
  add_header Access-Control-Allow-Origin *;
}

#Yoast sitemap
location ~ ([^/]*)sitemap(.*)\\.x(m|s)l\$ {
  ## this redirects sitemap.xml to /sitemap_index.xml
  rewrite ^/sitemap\\.xml\$ /sitemap_index.xml permanent;
  ## this makes the XML sitemaps work
  rewrite ^/([a-z]+)?-?sitemap\\.xsl\$ /index.php?xsl=\$1 last;
  rewrite ^/sitemap_index\\.xml\$ /index.php?sitemap=1 last;
  rewrite ^/([^/]+?)-sitemap([0-9]+)?\\.xml\$ /index.php?sitemap=\$1&sitemap_n=\$2 last;

  ## The following lines are optional for the premium extensions
  ## News SEO
  rewrite ^/news-sitemap\\.xml\$ /index.php?sitemap=wpseo_news last;
  ## Local SEO
  rewrite ^/locations\\.kml\$ /index.php?sitemap=wpseo_local_kml last;
  rewrite ^/geo-sitemap\\.xml\$ /index.php?sitemap=wpseo_local last;
  ## Video SEO
  rewrite ^/video-sitemap\\.xsl\$ /index.php?xsl=video last;
}

index index.php;

location / {
  try_files \$uri \$uri/ /index.php\$is_args\$args;
}

location ~ ^/(fpm-status|ping)\$ {
  include fastcgi_params;
  fastcgi_pass 127.0.0.1:9000;
  fastcgi_param SCRIPT_FILENAME \$document_root\$fastcgi_script_name;
  break;
}

location ~ \\.php\$ {
  # zero-day exploit defense.
  try_files \$uri =404;

  # logging vi PHP-FPM
  fastcgi_intercept_errors on;

  # pass request to fastcgi/php-cgi via spawn-fcgi
  fastcgi_pass unix:/var/run/php-fpm.sock;

  # default fastcgi_params
  include fastcgi_params;

  # max timeouts (should match php.ini)
  fastcgi_connect_timeout 600s;
  fastcgi_send_timeout 600s;
  fastcgi_read_timeout 600s;

  # override fastcgi_params
  fastcgi_param SERVER_NAME \$host;
  fastcgi_param SCRIPT_FILENAME \$document_root\$fastcgi_script_name;

  break;
}

location ~ /purge(/.*) {
  #fastcgi_cache_purge WORDPRESS "\$scheme\$request_method\$host\$1";
}
WORDPRESSCONF
HTTPS Virtual Host
This is an example of a virtual host running WordPress.
# use a conf file to include our sites-enabled conf files
cat <<VIRTUALHOST > /etc/nginx/sites-available/virtualhost.conf
server {
  # Domain validation is on port 80
  listen 80;

  # Hostnames to listen on, you will pass each of these to letsencrypt with "-w www.example.com"
  server_name www.example.com;

  # Your document root, you will pass this path to letsencrypt with "-w /var/www/www.example.com/html/"
  root /var/www/www.example.com/html/;

  # handle letsencrypt domain validation
  location ~ /.well-known {
      allow all;
  }

  # permanently redirect everything else
  location / {
    return 301 https://$server_name$request_uri;
  }
}

server {
  # All SSL is served on 443. If available include "http2", otherwise remove it.
  listen 443 ssl http2;

  # Hostnames to listen on
  server_name www.example.com;

  # Add SSL Keys here once they are generated
  #ssl_certificate /etc/letsencrypt/live/example.com/fullchain.pem;
  #ssl_certificate_key /etc/letsencrypt/live/example.com/privkey.pem;

  include /etc/nginx/includes/ssl.conf;

  # WordPress Sites
  # include /etc/nginx/includes/wordpress.conf;
  # include /var/www/www.example.com/html/nginx.conf;

  # handle all requests...
  # location / {
  # }
}
VIRTUALHOST

# link the virtual host using full pathnames for source and target!
# ln -s /etc/nginx/sites-available/virtualhost.conf /etc/nginx/sites-enabled/virtualhost.conf

nginx -t && service nginx reload
Generating Barcodes
yum install -y barcode barcode-devel php-tcpdf.noarch
cd /usr/local/src
wget https://ashberg.de/php-barcode/download/files/genbarcode-0.4.tar.gz
tar -xzvf genbarcode-0.4.tar.gz
cd genbarcode-0.4
make && make install

# use to generate via php
wget https://ashberg.de/php-barcode/download/files/php-barcode-0.4.tar.gz
The post LEMP: CentOS 7, NGINX, PHP7, and Redis for WordPress appeared first on Justin Silver.
]]>The post Node.js + PM2 + NGINX + Redis on CentOS 7 appeared first on Justin Silver.
]]>This is a quick setup guide for the application stack I have been using recently. Most of my latest work has been a throwback to the first server-side programming I did in the 90’s – javascript – except this time it’s Node.js instead of Netscape Communication Server. In this setup PM2 is used to manage the Node process running as an arbitrary user, running on an unprivileged port. This means that the application can be restarted without root credentials. The front-end is served by NGINX and it does need to be started as root because it runs on the privileged ports 80 and 443 in this use case. It also gives us a lot of the built in features that Nginx gives you on the front end, like serving all your content over SSL – for free using Let’s Encrypt event. My caching needs are provided by Redis.
Here is the setup – run as root or use sudo.
Firewalld
Enable the firewalld service and only allow http/s traffic to the server – in addition to the default of just ssh.
#!/bin/bash

# enable on book
systemctl enable firewalld

# (re)start the service
(service firewalld status > /dev/null && service firewalld restart) || service firewalld start

# add the http and http services and reload
firewall-cmd --permanent --zone=public --add-service=http
firewall-cmd --permanent --zone=public --add-service=https
firewall-cmd --reload
Letsencrypt
Use Letsencrypt for free SSL certificates.
yum -y install letsencrypt
openssl dhparam -out /etc/ssl/certs/dhparam.pem 2048
Yum Cron
#!/bin/bash

# make sure the YUM_CRON_EMAIL is set
if [[ -z $YUM_CRON_EMAIL ]]; then
  echo "You must specify an email using \$YUM_CRON_EMAIL";
else
  # install and enable, plus patch for bug fixing
  yum -y install yum-cron patch
  chkconfig yum-cron on

  # configure via sed replacements
  sed -i "s|^email_to = root|email_to = ${YUM_CRON_EMAIL}|" /etc/yum/yum-cron.conf
  sed -i 's|^update_messages = no|update_messages = yes|' /etc/yum/yum-cron.conf
  sed -i 's|^download_updates = no|download_updates = yes|' /etc/yum/yum-cron.conf
  sed -i 's|^apply_updates = no|apply_updates = yes|' /etc/yum/yum-cron.conf
  sed -i 's|^emit_via = stdio|emit_via = email|' /etc/yum/yum-cron.conf

  sed -i "s|^email_to = root|email_to = ${YUM_CRON_EMAIL}|" /etc/yum/yum-cron-hourly.conf
  sed -i 's|^update_cmd = default|update_cmd = security|' /etc/yum/yum-cron-hourly.conf
  sed -i 's|^update_messages = no|update_messages = yes|' /etc/yum/yum-cron-hourly.conf
  sed -i 's|^download_updates = no|download_updates = yes|' /etc/yum/yum-cron-hourly.conf
  sed -i 's|^apply_updates = no|apply_updates = yes|' /etc/yum/yum-cron-hourly.conf
  sed -i 's|^emit_via = stdio|emit_via = email|' /etc/yum/yum-cron-hourly.conf

  egrep '^email_to|^update_messages|^download_updates|^apply_updates|^emit_via' /etc/yum/yum-cron.conf
  egrep '^email_to|^update_cmd|^update_messages|^download_updates|^apply_updates|^emit_via' /etc/yum/yum-cron-hourly.conf

  # fix bug in yum-cron nightly updates
  if [[ $(grep -q "# success, dependencies resolved" /usr/sbin/yum-cron) -ne 0 ]]; then
    patch /usr/sbin/yum-cron <<PATCHFILE
--- yum-cron.orig 2016-10-23 19:24:57.099859931 +0000
+++ yum-cron  2016-10-23 19:27:58.048784006 +0000
@@ -504,7 +504,13 @@
     except yum.Errors.RepoError, e:
       self.emitCheckFailed("%s" %(e,))
       sys.exit()
-        if res != 2:
+        if res == 0:
+            # success, empty transaction
+            sys.exit(0)
+        elif res == 2:
+            # success, dependencies resolved
+            pass
+        else:
       self.emitCheckFailed("Failed to build transaction: %s" %(str.join("\n", resmsg),))
       sys.exit(1)
PATCHFILE
  fi
  # (re)start the yum-cron service
  (service yum-cron status > /dev/null && service yum-cron restart) || service yum-cron start
fi
Install NGINX
We are going to use the “mainline” repo to get HTTP2 support. I like to create a conf file in “sites-available” that is linked to “sites-enabled” so I can disable things easily – this is enabled by adding a file under /etc/nginx/conf.d.
#!/bin/bash

# import src utility
if [[ -z $(type -t src) ]]; then
  source <(curl -sL https://www.doublesharp.com/src)
fi

src osname
src osversion

cat <<REPO > /etc/yum.repos.d/nginx.repo
[nginx]
name=nginx repo
# default repo
#baseurl=http://nginx.org/packages/$(osname)/$(osversion)/\$basearch/
# mainline "dev" repo for http2 support
baseurl=http://nginx.org/packages/mainline/$(osname)/$(osversion)/\$basearch/
gpgcheck=0
enabled=1
REPO

#install nginx
yum install -y nginx

# turn on for reboots
systemctl enable nginx

mkdir -p /etc/nginx/includes
mkdir -p /etc/nginx/sites-enabled
mkdir -p /etc/nginx/sites-available
mkdir -p /etc/nginx/streams-enabled
mkdir -p /etc/nginx/streams-available

# use a conf file to include our sites-enabled conf files
cat <<SITESENABLED > /etc/nginx/includes/sites-enabled.conf
include                 /etc/nginx/sites-enabled/*.conf;
SITESENABLED

[[ -f "/etc/nginx/conf.d/_.sites-enabled.conf" ]] || ln -s /etc/nginx/includes/sites-enabled.conf /etc/nginx/conf.d/_.sites-enabled.conf

# enable httpd in selinux
semanage permissive -a httpd_t

cat <<NGINX_CONF > /etc/nginx/nginx.conf
user                    nginx;
worker_processes        auto;

error_log               /var/log/nginx/error.log warn;
pid                     /var/run/nginx.pid;

worker_rlimit_nofile    100000;

events {
  # determines how much clients will be served per worker
  # max clients = worker_connections * worker_processes
  # max clients is also limited by the number of socket connections available on the system (~64k)
  worker_connections      100000;

  # optmized to serve many clients with each thread, essential for linux
  use                     epoll;

  # accept as many connections as possible, may flood worker connections if set too low
  multi_accept on;
}

# web servers / virtual hosts
http {
  include                 /etc/nginx/mime.types;
  default_type            application/octet-stream;

  log_format              main    '\$remote_addr - \$remote_user [\$time_local] "\$request" '
                                  '\$status \$body_bytes_sent "\$http_referer" '
                                  '"\$http_user_agent" "\$http_x_forwarded_for"';

  access_log              /var/log/nginx/access.log combined flush=1m buffer=128k;

  # cache informations about FDs, frequently accessed files
  # can boost performance, but you need to test those values
  open_file_cache         max=200000 inactive=20s;
  open_file_cache_valid   30s;
  open_file_cache_min_uses 2;
  open_file_cache_errors  on;

  # send headers in one peace, its better then sending them one by one
  tcp_nopush              on;

  # don't buffer data sent, good for small data bursts in real time
  tcp_nodelay             on;

  # server will close connection after this time
  keepalive_timeout       30;

  # allow the server to close connection on non responding client, this will free up memory
  reset_timedout_connection on;

  # request timed out -- default 60
  client_body_timeout     10;

  # if client stop responding, free up memory -- default 60
  send_timeout            2;

  # reduce the data that needs to be sent over network
  gzip                    on;
  gzip_min_length         10240;
  gzip_proxied            expired no-cache no-store private auth;
  gzip_types              text/plain text/css text/xml text/javascript application/x-javascript application/xml;
  gzip_disable            "MSIE [1-6]\.";

  proxy_buffer_size       128k;
  proxy_buffers           64 256k;
  proxy_busy_buffers_size 256k;
  proxy_ignore_client_abort on;

  include                 /etc/nginx/conf.d/*.conf;
}

# load balancer streams
stream {
  include                 /etc/nginx/streams-enabled/*.conf;
}
NGINX_CONF


# create a virtual server conf file that is in sites-available
cat <<NGINX_HOST > /etc/nginx/sites-available/myapp.conf
upstream myapp {
        # our app will be on localhost port 3000, but you can change this here
        server                  127.0.0.1:3000 fail_timeout=0;
}

server {
        listen                  80;
        server_name             myapp.example.com;

        location / {
                proxy_set_header        Host \$host:\$server_port;
                proxy_set_header        X-Real-IP \$remote_addr;
                proxy_set_header        X-Forwarded-For \$proxy_add_x_forwarded_for;
                proxy_set_header        X-Forwarded-Proto \$scheme;

                proxy_pass              http://myapp;
        }
}
NGINX_HOST

# link this conf to sites-enabled. it's important to use the full path
#ln -s /etc/nginx/sites-available/myapp.conf /etc/nginx/sites-enabled/myapp.conf

nginx -t && (service nginx status > /dev/null && service nginx restart)
Install Redis
To install Redis with yum, first you need to install EPEL. Once the installed, you will have access to the repository containing the Redis install.
#!/bin/bash

# install the EPEL repo to access Redis
yum install -y epel-release
yum install -y redis

# fix redis background saves on low memory
sysctl vm.overcommit_memory=1 && cat <<SYSCTL_MEM > /etc/sysctl.d/88-vm.overcommit_memory.conf
vm.overcommit_memory = 1
SYSCTL_MEM

# increase max connections
sysctl -w net.core.somaxconn=65535 && cat <<SYSCTL_CONN > /etc/sysctl.d/88-net.core.somaxconn.conf
net.core.somaxconn = 65535
SYSCTL_CONN

sysctl -w fs.file-max=100000 && cat <<SYSCTL_FILEMAX > /etc/sysctl.d/88-fs.file-max.conf
fs.file-max = 100000
SYSCTL_FILEMAX

sed -i "s|^tcp-backlog [[:digit:]]\+|tcp-backlog 65535|" /etc/redis.conf

# enable redis service on reboot
systemctl enable redis

# start service
(service redis status > /dev/null && service redis restart) || service redis start
Install Node.js & PM2
We want to install Node.js and then the PM2 package globally so that it can be accessed by other users.
#!/bin/bash

# make sure the SRC_NODE_VERSION is set
if [[ -z $SRC_NODE_VERSION ]]; then
  echo "You must specify a node version using \$SRC_NODE_VERSION";
else
  # Select node version to install
  curl --silent --location https://rpm.nodesource.com/setup_$SRC_NODE_VERSION.x | bash -

  # install via yum
  yum install -y git gcc-c++ make nodejs
fi

# PM2 - install as global
npm install pm2@latest -g
Create “appuser”
As root, create a new user named “appuser”, or whatever you want your app user to be named. This could even be the default centos@/ec2-user@/etc that many hosts provide.
adduser appuser
passwd appuser
Create PM2 service as “appuser”
Log in as the “appuser” user and create the Node app in your home directory. This directory should be owned by the “appuser”. In this case we assume the server is going to be listening on localhost port 3000, which means we can manage it with pm2 without having root permissions.
mkdir ~/apps
cd /apps

# create your app here, git clone, whatever
# we assume the app is in ~/apps/myapp/server.js

pm2 start ~/apps/myapp/server.js --name=myapp
pm2 status myapp
pm2 restart myapp
The post Node.js + PM2 + NGINX + Redis on CentOS 7 appeared first on Justin Silver.
]]>The post Install Jenkins as a Service on CentOS 7 appeared first on Justin Silver.
]]>I have previously written about how to Install Jenkins on CentOS as a Service where it was necessary to write your own startup, shutdown, configuration, and init.d scripts. Luckily this is all much easier now as you can install the software directly from a yum repository – you’ll just need to fetch the repo from http://pkg.jenkins-ci.org/redhat/jenkins.repo.
Install Jenkins from the Yum Repository
Make sure you have Java on your system, then fetch the yum repository and install Jenkins.
yum -y install java
curl http://pkg.jenkins-ci.org/redhat/jenkins.repo -o /etc/yum.repos.d/jenkins.repo
rpm --import https://jenkins-ci.org/redhat/jenkins-ci.org.key
yum -y install jenkins
Enable and Start Service
Since CentOS 7 uses Systemd, use it to start the service on reboot.
systemctl enable jenkins
service jenkins start
Access Jenkins
This will start jenkins on port 8080 by default (you can change these settings in /etc/sysconfig/jenkins). Leaving it as is and setting up a reverse Nginx proxy is my preference. Once you load the Jenkins home page you will be prompted to enter a password located in a file on your system to continue the setup. Here is a sample of my Nginx configuration.
# jenkins is upstream listening on port 8080
upstream jenkins {
        server                          127.0.0.1:8080 fail_timeout=0;
}

# nginx is listening on port 80
server {
        listen                          80;
        server_name                     jenkins.example.com;

        location / {

                proxy_set_header        Host $host:$server_port;
                proxy_set_header        X-Real-IP $remote_addr;
                proxy_set_header        X-Forwarded-For $proxy_add_x_forwarded_for;
                proxy_set_header        X-Forwarded-Proto $scheme;

                proxy_pass              http://jenkins;
        }
}
Keep in mind that you may have issues initially proxying to Jenkins if SELinux is configured to block access to port 8080. If you try to load the site via Ngnix and get a “502 Bad Gateway” error, check out the /var/log/audit/audit.log – you will probably see errors regarding Nginx connecting to your port. You can either add the port by hand, or do it automatically with audit2allow.
mkdir ~/.semanage && cd ~/.semanage
cat /var/log/audit/audit.log | grep nginx | grep denied | audit2allow -M semanage
semodule -i semanage.pp
If you need to generate an SSH key for the Jenkins user, use sudo to run as the proper user.
sudo -u jenkins ssh-keygen
Enjoy!
The post Install Jenkins as a Service on CentOS 7 appeared first on Justin Silver.
]]>The post Letsencrypt: Free SSL Certificates for NGINX appeared first on Justin Silver.
]]>I always wanted all of my sites to run over SSL, but it also didn’t seem worth the expense of buying certificates for all the domains I own. Enter Let’s Encrypt which offers free 90 day SSL certificates. This guide shows how to install and use letsencrypt to generate SSL certificates for NGINX running on CentOS 7, however it should be similar on other supported systems. A bit about Let’s Encrypt from their site:
Let’s Encrypt is a free, automated, and open certificate authority (CA), run for the public’s benefit. Let’s Encrypt is a service provided by the Internet Security Research Group (ISRG).
The key principles behind Let’s Encrypt are:
- Free: Anyone who owns a domain name can use Let’s Encrypt to obtain a trusted certificate at zero cost.
- Automatic: Software running on a web server can interact with Let’s Encrypt to painlessly obtain a certificate, securely configure it for use, and automatically take care of renewal.
- Secure: Let’s Encrypt will serve as a platform for advancing TLS security best practices, both on the CA side and by helping site operators properly secure their servers.
- Transparent: All certificates issued or revoked will be publicly recorded and available for anyone to inspect.
- Open: The automatic issuance and renewal protocol will be published as an open standard that others can adopt.
- Cooperative: Much like the underlying Internet protocols themselves, Let’s Encrypt is a joint effort to benefit the community, beyond the control of any one organization.
Install Letsencrypt
Install letsencrypt with yum. Next generate a strong Diffie-Hellman key – you can specify a different path but you need to change it in the Nginx server block.
yum -y install letsencrypt
openssl dhparam -out /etc/ssl/certs/dhparam.pem 2048
Update Nginx
Edit your Nginx configuration to listen on HTTP and HTTPS, and respond to Let’s Encrypt domain validation requests to /.well-known. Go ahead and add the SSL configuration, but no keys (since they don’t exist yet).
server {
	# Domain validation is on port 80, SSL is served on 443. If available include "http2", otherwise remove it.
	listen 80 443 ssl http2;

	# Hostnames to listen on, you will pass each of these to letsencrypt with "-w www.example.com"
	server_name www.example.com;

	# Your document root, you will pass this path to letsencrypt with "-w /var/www/www.example.com/html/"
	root /var/www/www.example.com/html/;

	# Add SSL Keys here once they are generated

	# Use TLS (so don't use old version of SSL)
	ssl_protocols                   TLSv1 TLSv1.1 TLSv1.2;
	ssl_prefer_server_ciphers       on;
	ssl_ciphers                     'ECDHE-RSA-AES128-GCM-SHA256:ECDHE-ECDSA-AES128-GCM-SHA256:ECDHE-RSA-AES256-GCM-SHA384:ECDHE-ECDSA-AES256-GCM-SHA384:DHE-RSA-AES128-GCM-SHA256:DHE-DSS-AES128-GCM-SHA256:kEDH+AESGCM:ECDHE-RSA-AES128-SHA256:ECDHE-ECDSA-AES128-SHA256:ECDHE-RSA-AES128-SHA:ECDHE-ECDSA-AES128-SHA:ECDHE-RSA-AES256-SHA384:ECDHE-ECDSA-AES256-SHA384:ECDHE-RSA-AES256-SHA:ECDHE-ECDSA-AES256-SHA:DHE-RSA-AES128-SHA256:DHE-RSA-AES128-SHA:DHE-DSS-AES128-SHA256:DHE-RSA-AES256-SHA256:DHE-DSS-AES256-SHA:DHE-RSA-AES256-SHA:AES128-GCM-SHA256:AES256-GCM-SHA384:AES128-SHA256:AES256-SHA256:AES128-SHA:AES256-SHA:AES:CAMELLIA:DES-CBC3-SHA:!aNULL:!eNULL:!EXPORT:!DES:!RC4:!MD5:!PSK:!aECDH:!EDH-DSS-DES-CBC3-SHA:!EDH-RSA-DES-CBC3-SHA:!KRB5-DES-CBC3-SHA';
	ssl_dhparam                     /etc/ssl/certs/dhparam.pem;
	ssl_session_timeout             1d;
	ssl_session_cache               shared:SSL:50m;
	ssl_stapling                    on;
	ssl_stapling_verify             on;

	# handle letsencrypt domain validation
	location ~ /.well-known {
		allow all;
	}

	# handle all requests...
	location / {

	}
}
Generate SSL Keys
Validate the configuration, and when it passes reload Nginx. You can then generate an SSL key with letencrypt using the --webroot method. With this method you need to pass your web root with “-w /path/to/your/webroot” and each domain you want an SSL for with “-d www.example.com -d example.com -d images.example.com“, and so on. The first time you run Let’s Encrypt you will need to accept some terms, enter your email, etc, but subsequent runs won’t ask for this.
# validate nginx configuration
nginx -t
# reload nginx configuration
service nginx reload
# generate SSL keys
letsencrypt certonly --webroot -w /var/www/www.example.com/html/ -d www.example.com
Add Certificate and Key to Nginx
Once the keys have generated, you will need to add the certificate and key to your Nginx configuration. Edit the server block and add the following – you may need to change the path for the letsencrypt location on your system. Don’t move them since you will need to be able to renew them every 90 days.
# ssl certs from letsencrypt
ssl_certificate /etc/letsencrypt/live/www.example.com/fullchain.pem;
ssl_certificate_key /etc/letsencrypt/live/www.example.com/privkey.pem;
Load Site Over SSL
Validate the Nginx configuration again, then reload the service. Once it is up, you can use curl to validate that it is serving requests over SSL.
# validate nginx configuration
nginx -t
# reload nginx configuration
service nginx reload
# see if you can load your site over SSL
curl -s https://www.example.com
If you have trouble validating your domain and get 403 errors and use SELinux, it’s possible that you will need to run the following command to give nginx permission to read the .well-known directory.
chcon -Rt httpd_sys_content_t /var/www/yoursite/.well-known
Auto Renew Certificates
Your certificate will expire every 90 days so it’s easiest to set up a cron job to automatically check for soon to expire certificates once per day so they can be renewed – this is why we don’t want to move the certs out of the /etc/letsencrypt/live/... directory. You may need to reload nginx as well if the certificate is updated but this should generally be transparent to clients. Edit your crontab by running crontab -e and adding the following to check for updates at 1AM.
# LetsEncrypt Renewals
0 1 * * * letsencrypt renew >/dev/null 2>&1 && service nginx reload
Note that your certificates will only be renewed if they are close to expiration, otherwise the system will skip it and continue using the currently installed cert. You want to update at least weekly although daily is prefered to make sure you everything is up to date.
[root@www ~]# letsencrypt renew
-------------------------------------------------------------------------------
Processing /etc/letsencrypt/renewal/justinsilver.com.conf
-------------------------------------------------------------------------------
Cert not yet due for renewal

The following certs are not due for renewal yet:
  /etc/letsencrypt/live/justinsilver.com/fullchain.pem (skipped)
The post Letsencrypt: Free SSL Certificates for NGINX appeared first on Justin Silver.
]]>The post Dynamically Update /etc/hosts from NGINX appeared first on Justin Silver.
]]>I wanted to guarantee that requests coming from one of my servers going to a domain they host are routed to localhost. The solution I arrived at was to generate a list of domains hosted under NGINX virtual hosts and dynamically updates /etc/hosts, so go do this I wrote a bash script. This script can then be called via cron (or other scripts scheduled in cron or otherwise) to concatenate to the actual hosts file.
Setup Configuration
First we need to create a directory to hold the custom configuration files called /etc/hosts.d/ and then we want to make a backup of our existing /etc/hosts file to use as the base, “main” configuration for our script. The files that will be appended to the main file will be in the hosts.d directory and end with the extension *.conf.
# Create a configuration directory for hosts.conf files
mkdir -p /etc/hosts.d/
# Copy the default /etc/hosts file to be our "main" conf file
cp /etc/hosts /etc/hosts.conf
Create Bash Script
Next create a bash script called /usr/local/bin/hosts that checks for custom configuration files and conditionally includes them into the /etc/hosts file. You can schedule this script via cron or call it from other scripts on demand if it’s only necessary to regenerate the file sporadically.
Don’t forget to run chmod +x /usr/local/bin/hosts to make it executable.
#!/bin/bash
#
# Create the /etc/hosts file using a base configuration and dynamic conf files
##################################################################################


HOSTS="/etc/hosts"
MAIN="/etc/hosts.conf"
CONF="/etc/hosts.d/*.conf"

# Test for *.conf files
if ls $CONF 1> /dev/null 2>&1; then
	# Get main and extra conf files
	cat $MAIN $CONF> $HOSTS
else
	# Get main conf file only
	cat $MAIN> $HOSTS
fi
Send Nginx Virtual Hosts to 127.0.0.1
Next we can leverage all the work so far to create a script that gets all the domains for virtual hosts on Nginx and puts them into a file that can then be appended to /etc/hosts. We’ll call it /usr/local/bin/nginx_to_hosts and once again remember to make it executable with chmod +x /usr/local/bin/nginx_to_hosts
#!/bin/bash
#
# Get virtual hosts from Nginx, create custom hosts entries, regenerate hosts file
##################################################################################

# This is where we will save the custom hosts entries
CONF="/etc/hosts.d/nginx_hosts.conf"

# Get a list of all the Nginx virtual host domains
domains=`find /etc/nginx/ -type f -name "*.conf" -print0 | xargs -0 egrep '^(\s|\t)*server_name' | sed -r 's/(.*server_name\s*|;)//g'`

# Set each domain to point to localhost
hosts=$(for domain in $domains; do printf "\n127.0.0.1 $domain"; done)

# Create the custom host file for Nginx domains
printf "#Nginx Virtual Host Domains $hosts\n" > $CONF

# Regenerate /etc/hosts file
/usr/local/bin/hosts
The post Dynamically Update /etc/hosts from NGINX appeared first on Justin Silver.
]]>The post NGINX Reverse Proxy to Legacy Website appeared first on Justin Silver.
]]>NGINX reverse proxies can be a very powerful tool for many reasons and recently came to the rescue as I was at a loss as to how to provide access to a legacy website when launching the new one. The caveat in this case was that the legacy server is, well, old. It has many hard coded values throughout including URLs and only likes to listen on particular hostnames from time to time. Since I did not write this site and do not have access to the source code (it’s a DLL on a Windows box somewhere) I had to come up up with a solution to didn’t involve modifying the code.
Fake the DNS?
The first option I thought of was to just update the /etc/hosts file (or Windows equivalent) to point the domain name to the old server IP address when needed, but this is a bit cumbersome. Comparing data between the new and old systems – presumably the main reason you would want to see the old server – is pretty much out. Faking the DNS is a no go.
NGINX Reverse Proxy
An NGINX reverse proxy takes a request from a front-end NGINX server and passes it on to a back-end server in more traditional setup. In this situation the request is being made to the legacy server IP address and some special parameters are used to rewrite the domain information for redirects, cookies, and page content. We are also checking the port to determine if the request to the legacy server should be made via HTTP or HTTPS.
server {
        # listen on 80 and 443, ssl if the latter
        listen                          80;
        listen                          443 ssl;

        # this is the "new" url for the legacy site
        server_name                     gamma.example.com;

        # ssl config
        ssl                             on;
        ssl_certificate                 /etc/nginx/ssl/example.com.crt;
        ssl_certificate_key             /etc/nginx/ssl/example.com.key;

        # legacy server IP address
        set $legacy_ip 123.123.123.123;

        # proxy over which protocol?
        set $protocol http;
        if ( $server_port = 443 ){
                set $protocol https;
        }

        # pass everything through the proxy
        location / {
                # proxy all requests to the legacy server
                proxy_pass                      $protocol://$legacy_ip;

                # set the Host header on the request
                proxy_set_header                Host "www.example.com";

                # replace redirect strings
                proxy_redirect                  http://www.example.com/ /;
                proxy_redirect                  https://www.example.com/ https://gamma.example.com/;

                # replace cookie domains
                proxy_cookie_domain             'www.example.com' 'gamma.example.com';

                # replace page content
                sub_filter_once off;
                sub_filter                      'www.example.com' 'gamma.example.com';
        }
}
The post NGINX Reverse Proxy to Legacy Website appeared first on Justin Silver.
]]>