The post Fantom Lachesis Full Node RPC appeared first on Justin Silver.
]]>Create an Alpine Linux image to run the lachesis node for the Fantom cryptocurrency.
FROM alpine:latest as build-stage

ARG LACHESIS_VERSION=release/1.0.0-rc.0

ENV GOROOT=/usr/lib/go
ENV GOPATH=/go
ENV PATH=$GOROOT/bin:$GOPATH/bin:/build:$PATH

RUN set -xe; \
  apk add --no-cache --virtual .build-deps \
  # get the build dependencies for go
  git make musl-dev go linux-headers; \
  # install fantom lachesis from github
  mkdir -p ${GOPATH}; cd ${GOPATH}; \
  git clone --single-branch --branch ${LACHESIS_VERSION} https://github.com/Fantom-foundation/go-lachesis.git; \
  cd go-lachesis; \
  make build -j$(nproc); \
  mv build/lachesis /usr/local/bin; \
  rm -rf /go; \
  # remove our build dependencies
  apk del .build-deps;

FROM alpine:latest as lachesis

# copy the binary
COPY --from=build-stage /usr/local/bin/lachesis /usr/local/bin/lachesis

COPY run.sh /usr/local/bin

WORKDIR /root

ENV LACHESIS_PORT=5050
ENV LACHESIS_HTTP=18545
ENV LACHESIS_API=eth,ftm,debug,admin,web3,personal,net,txpool
ENV LACHESIS_VERBOSITY=2

EXPOSE ${LACHESIS_PORT}
EXPOSE ${LACHESIS_HTTP}

VOLUME [ "/root/.lachesis" ]

CMD ["run.sh"]
The run.sh just starts the nodes with the ports you set in the environment.
#!/usr/bin/env sh

set -xe

lachesis \
  --port ${LACHESIS_PORT} \
  --http \
  --http.addr "0.0.0.0" \
  --http.port ${LACHESIS_HTTP} \
  --http.api "${LACHESIS_API}" \
  --nousb \
  --verbosity ${LACHESIS_VERBOSITY}
Use docker-compose to define the TCP/UDP ports to expose as well as a data volume to persist the blockchain data.
version: '3.4'

services:
  lachesis:
    image: doublesharp/fantom-lachesis:latest
    restart: always
    ports:
      - '5050:5050'
      - '5050:5050/udp'
      - '18545:18545'
    volumes:
      - lachesis:/root/.lachesis
    environment:
      LACHESIS_VERBOSITY: 2

volumes:
  lachesis: {}
The post Fantom Lachesis Full Node RPC appeared first on Justin Silver.
]]>The post Alpine Linux PHP + iconv fix appeared first on Justin Silver.
]]>To use PHP with iconv on Alpine Linux – in a Docker container for example – you need to use the preloadable iconv library, which was previously provided with the gnu-libiconv package, but was removed after Alpine v3.13. After recently rebuilding an Alpine image and running a PHP script that required iconv, I saw the following error:
Notice: iconv(): Wrong charset, conversion from `UTF-8' to `UTF-8//IGNORE' is not allowed
To work around it I installed the gnu-libiconv package from the v3.13 repo. For my projects I went ahead and exported the preloadable binary once it was built as well so that I could just COPY it into the image instead of building it – in my case it’s only for Alpine after all.
You can do this by using an Alpine image tag of alpine:3.13 to add gnu-libiconv and compile /usr/lib/preloadable_libiconv.so, then copy it to a volume to save the binary once the container exits – the output folder is called ./out in this example.
% docker run -v $(pwd)/out:/out -it alpine:3.13 \
/bin/sh -c 'apk add --no-cache gnu-libiconv && cp -f /usr/lib/preloadable_libiconv.so /out/preloadable_libiconv.so'

fetch https://dl-cdn.alpinelinux.org/alpine/v3.13/main/x86_64/APKINDEX.tar.gz
fetch https://dl-cdn.alpinelinux.org/alpine/v3.13/community/x86_64/APKINDEX.tar.gz
(1/1) Installing gnu-libiconv (1.15-r3)
Executing busybox-1.32.1-r6.trigger
OK: 8 MiB in 15 packages

% ls -la out/preloadable_libiconv.so
-rw-r--r--  1 justin  staff  1005216 Apr 23 14:32 out/preloadable_libiconv.so
Once you have the prebuilt binary you can use COPY in your Dockerfile to use it without needing to build it.
# copy preloadable_libiconv.so from prebuilt
COPY /rootfs/usr/lib/preloadable_libiconv.so /usr/lib/preloadable_libiconv.so
ENV LD_PRELOAD /usr/lib/preloadable_libiconv.so php
If you prefer to install the older package that includes the preloadable binary in a different Alpine Dockerfile you can specify an older repository in a RUN command, like so:
FROM wordpress:5.7.1-php7.4-fpm-alpine
# ... some config
RUN apk add --no-cache \
    --repository http://dl-cdn.alpinelinux.org/alpine/v3.13/community/ \
    --allow-untrusted \
    gnu-libiconv
ENV LD_PRELOAD /usr/lib/preloadable_libiconv.so php
The post Alpine Linux PHP + iconv fix appeared first on Justin Silver.
]]>The post Fix pkg on FreeNAS 11.2 appeared first on Justin Silver.
]]>I upgraded to FreeNAS 11.2, and then was unable to run pkg with an error about being unable to find the local repo file.
pkg: Repository local load error: access repo file(/var/db/pkg/repo-local.sqlite) failed: No such file or directory
[root@freenas ~]# pkg install ca_root_nss
Updating local repository catalogue...
pkg: Repository local load error: access repo file(/var/db/pkg/repo-local.sqlite) failed: No such file or directory
pkg: file:///usr/ports/packages/meta.txz: No such file or directory
repository local has no meta file, using default settings
pkg: file:///usr/ports/packages/packagesite.txz: No such file or directory
Unable to update repository local
Error updating repositories!
This can be fixed by editing the configuration files in /usr/local/etc/pkg/repos/, setting toggling the “enabled” parameter to “no” for local.conf and to “yes” for FreeBSD.conf.
sed 's/enabled: yes/enabled: no/' /usr/local/etc/pkg/repos/local.conf
sed 's/enabled: no/enabled: yes/' /usr/local/etc/pkg/repos/FreeBSD.conf
You should now be able to install and update using pkg.
The post Fix pkg on FreeNAS 11.2 appeared first on Justin Silver.
]]>The post Docker-CE on CentOS 7 appeared first on Justin Silver.
]]>Install Docker-CE (not just “docker) to get the latest version on CentOS.
yum install -y yum-utils device-mapper-persistent-data lvm2
yum-config-manager --add-repo https://download.docker.com/linux/centos/docker-ce.repo
yum makecache fast
yum install -y docker-ce
chkconfig docker on
service docker start
Update firewalld to allow host/container traffic.
Restart firewalld to pick up the changes.
# trust the docker interface
firewall-cmd --permanent --zone=trusted --change-interface=docker0
# accept IPv4 traffic
firewall-cmd --permanent --direct --add-rule ipv4 filter INPUT 4 -i docker0 -j ACCEPT
# any ports on the host you want to access from the containers (strapi port 1337 here)
firewall-cmd --permanent --zone=trusted --add-port=1337/tcp
firewall-cmd --reload
service docker restart
Create a group named “docker” and add any users that are allowed to create containers.
groupadd docker
# allow users to access docker by adding them to the docker group
# usermod -aG docker $USER
Use an entrypoint file to create an entry in /etc/hosts to point to the host. Requires ping and ip on the machine, on Debian these are found in the apt packages inetutils-ping and iproute.
#!/bin/bash

# fix for linux hosts
HOST_DOMAIN="host.docker.internal"
ping -q -c1 $HOST_DOMAIN > /dev/null 2>&1
if [ $? -ne 0 ]; then
  HOST_IP=$(ip route | awk 'NR==1 {print $3}')
  echo -e "$HOST_IP\t$HOST_DOMAIN" >> /etc/hosts
fi

exec "$@"
The post Docker-CE on CentOS 7 appeared first on Justin Silver.
]]>The post Wildcard SSL Certs: Let’s Encrypt & Cloudflare appeared first on Justin Silver.
]]>My servers have been using free Let’s Encrypt SSL certificates for some time now, but I was really excited to hear about support for wildcard SSL certificates in 2018. Wildcards are now available thus I am now using Let’s Encrypt Wildcard SSL Certificates with Cloudflare DNS-01 challenges from my Jenkins CI/CD server. The wildcard ssl cert is generated manually the first time, afterwards it uses a root user cron job to check for certificate renewals. After the certbot tool is finished with the renewal request it calls a “post hook” script that copies the wildcard SSL certificates (as needed) to the Jenkins home directory. From there they can be deployed via SSH to the servers.
The SSH user does not have root access, rather the wildcard SSL certificates are symlinked from a user account to the Nginx configuration. Nginx is scheduled to gracefully reload approximately 30 minutes after the SSL certificate renewals are processed, therefore new any new certificate will be served shortly after it is generated.
Generate Wildcard SSL Certs
# configuration for cloudflare
CLOUDFLARE_EMAIL="[email protected]"
CLOUDFLARE_API_KEY="put-your-key-here"
DOMAIN="your-domain.com"

# as root configure your cloudflare secrets
mkdir -p /root/.secrets
cat <<CLOUDFLARE_CONFIG > /root/.secrets/cloudflare.ini
dns_cloudflare_email="$CLOUDFLARE_EMAIL"
dns_cloudflare_api_key="$CLOUDFLARE_API_KEY"
CLOUDFLARE_CONFIG

# make sure they are hidden, the api key is more powerful than a password!
chmod 0700 /root/.secrets/
chmod 0400 /root/.secrets/cloudflare.ini

# install pip, upgrade, then install the cloudflare/certbot tool
yum install -y python-pip
pip install --upgrade pip
pip install certbot-dns-cloudflare

# generate a wildcard cert for the domain using a dns challenge
#
# --quiet, suppress output
# --non-interactive, avoid user input
# --agree-tos, agree to tos on first run
# --keep-until-expiring, keep existing certs
# --preferred-challenges, specify to use dns-01 challenge
# --dns-cloudflare, use the cloudflare dns plugin
# --dns-cloudflare-credentials, path to ini config
# -d, domains to generate keys for, you can add additional ones if needed
certbot certonly \
  --quiet \
  --non-interactive \
  --agree-tos \
  --keep-until-expiring \
  --preferred-challenges dns-01 \
  --dns-cloudflare \
  --dns-cloudflare-credentials /root/.secrets/cloudflare.ini \
  -d $DOMAIN,*.$DOMAIN
Ubuntu / Debian
apt-get update -y
apt-get install -y python3-pip
pip install --upgrade acme pip
pip install certbot-dns-cloudflare
Certbot Post Hook for Jenkins
This bash script will be run after certbot renewals are processed to make the SSL certs available to Jenkins for distribution to the servers.
# where we are going to store the SSL certs for deployment
JENKINS_SSL="/home/jenkins/secrets/ssl"
DOMAIN="your-domain.com"

# run this after the certbot renewal to copy keys to jenkins
POST_HOOK_PATH="/usr/local/bin/certbot-post-hook"
cat <<CERTBOT_POST_HOOK > "$POST_HOOK_PATH"
# copy ssl certs and keys
cp /etc/letsencrypt/live/$DOMAIN/fullchain.pem "$JENKINS_SSL/$DOMAIN-fullchain.pem"
cp /etc/letsencrypt/live/$DOMAIN/privkey.pem "$JENKINS_SSL/$DOMAIN-privkey.pem"

# make sure the jenkins user can read them
chown -R jenkins.jenkins "$JENKINS_SSL"
CERTBOT_POST_HOOK

# make post hook executable
chmod +x "$POST_HOOK_PATH"
SSL Certificate Renewals
On the Jenkins server add a crontab entry for the root user to process SSL certificate renewals. Note the path to $POST_HOOK_PATH above is used here, so adjust as needed. The same credentials used to generate the cert will be used here as well, as a result they do not need to be included again.
# process let's encrypt renewals at 3:30am
30 3 * * * /usr/bin/certbot renew --quiet --post-hook /usr/local/bin/certbot-post-hook > /dev/null 2>&1
Certbot Post Hook for Jenkins
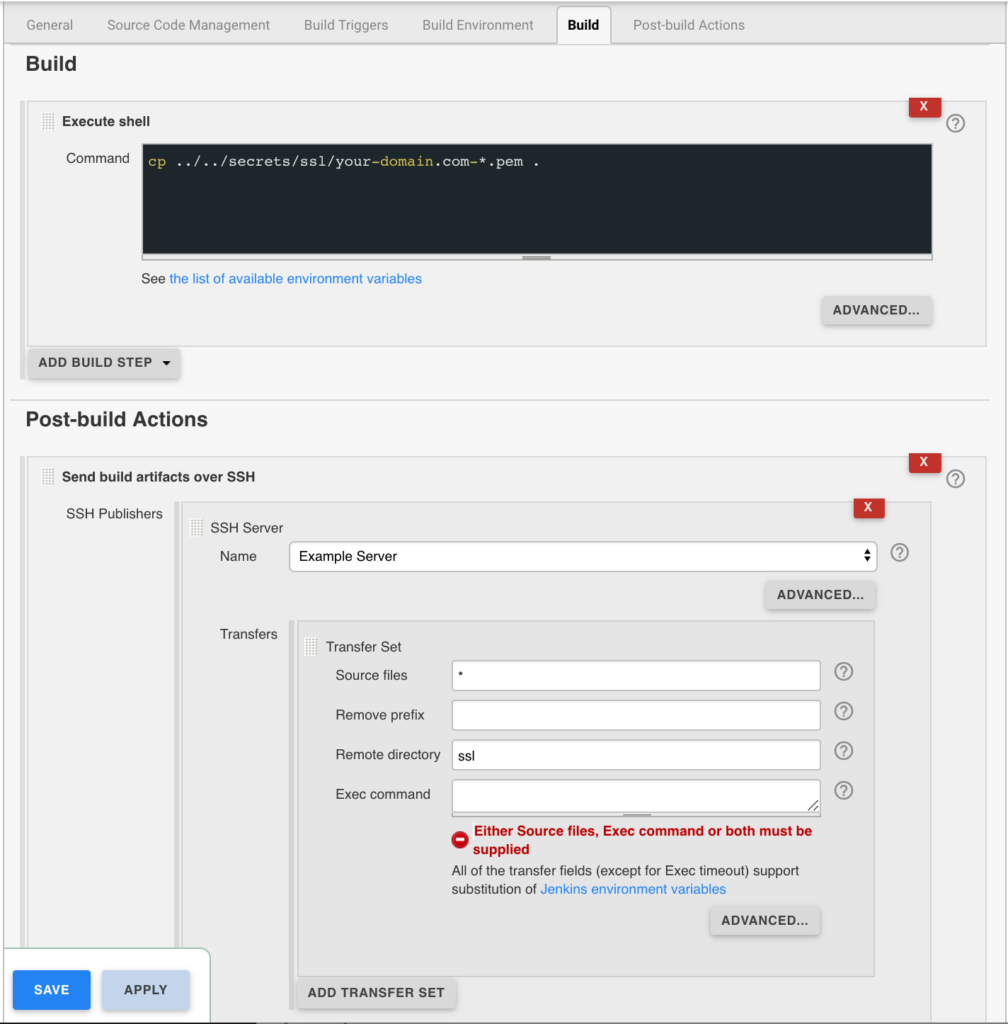
Jenkins is used to handle the SSL certificate deployment to the app servers because it is already set up to deploy files to my servers via SSH. First the required certificates are copied to the workspace, then uploaded using an SSH transfer set to each server. These certificates are then symlinked by the root user to the Nginx configuration for user. A cron job on each app server gracefully restarts nginx nightly to pick up any new certificates.
In the example below the certificates end up in a user home directory like so /home/username/ssl/your-domain.com-fullchain.pem therefore you will need to adjust for your username and domain.
Gracefully Reload Nginx
Pick up new certificates from renewals by gracefully reloading Nginx via a root cron job due to Nginx not seeing the change otherwise.
# reload nginx gracefully at 4:00am
0 4 * * * /usr/sbin/service nginx reload
The post Wildcard SSL Certs: Let’s Encrypt & Cloudflare appeared first on Justin Silver.
]]>The post Install ClamAV + Maldet on CentOS 7 appeared first on Justin Silver.
]]>A quick guide for installing ClamAV and Maldet on CentOS 7 for malware scanning and quarantining.
Install ClamAV and Maldet
Using the ClamAV malware library will speed up the scans performed by Maldet.
You will need to install Maldet from source, which can be downloaded from rfxn.net.
Use the sed commands below to edit values in the /usr/local/maldetect/conf.maldet configuration file.
email_alert="1": Send notifications via email when cron job runsemail_addr="YOUR_EMAIL@HOSTNAME": The email address notifications should be send toemail_subj="Malware alerts for $HOSTNAME - $(date +%Y-%m-%d)": The email subject for notificationsquarantine_hits="1": Move the malware to quarantine.quarantine_clean="1": Delete any malware detected.
#!/bin/bash

# make sure the MALDET_EMAIL is set
if [[ -z $MALDET_EMAIL ]]; then
  read -e -p "Please enter a notification email: " MALDET_EMAIL
fi
if [[ -z $MALDET_EMAIL ]]; then
  exit 0
fi

yum install -y epel-release wget perl
yum install -y clamav

cd /usr/local/src
curl -s http://www.rfxn.com/downloads/maldetect-current.tar.gz -o maldetect-current.tar.gz
tar -xzf maldetect-current.tar.gz
cd maldetect-*
./install.sh
maldet --update-sigs --update-ver

sed -i "s|[email protected]|${MALDET_EMAIL}|" /usr/local/maldetect/conf.maldet
sed -i 's|^scan_clamscan="0"|scan_clamscan="1"|' /usr/local/maldetect/conf.maldet
sed -i 's|^email_alert="0"|email_alert="1"|' /usr/local/maldetect/conf.maldet
sed -i 's|^quarantine_hits="0"|quarantine_hits="1"|' /usr/local/maldetect/conf.maldet
sed -i 's|^quarantine_clean="0"|quarantine_clean="1"|' /usr/local/maldetect/conf.maldet
# add email subject if it doesn't exist
grep -q email_subj /usr/local/maldetect/conf.maldet || echo 'email_subj="Malware alerts for $HOSTNAME - $(date +%Y-%m-%d)"' >> /usr/local/maldetect/conf.maldet
Your system should now perform a daily scan via cron job. You can also scan manually from the command line and specifying the directory to check for malware – or you can use root to scan the entire filesystem.
maldet --scan-all /path/to/scan
The post Install ClamAV + Maldet on CentOS 7 appeared first on Justin Silver.
]]>The post Node.js + PM2 + NGINX + Redis on CentOS 7 appeared first on Justin Silver.
]]>This is a quick setup guide for the application stack I have been using recently. Most of my latest work has been a throwback to the first server-side programming I did in the 90’s – javascript – except this time it’s Node.js instead of Netscape Communication Server. In this setup PM2 is used to manage the Node process running as an arbitrary user, running on an unprivileged port. This means that the application can be restarted without root credentials. The front-end is served by NGINX and it does need to be started as root because it runs on the privileged ports 80 and 443 in this use case. It also gives us a lot of the built in features that Nginx gives you on the front end, like serving all your content over SSL – for free using Let’s Encrypt event. My caching needs are provided by Redis.
Here is the setup – run as root or use sudo.
Firewalld
Enable the firewalld service and only allow http/s traffic to the server – in addition to the default of just ssh.
#!/bin/bash

# enable on book
systemctl enable firewalld

# (re)start the service
(service firewalld status > /dev/null && service firewalld restart) || service firewalld start

# add the http and http services and reload
firewall-cmd --permanent --zone=public --add-service=http
firewall-cmd --permanent --zone=public --add-service=https
firewall-cmd --reload
Letsencrypt
Use Letsencrypt for free SSL certificates.
yum -y install letsencrypt
openssl dhparam -out /etc/ssl/certs/dhparam.pem 2048
Yum Cron
#!/bin/bash

# make sure the YUM_CRON_EMAIL is set
if [[ -z $YUM_CRON_EMAIL ]]; then
  echo "You must specify an email using \$YUM_CRON_EMAIL";
else
  # install and enable, plus patch for bug fixing
  yum -y install yum-cron patch
  chkconfig yum-cron on

  # configure via sed replacements
  sed -i "s|^email_to = root|email_to = ${YUM_CRON_EMAIL}|" /etc/yum/yum-cron.conf
  sed -i 's|^update_messages = no|update_messages = yes|' /etc/yum/yum-cron.conf
  sed -i 's|^download_updates = no|download_updates = yes|' /etc/yum/yum-cron.conf
  sed -i 's|^apply_updates = no|apply_updates = yes|' /etc/yum/yum-cron.conf
  sed -i 's|^emit_via = stdio|emit_via = email|' /etc/yum/yum-cron.conf

  sed -i "s|^email_to = root|email_to = ${YUM_CRON_EMAIL}|" /etc/yum/yum-cron-hourly.conf
  sed -i 's|^update_cmd = default|update_cmd = security|' /etc/yum/yum-cron-hourly.conf
  sed -i 's|^update_messages = no|update_messages = yes|' /etc/yum/yum-cron-hourly.conf
  sed -i 's|^download_updates = no|download_updates = yes|' /etc/yum/yum-cron-hourly.conf
  sed -i 's|^apply_updates = no|apply_updates = yes|' /etc/yum/yum-cron-hourly.conf
  sed -i 's|^emit_via = stdio|emit_via = email|' /etc/yum/yum-cron-hourly.conf

  egrep '^email_to|^update_messages|^download_updates|^apply_updates|^emit_via' /etc/yum/yum-cron.conf
  egrep '^email_to|^update_cmd|^update_messages|^download_updates|^apply_updates|^emit_via' /etc/yum/yum-cron-hourly.conf

  # fix bug in yum-cron nightly updates
  if [[ $(grep -q "# success, dependencies resolved" /usr/sbin/yum-cron) -ne 0 ]]; then
    patch /usr/sbin/yum-cron <<PATCHFILE
--- yum-cron.orig 2016-10-23 19:24:57.099859931 +0000
+++ yum-cron  2016-10-23 19:27:58.048784006 +0000
@@ -504,7 +504,13 @@
     except yum.Errors.RepoError, e:
       self.emitCheckFailed("%s" %(e,))
       sys.exit()
-        if res != 2:
+        if res == 0:
+            # success, empty transaction
+            sys.exit(0)
+        elif res == 2:
+            # success, dependencies resolved
+            pass
+        else:
       self.emitCheckFailed("Failed to build transaction: %s" %(str.join("\n", resmsg),))
       sys.exit(1)
PATCHFILE
  fi
  # (re)start the yum-cron service
  (service yum-cron status > /dev/null && service yum-cron restart) || service yum-cron start
fi
Install NGINX
We are going to use the “mainline” repo to get HTTP2 support. I like to create a conf file in “sites-available” that is linked to “sites-enabled” so I can disable things easily – this is enabled by adding a file under /etc/nginx/conf.d.
#!/bin/bash

# import src utility
if [[ -z $(type -t src) ]]; then
  source <(curl -sL https://www.doublesharp.com/src)
fi

src osname
src osversion

cat <<REPO > /etc/yum.repos.d/nginx.repo
[nginx]
name=nginx repo
# default repo
#baseurl=http://nginx.org/packages/$(osname)/$(osversion)/\$basearch/
# mainline "dev" repo for http2 support
baseurl=http://nginx.org/packages/mainline/$(osname)/$(osversion)/\$basearch/
gpgcheck=0
enabled=1
REPO

#install nginx
yum install -y nginx

# turn on for reboots
systemctl enable nginx

mkdir -p /etc/nginx/includes
mkdir -p /etc/nginx/sites-enabled
mkdir -p /etc/nginx/sites-available
mkdir -p /etc/nginx/streams-enabled
mkdir -p /etc/nginx/streams-available

# use a conf file to include our sites-enabled conf files
cat <<SITESENABLED > /etc/nginx/includes/sites-enabled.conf
include                 /etc/nginx/sites-enabled/*.conf;
SITESENABLED

[[ -f "/etc/nginx/conf.d/_.sites-enabled.conf" ]] || ln -s /etc/nginx/includes/sites-enabled.conf /etc/nginx/conf.d/_.sites-enabled.conf

# enable httpd in selinux
semanage permissive -a httpd_t

cat <<NGINX_CONF > /etc/nginx/nginx.conf
user                    nginx;
worker_processes        auto;

error_log               /var/log/nginx/error.log warn;
pid                     /var/run/nginx.pid;

worker_rlimit_nofile    100000;

events {
  # determines how much clients will be served per worker
  # max clients = worker_connections * worker_processes
  # max clients is also limited by the number of socket connections available on the system (~64k)
  worker_connections      100000;

  # optmized to serve many clients with each thread, essential for linux
  use                     epoll;

  # accept as many connections as possible, may flood worker connections if set too low
  multi_accept on;
}

# web servers / virtual hosts
http {
  include                 /etc/nginx/mime.types;
  default_type            application/octet-stream;

  log_format              main    '\$remote_addr - \$remote_user [\$time_local] "\$request" '
                                  '\$status \$body_bytes_sent "\$http_referer" '
                                  '"\$http_user_agent" "\$http_x_forwarded_for"';

  access_log              /var/log/nginx/access.log combined flush=1m buffer=128k;

  # cache informations about FDs, frequently accessed files
  # can boost performance, but you need to test those values
  open_file_cache         max=200000 inactive=20s;
  open_file_cache_valid   30s;
  open_file_cache_min_uses 2;
  open_file_cache_errors  on;

  # send headers in one peace, its better then sending them one by one
  tcp_nopush              on;

  # don't buffer data sent, good for small data bursts in real time
  tcp_nodelay             on;

  # server will close connection after this time
  keepalive_timeout       30;

  # allow the server to close connection on non responding client, this will free up memory
  reset_timedout_connection on;

  # request timed out -- default 60
  client_body_timeout     10;

  # if client stop responding, free up memory -- default 60
  send_timeout            2;

  # reduce the data that needs to be sent over network
  gzip                    on;
  gzip_min_length         10240;
  gzip_proxied            expired no-cache no-store private auth;
  gzip_types              text/plain text/css text/xml text/javascript application/x-javascript application/xml;
  gzip_disable            "MSIE [1-6]\.";

  proxy_buffer_size       128k;
  proxy_buffers           64 256k;
  proxy_busy_buffers_size 256k;
  proxy_ignore_client_abort on;

  include                 /etc/nginx/conf.d/*.conf;
}

# load balancer streams
stream {
  include                 /etc/nginx/streams-enabled/*.conf;
}
NGINX_CONF


# create a virtual server conf file that is in sites-available
cat <<NGINX_HOST > /etc/nginx/sites-available/myapp.conf
upstream myapp {
        # our app will be on localhost port 3000, but you can change this here
        server                  127.0.0.1:3000 fail_timeout=0;
}

server {
        listen                  80;
        server_name             myapp.example.com;

        location / {
                proxy_set_header        Host \$host:\$server_port;
                proxy_set_header        X-Real-IP \$remote_addr;
                proxy_set_header        X-Forwarded-For \$proxy_add_x_forwarded_for;
                proxy_set_header        X-Forwarded-Proto \$scheme;

                proxy_pass              http://myapp;
        }
}
NGINX_HOST

# link this conf to sites-enabled. it's important to use the full path
#ln -s /etc/nginx/sites-available/myapp.conf /etc/nginx/sites-enabled/myapp.conf

nginx -t && (service nginx status > /dev/null && service nginx restart)
Install Redis
To install Redis with yum, first you need to install EPEL. Once the installed, you will have access to the repository containing the Redis install.
#!/bin/bash

# install the EPEL repo to access Redis
yum install -y epel-release
yum install -y redis

# fix redis background saves on low memory
sysctl vm.overcommit_memory=1 && cat <<SYSCTL_MEM > /etc/sysctl.d/88-vm.overcommit_memory.conf
vm.overcommit_memory = 1
SYSCTL_MEM

# increase max connections
sysctl -w net.core.somaxconn=65535 && cat <<SYSCTL_CONN > /etc/sysctl.d/88-net.core.somaxconn.conf
net.core.somaxconn = 65535
SYSCTL_CONN

sysctl -w fs.file-max=100000 && cat <<SYSCTL_FILEMAX > /etc/sysctl.d/88-fs.file-max.conf
fs.file-max = 100000
SYSCTL_FILEMAX

sed -i "s|^tcp-backlog [[:digit:]]\+|tcp-backlog 65535|" /etc/redis.conf

# enable redis service on reboot
systemctl enable redis

# start service
(service redis status > /dev/null && service redis restart) || service redis start
Install Node.js & PM2
We want to install Node.js and then the PM2 package globally so that it can be accessed by other users.
#!/bin/bash

# make sure the SRC_NODE_VERSION is set
if [[ -z $SRC_NODE_VERSION ]]; then
  echo "You must specify a node version using \$SRC_NODE_VERSION";
else
  # Select node version to install
  curl --silent --location https://rpm.nodesource.com/setup_$SRC_NODE_VERSION.x | bash -

  # install via yum
  yum install -y git gcc-c++ make nodejs
fi

# PM2 - install as global
npm install pm2@latest -g
Create “appuser”
As root, create a new user named “appuser”, or whatever you want your app user to be named. This could even be the default centos@/ec2-user@/etc that many hosts provide.
adduser appuser
passwd appuser
Create PM2 service as “appuser”
Log in as the “appuser” user and create the Node app in your home directory. This directory should be owned by the “appuser”. In this case we assume the server is going to be listening on localhost port 3000, which means we can manage it with pm2 without having root permissions.
mkdir ~/apps
cd /apps

# create your app here, git clone, whatever
# we assume the app is in ~/apps/myapp/server.js

pm2 start ~/apps/myapp/server.js --name=myapp
pm2 status myapp
pm2 restart myapp
The post Node.js + PM2 + NGINX + Redis on CentOS 7 appeared first on Justin Silver.
]]>The post Slate Documentation Server on EC2 Amazon Linux appeared first on Justin Silver.
]]>I was trying to setup the Slate API Documentation Server on an EC2 instance running Amazon Linux. When I fetch the git repository and attempted to install the dependencies using bundle install, it would fail with the following error.
$ bundle install
/usr/share/ruby/vendor_ruby/2.0/rubygems/core_ext/kernel_require.rb:55:in `require': cannot load such file -- io/console (LoadError)
	from /usr/share/ruby/vendor_ruby/2.0/rubygems/core_ext/kernel_require.rb:55:in `require'
	from /usr/local/share/ruby/gems/2.0/gems/bundler-1.12.5/lib/bundler/vendor/thor/lib/thor/shell/basic.rb:2:in `<top (required)>'
	from /usr/share/ruby/vendor_ruby/2.0/rubygems/core_ext/kernel_require.rb:55:in `require'
	from /usr/share/ruby/vendor_ruby/2.0/rubygems/core_ext/kernel_require.rb:55:in `require'
	from /usr/local/share/ruby/gems/2.0/gems/bundler-1.12.5/lib/bundler/vendor/thor/lib/thor/shell/color.rb:1:in `<top (required)>'
	from /usr/local/share/ruby/gems/2.0/gems/bundler-1.12.5/lib/bundler/vendor/thor/lib/thor/shell.rb:17:in `shell'
	from /usr/local/share/ruby/gems/2.0/gems/bundler-1.12.5/lib/bundler/ui/shell.rb:15:in `initialize'
	from /usr/local/share/ruby/gems/2.0/gems/bundler-1.12.5/lib/bundler/cli.rb:13:in `new'
	from /usr/local/share/ruby/gems/2.0/gems/bundler-1.12.5/lib/bundler/cli.rb:13:in `rescue in start'
	from /usr/local/share/ruby/gems/2.0/gems/bundler-1.12.5/lib/bundler/cli.rb:11:in `start'
	from /usr/local/share/ruby/gems/2.0/gems/bundler-1.12.5/exe/bundle:27:in `block in <top (required)>'
	from /usr/local/share/ruby/gems/2.0/gems/bundler-1.12.5/lib/bundler/friendly_errors.rb:98:in `with_friendly_errors'
	from /usr/local/share/ruby/gems/2.0/gems/bundler-1.12.5/exe/bundle:19:in `<top (required)>'
	from /usr/local/bin/bundle:23:in `load'
	from /usr/local/bin/bundle:23:in `<main>'
I was able to work around this by removing the system installed version of ruby and replace it with an rvm, and newer, version.
sudo yum update
cd ~
gpg2 --keyserver hkp://keys.gnupg.net --recv-keys 409B6B1796C275462A1703113804BB82D39DC0E3
wget https://raw.github.com/wayneeseguin/rvm/master/binscripts/rvm-installer
bash -s stable < rvm-installer
source /home/ec2-user/.rvm/scripts/rvm
rvm requirements
sudo yum erase ruby
rvm install ruby
rvm use ruby --default
rvm rubygems current
Once you have replaced the version of ruby on the system, you will need to install bundler and then the dependencies.
gem install bundler
bundle install
The post Slate Documentation Server on EC2 Amazon Linux appeared first on Justin Silver.
]]>The post Monitor IPSec VPN Tunnel appeared first on Justin Silver.
]]>I have an IPSec Tunnel built from one of my servers to an integration partner which is used to secure our web service calls. It uses a IPSec, OpenSwan, and Pluto to maintain a private network. Unfortunately I was seeing that this tunnel would for some reason collapse, requiring me to manually restart IPSec to rebuild the tunnel and re-enable our web services. This usually seemed to happen around 1am so despite many, many (MANY), emails, I wouldn’t actually fix it for several hours.
To aid in the process of stopping and then restarting the services, I wrote a bash script to handle all the comments. I only have one IPSec interface of ipsec0 which is used in my script. Make sure to chmod +x /usr/local/bin/ipsec-restart.sh.
#!/bin/bash

# get the -i or --interface argument value
while [[ $# > 1 ]]
do
key="$1"
case $key in
    -i|--interface)
    INTERFACE="$2"
    shift # past argument
    ;;
esac
shift # past argument or value
done

# show an error if the interface isn't specified
if [ -z "$INTERFACE" ]
  then
    echo "You must provide an interface argument with -i or --interface"
    exit
fi

# restart ipsec, then bring up the IPSec tunnel
/sbin/service ipsec restart
/usr/sbin/ipsec whack --shutdown
/usr/sbin/ipsec setup --restart
/usr/sbin/ipsec auto --add $INTERFACE
sleep 5
/usr/sbin/ipsec auto --up $INTERFACE
Next step is to have the system automatically run the script when the tunnel goes down. Using NetCat (nc) is a good option for this – it can actually do a crazy number of things I won’t go into here. Basically we want to test the hostname of our service to see if we can open port 80, and if not, run the restart script. Passing in -w 10 tells it to wait 10 seconds to time out. By redirecting the output we can have this show nothing if it connects successfully, but email the address specified in the MAILTO with the ipsec-restart.sh output. Run this script every 5 minutes (and as root) by adding it to crontab while logged in as root, or using sudo crontab -e to edit.
# Monitor VPN
MAILTO="[email protected]"
*/5 * * * * ( nc -w 10 -z hostname.webservice.com 80 ) >& /dev/null || /usr/local/bin/ipsec-restart.sh -i ipsec0
The post Monitor IPSec VPN Tunnel appeared first on Justin Silver.
]]>The post Install logtail on CentOS appeared first on Justin Silver.
]]>The developer of logtail has not made the repository available via yum for quick installation. Even if you don’t want to access logtail from the command line, it is still used by several other scripts and plugins, such as the Nginx plugins for Munin. The easiest way to do this is to install logcheck, which includes logtail. You can use rpm to handle the install, but you will need to install some dependencies first.
Install Dependencies
Use rpm to install the logtail dependencies in the order below – liblockfile, lockfile-progs, perl-mime-construct, and perl-Proc-WaitState. If you already have one of these packages rpm should let you know when you try to re-install it.
liblockfile
rpm -ivh ftp://ftp.univie.ac.at/systems/linux/fedora/epel/5/i386/liblockfile-1.08-9.el5.i386.rpm
Retrieving ftp://ftp.univie.ac.at/systems/linux/fedora/epel/5/i386/liblockfile-1.08-9.el5.i386.rpm
Preparing...                ########################################### [100%]
   1:liblockfile            ########################################### [100%]
liblockfilewas successfully installed.
lockfile-progs
rpm -ivh ftp://ftp.univie.ac.at/systems/linux/fedora/epel/5/i386/lockfile-progs-0.1.15-2.el5.i386.rpm
Retrieving ftp://ftp.univie.ac.at/systems/linux/fedora/epel/5/i386/lockfile-progs-0.1.15-2.el5.i386.rpm
Preparing...                ########################################### [100%]
   1:lockfile-progs         ########################################### [100%]
lockfile-progswas successfully installed.
perl-mime-construct
rpm -ivh ftp://ftp.univie.ac.at/systems/linux/fedora/epel/5/i386/perl-mime-construct-1.11-2.el5.noarch.rpm
Retrieving ftp://ftp.univie.ac.at/systems/linux/fedora/epel/5/i386/perl-mime-construct-1.11-2.el5.noarch.rpm
Preparing...                ########################################### [100%]
	package perl-mime-construct-1.11-2.el5.noarch is already installed
perl-mime-constructwas already installed.
perl-Proc-WaitStat
rpm -ivh ftp://ftp.univie.ac.at/systems/linux/fedora/epel/5/i386/perl-Proc-WaitStat-1.00-2.el5.noarch.rpm
Retrieving ftp://ftp.univie.ac.at/systems/linux/fedora/epel/5/i386/perl-Proc-WaitStat-1.00-2.el5.noarch.rpm
Preparing...                ########################################### [100%]
	package perl-Proc-WaitStat-1.00-2.el5.noarch is already installed
perl-Proc-WaitStatwas already installed.
Install logcheck
Now we’re ready to install logcheck. Use the following rpm to wrap up the install.
rpm -ivh ftp://ftp.univie.ac.at/systems/linux/fedora/epel/5/i386/logcheck-1.3.13-6.el5.noarch.rpm
Retrieving ftp://ftp.univie.ac.at/systems/linux/fedora/epel/5/i386/logcheck-1.3.13-6.el5.noarch.rpm
Preparing...                ########################################### [100%]
   1:logcheck               ########################################### [100%]
Run logtail
Now that logcheck is installed, you should be able to call logtail from the command line, or other scripts and plugins.
[root@web1 ~]# logtail
No logfile to read. Use -f [LOGFILE].
The post Install logtail on CentOS appeared first on Justin Silver.
]]>