The post Wildcard SSL Certs: Let’s Encrypt & Cloudflare appeared first on Justin Silver.
]]>My servers have been using free Let’s Encrypt SSL certificates for some time now, but I was really excited to hear about support for wildcard SSL certificates in 2018. Wildcards are now available thus I am now using Let’s Encrypt Wildcard SSL Certificates with Cloudflare DNS-01 challenges from my Jenkins CI/CD server. The wildcard ssl cert is generated manually the first time, afterwards it uses a root user cron job to check for certificate renewals. After the certbot tool is finished with the renewal request it calls a “post hook” script that copies the wildcard SSL certificates (as needed) to the Jenkins home directory. From there they can be deployed via SSH to the servers.
The SSH user does not have root access, rather the wildcard SSL certificates are symlinked from a user account to the Nginx configuration. Nginx is scheduled to gracefully reload approximately 30 minutes after the SSL certificate renewals are processed, therefore new any new certificate will be served shortly after it is generated.
Generate Wildcard SSL Certs
# configuration for cloudflare
CLOUDFLARE_EMAIL="[email protected]"
CLOUDFLARE_API_KEY="put-your-key-here"
DOMAIN="your-domain.com"

# as root configure your cloudflare secrets
mkdir -p /root/.secrets
cat <<CLOUDFLARE_CONFIG > /root/.secrets/cloudflare.ini
dns_cloudflare_email="$CLOUDFLARE_EMAIL"
dns_cloudflare_api_key="$CLOUDFLARE_API_KEY"
CLOUDFLARE_CONFIG

# make sure they are hidden, the api key is more powerful than a password!
chmod 0700 /root/.secrets/
chmod 0400 /root/.secrets/cloudflare.ini

# install pip, upgrade, then install the cloudflare/certbot tool
yum install -y python-pip
pip install --upgrade pip
pip install certbot-dns-cloudflare

# generate a wildcard cert for the domain using a dns challenge
#
# --quiet, suppress output
# --non-interactive, avoid user input
# --agree-tos, agree to tos on first run
# --keep-until-expiring, keep existing certs
# --preferred-challenges, specify to use dns-01 challenge
# --dns-cloudflare, use the cloudflare dns plugin
# --dns-cloudflare-credentials, path to ini config
# -d, domains to generate keys for, you can add additional ones if needed
certbot certonly \
  --quiet \
  --non-interactive \
  --agree-tos \
  --keep-until-expiring \
  --preferred-challenges dns-01 \
  --dns-cloudflare \
  --dns-cloudflare-credentials /root/.secrets/cloudflare.ini \
  -d $DOMAIN,*.$DOMAIN
Ubuntu / Debian
apt-get update -y
apt-get install -y python3-pip
pip install --upgrade acme pip
pip install certbot-dns-cloudflare
Certbot Post Hook for Jenkins
This bash script will be run after certbot renewals are processed to make the SSL certs available to Jenkins for distribution to the servers.
# where we are going to store the SSL certs for deployment
JENKINS_SSL="/home/jenkins/secrets/ssl"
DOMAIN="your-domain.com"

# run this after the certbot renewal to copy keys to jenkins
POST_HOOK_PATH="/usr/local/bin/certbot-post-hook"
cat <<CERTBOT_POST_HOOK > "$POST_HOOK_PATH"
# copy ssl certs and keys
cp /etc/letsencrypt/live/$DOMAIN/fullchain.pem "$JENKINS_SSL/$DOMAIN-fullchain.pem"
cp /etc/letsencrypt/live/$DOMAIN/privkey.pem "$JENKINS_SSL/$DOMAIN-privkey.pem"

# make sure the jenkins user can read them
chown -R jenkins.jenkins "$JENKINS_SSL"
CERTBOT_POST_HOOK

# make post hook executable
chmod +x "$POST_HOOK_PATH"
SSL Certificate Renewals
On the Jenkins server add a crontab entry for the root user to process SSL certificate renewals. Note the path to $POST_HOOK_PATH above is used here, so adjust as needed. The same credentials used to generate the cert will be used here as well, as a result they do not need to be included again.
# process let's encrypt renewals at 3:30am
30 3 * * * /usr/bin/certbot renew --quiet --post-hook /usr/local/bin/certbot-post-hook > /dev/null 2>&1
Certbot Post Hook for Jenkins
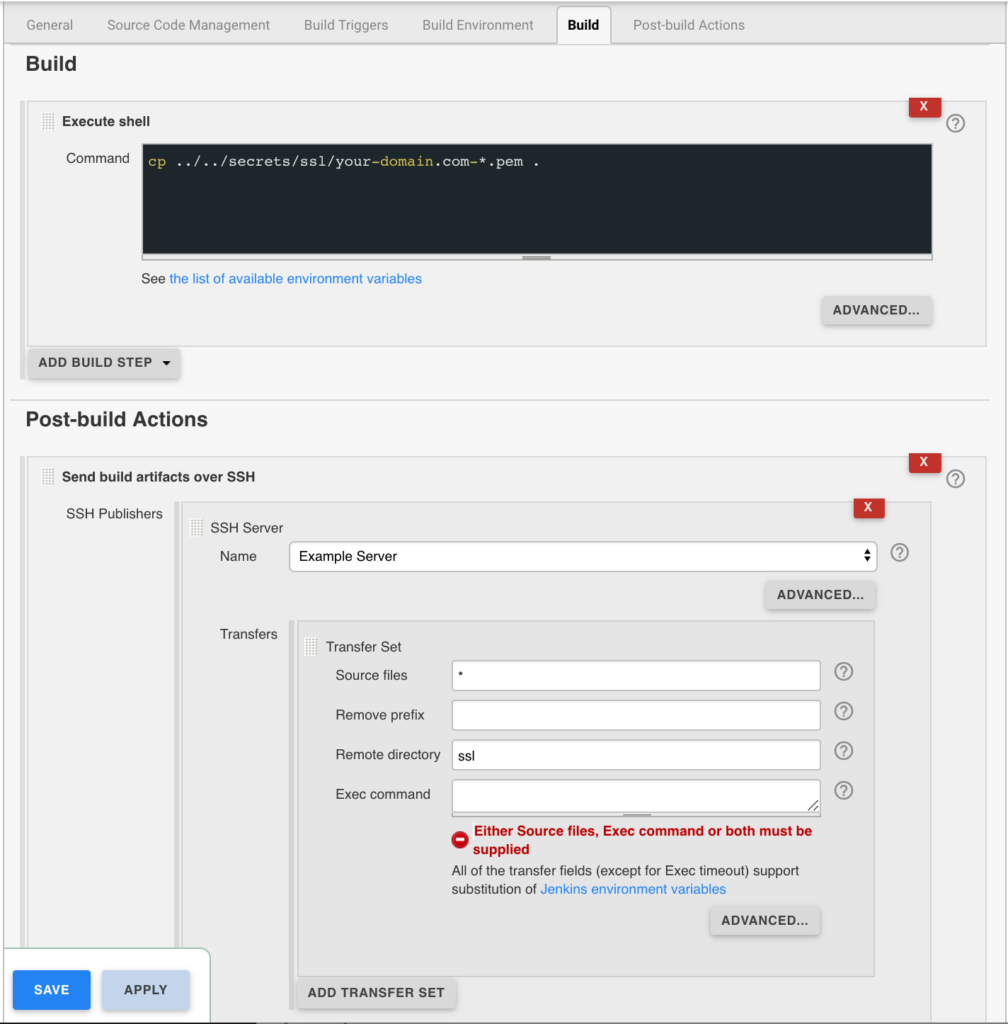
Jenkins is used to handle the SSL certificate deployment to the app servers because it is already set up to deploy files to my servers via SSH. First the required certificates are copied to the workspace, then uploaded using an SSH transfer set to each server. These certificates are then symlinked by the root user to the Nginx configuration for user. A cron job on each app server gracefully restarts nginx nightly to pick up any new certificates.
In the example below the certificates end up in a user home directory like so /home/username/ssl/your-domain.com-fullchain.pem therefore you will need to adjust for your username and domain.
Gracefully Reload Nginx
Pick up new certificates from renewals by gracefully reloading Nginx via a root cron job due to Nginx not seeing the change otherwise.
# reload nginx gracefully at 4:00am
0 4 * * * /usr/sbin/service nginx reload
The post Wildcard SSL Certs: Let’s Encrypt & Cloudflare appeared first on Justin Silver.
]]>The post Letsencrypt: Free SSL Certificates for NGINX appeared first on Justin Silver.
]]>I always wanted all of my sites to run over SSL, but it also didn’t seem worth the expense of buying certificates for all the domains I own. Enter Let’s Encrypt which offers free 90 day SSL certificates. This guide shows how to install and use letsencrypt to generate SSL certificates for NGINX running on CentOS 7, however it should be similar on other supported systems. A bit about Let’s Encrypt from their site:
Let’s Encrypt is a free, automated, and open certificate authority (CA), run for the public’s benefit. Let’s Encrypt is a service provided by the Internet Security Research Group (ISRG).
The key principles behind Let’s Encrypt are:
- Free: Anyone who owns a domain name can use Let’s Encrypt to obtain a trusted certificate at zero cost.
- Automatic: Software running on a web server can interact with Let’s Encrypt to painlessly obtain a certificate, securely configure it for use, and automatically take care of renewal.
- Secure: Let’s Encrypt will serve as a platform for advancing TLS security best practices, both on the CA side and by helping site operators properly secure their servers.
- Transparent: All certificates issued or revoked will be publicly recorded and available for anyone to inspect.
- Open: The automatic issuance and renewal protocol will be published as an open standard that others can adopt.
- Cooperative: Much like the underlying Internet protocols themselves, Let’s Encrypt is a joint effort to benefit the community, beyond the control of any one organization.
Install Letsencrypt
Install letsencrypt with yum. Next generate a strong Diffie-Hellman key – you can specify a different path but you need to change it in the Nginx server block.
yum -y install letsencrypt
openssl dhparam -out /etc/ssl/certs/dhparam.pem 2048
Update Nginx
Edit your Nginx configuration to listen on HTTP and HTTPS, and respond to Let’s Encrypt domain validation requests to /.well-known. Go ahead and add the SSL configuration, but no keys (since they don’t exist yet).
server {
	# Domain validation is on port 80, SSL is served on 443. If available include "http2", otherwise remove it.
	listen 80 443 ssl http2;

	# Hostnames to listen on, you will pass each of these to letsencrypt with "-w www.example.com"
	server_name www.example.com;

	# Your document root, you will pass this path to letsencrypt with "-w /var/www/www.example.com/html/"
	root /var/www/www.example.com/html/;

	# Add SSL Keys here once they are generated

	# Use TLS (so don't use old version of SSL)
	ssl_protocols                   TLSv1 TLSv1.1 TLSv1.2;
	ssl_prefer_server_ciphers       on;
	ssl_ciphers                     'ECDHE-RSA-AES128-GCM-SHA256:ECDHE-ECDSA-AES128-GCM-SHA256:ECDHE-RSA-AES256-GCM-SHA384:ECDHE-ECDSA-AES256-GCM-SHA384:DHE-RSA-AES128-GCM-SHA256:DHE-DSS-AES128-GCM-SHA256:kEDH+AESGCM:ECDHE-RSA-AES128-SHA256:ECDHE-ECDSA-AES128-SHA256:ECDHE-RSA-AES128-SHA:ECDHE-ECDSA-AES128-SHA:ECDHE-RSA-AES256-SHA384:ECDHE-ECDSA-AES256-SHA384:ECDHE-RSA-AES256-SHA:ECDHE-ECDSA-AES256-SHA:DHE-RSA-AES128-SHA256:DHE-RSA-AES128-SHA:DHE-DSS-AES128-SHA256:DHE-RSA-AES256-SHA256:DHE-DSS-AES256-SHA:DHE-RSA-AES256-SHA:AES128-GCM-SHA256:AES256-GCM-SHA384:AES128-SHA256:AES256-SHA256:AES128-SHA:AES256-SHA:AES:CAMELLIA:DES-CBC3-SHA:!aNULL:!eNULL:!EXPORT:!DES:!RC4:!MD5:!PSK:!aECDH:!EDH-DSS-DES-CBC3-SHA:!EDH-RSA-DES-CBC3-SHA:!KRB5-DES-CBC3-SHA';
	ssl_dhparam                     /etc/ssl/certs/dhparam.pem;
	ssl_session_timeout             1d;
	ssl_session_cache               shared:SSL:50m;
	ssl_stapling                    on;
	ssl_stapling_verify             on;

	# handle letsencrypt domain validation
	location ~ /.well-known {
		allow all;
	}

	# handle all requests...
	location / {

	}
}
Generate SSL Keys
Validate the configuration, and when it passes reload Nginx. You can then generate an SSL key with letencrypt using the --webroot method. With this method you need to pass your web root with “-w /path/to/your/webroot” and each domain you want an SSL for with “-d www.example.com -d example.com -d images.example.com“, and so on. The first time you run Let’s Encrypt you will need to accept some terms, enter your email, etc, but subsequent runs won’t ask for this.
# validate nginx configuration
nginx -t
# reload nginx configuration
service nginx reload
# generate SSL keys
letsencrypt certonly --webroot -w /var/www/www.example.com/html/ -d www.example.com
Add Certificate and Key to Nginx
Once the keys have generated, you will need to add the certificate and key to your Nginx configuration. Edit the server block and add the following – you may need to change the path for the letsencrypt location on your system. Don’t move them since you will need to be able to renew them every 90 days.
# ssl certs from letsencrypt
ssl_certificate /etc/letsencrypt/live/www.example.com/fullchain.pem;
ssl_certificate_key /etc/letsencrypt/live/www.example.com/privkey.pem;
Load Site Over SSL
Validate the Nginx configuration again, then reload the service. Once it is up, you can use curl to validate that it is serving requests over SSL.
# validate nginx configuration
nginx -t
# reload nginx configuration
service nginx reload
# see if you can load your site over SSL
curl -s https://www.example.com
If you have trouble validating your domain and get 403 errors and use SELinux, it’s possible that you will need to run the following command to give nginx permission to read the .well-known directory.
chcon -Rt httpd_sys_content_t /var/www/yoursite/.well-known
Auto Renew Certificates
Your certificate will expire every 90 days so it’s easiest to set up a cron job to automatically check for soon to expire certificates once per day so they can be renewed – this is why we don’t want to move the certs out of the /etc/letsencrypt/live/... directory. You may need to reload nginx as well if the certificate is updated but this should generally be transparent to clients. Edit your crontab by running crontab -e and adding the following to check for updates at 1AM.
# LetsEncrypt Renewals
0 1 * * * letsencrypt renew >/dev/null 2>&1 && service nginx reload
Note that your certificates will only be renewed if they are close to expiration, otherwise the system will skip it and continue using the currently installed cert. You want to update at least weekly although daily is prefered to make sure you everything is up to date.
[root@www ~]# letsencrypt renew
-------------------------------------------------------------------------------
Processing /etc/letsencrypt/renewal/justinsilver.com.conf
-------------------------------------------------------------------------------
Cert not yet due for renewal

The following certs are not due for renewal yet:
  /etc/letsencrypt/live/justinsilver.com/fullchain.pem (skipped)
The post Letsencrypt: Free SSL Certificates for NGINX appeared first on Justin Silver.
]]>