The post Wildcard SSL Certs: Let’s Encrypt & Cloudflare appeared first on Justin Silver.
]]>My servers have been using free Let’s Encrypt SSL certificates for some time now, but I was really excited to hear about support for wildcard SSL certificates in 2018. Wildcards are now available thus I am now using Let’s Encrypt Wildcard SSL Certificates with Cloudflare DNS-01 challenges from my Jenkins CI/CD server. The wildcard ssl cert is generated manually the first time, afterwards it uses a root user cron job to check for certificate renewals. After the certbot tool is finished with the renewal request it calls a “post hook” script that copies the wildcard SSL certificates (as needed) to the Jenkins home directory. From there they can be deployed via SSH to the servers.
The SSH user does not have root access, rather the wildcard SSL certificates are symlinked from a user account to the Nginx configuration. Nginx is scheduled to gracefully reload approximately 30 minutes after the SSL certificate renewals are processed, therefore new any new certificate will be served shortly after it is generated.
Generate Wildcard SSL Certs
# configuration for cloudflare
CLOUDFLARE_EMAIL="[email protected]"
CLOUDFLARE_API_KEY="put-your-key-here"
DOMAIN="your-domain.com"

# as root configure your cloudflare secrets
mkdir -p /root/.secrets
cat <<CLOUDFLARE_CONFIG > /root/.secrets/cloudflare.ini
dns_cloudflare_email="$CLOUDFLARE_EMAIL"
dns_cloudflare_api_key="$CLOUDFLARE_API_KEY"
CLOUDFLARE_CONFIG

# make sure they are hidden, the api key is more powerful than a password!
chmod 0700 /root/.secrets/
chmod 0400 /root/.secrets/cloudflare.ini

# install pip, upgrade, then install the cloudflare/certbot tool
yum install -y python-pip
pip install --upgrade pip
pip install certbot-dns-cloudflare

# generate a wildcard cert for the domain using a dns challenge
#
# --quiet, suppress output
# --non-interactive, avoid user input
# --agree-tos, agree to tos on first run
# --keep-until-expiring, keep existing certs
# --preferred-challenges, specify to use dns-01 challenge
# --dns-cloudflare, use the cloudflare dns plugin
# --dns-cloudflare-credentials, path to ini config
# -d, domains to generate keys for, you can add additional ones if needed
certbot certonly \
  --quiet \
  --non-interactive \
  --agree-tos \
  --keep-until-expiring \
  --preferred-challenges dns-01 \
  --dns-cloudflare \
  --dns-cloudflare-credentials /root/.secrets/cloudflare.ini \
  -d $DOMAIN,*.$DOMAIN
Ubuntu / Debian
apt-get update -y
apt-get install -y python3-pip
pip install --upgrade acme pip
pip install certbot-dns-cloudflare
Certbot Post Hook for Jenkins
This bash script will be run after certbot renewals are processed to make the SSL certs available to Jenkins for distribution to the servers.
# where we are going to store the SSL certs for deployment
JENKINS_SSL="/home/jenkins/secrets/ssl"
DOMAIN="your-domain.com"

# run this after the certbot renewal to copy keys to jenkins
POST_HOOK_PATH="/usr/local/bin/certbot-post-hook"
cat <<CERTBOT_POST_HOOK > "$POST_HOOK_PATH"
# copy ssl certs and keys
cp /etc/letsencrypt/live/$DOMAIN/fullchain.pem "$JENKINS_SSL/$DOMAIN-fullchain.pem"
cp /etc/letsencrypt/live/$DOMAIN/privkey.pem "$JENKINS_SSL/$DOMAIN-privkey.pem"

# make sure the jenkins user can read them
chown -R jenkins.jenkins "$JENKINS_SSL"
CERTBOT_POST_HOOK

# make post hook executable
chmod +x "$POST_HOOK_PATH"
SSL Certificate Renewals
On the Jenkins server add a crontab entry for the root user to process SSL certificate renewals. Note the path to $POST_HOOK_PATH above is used here, so adjust as needed. The same credentials used to generate the cert will be used here as well, as a result they do not need to be included again.
# process let's encrypt renewals at 3:30am
30 3 * * * /usr/bin/certbot renew --quiet --post-hook /usr/local/bin/certbot-post-hook > /dev/null 2>&1
Certbot Post Hook for Jenkins
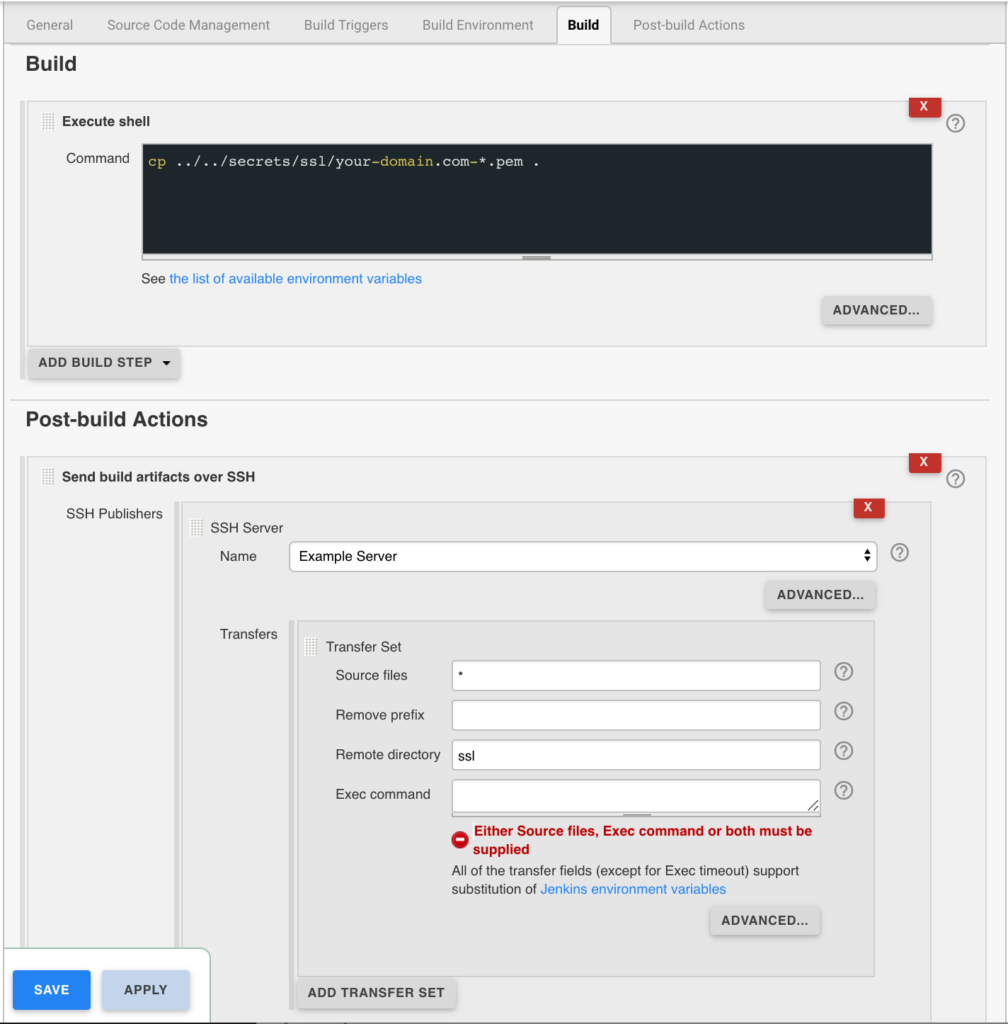
Jenkins is used to handle the SSL certificate deployment to the app servers because it is already set up to deploy files to my servers via SSH. First the required certificates are copied to the workspace, then uploaded using an SSH transfer set to each server. These certificates are then symlinked by the root user to the Nginx configuration for user. A cron job on each app server gracefully restarts nginx nightly to pick up any new certificates.
In the example below the certificates end up in a user home directory like so /home/username/ssl/your-domain.com-fullchain.pem therefore you will need to adjust for your username and domain.
Gracefully Reload Nginx
Pick up new certificates from renewals by gracefully reloading Nginx via a root cron job due to Nginx not seeing the change otherwise.
# reload nginx gracefully at 4:00am
0 4 * * * /usr/sbin/service nginx reload
The post Wildcard SSL Certs: Let’s Encrypt & Cloudflare appeared first on Justin Silver.
]]>The post Github + Multiple Repository SSH Deploy Keys appeared first on Justin Silver.
]]>I use Jenkins for CD/CI, but was running into the issue of deleted files not being removed from the target server. My solution to this issue was to only use Jenkins to generate the configuration and deployment scripts which are then transferred to the server via SSH. The deployment script updates from Github using a deployment key for that repository specifically, and Github won’t let you use the same key more than once. That means that if you want to have the same user deploying from multiple repositories you will need to be able to specify a specify key for each repository.
Generate SSH Keys
To do this you will first need to generate an SSH key for each of the Github repositories you want to deploy from, named after the repository. So if you have repo1 and repo2 for example, I would name the keys github_repo1 and github_repo2. Run ssh-keygen twice to generate each key, as seen below.
[username@www01 ~]$ ssh-keygen
Generating public/private rsa key pair.
Enter file in which to save the key (/home/username/.ssh/id_rsa): /home/username/.ssh/github_repo1
Enter passphrase (empty for no passphrase):
Enter same passphrase again:
Your identification has been saved in /home/username/.ssh/github_repo1.
Your public key has been saved in /home/username/.ssh/github_repo1.pub.
The key fingerprint is:
0a:15:7c:6c:e5:f7:fa:d2:e6:9e:18:ed:df:b7:e4:7d [email protected]
The key's randomart image is:
+--[ RSA 2048]----+
|     ... ..      |
|      ..+.       |
|      .o  . .    |
|     .     . .   |
|    .   S     .  |
|     . .     o   |
|      .     o... |
|            .==.E|
|            .=*+B|
+-----------------+
Configure Github Deploy Keys
Next we need to get the public part of the SSH key. Use cat to print it to the terminal, then cut and paste the results into Github.
[username@www01 ~]$ cat /home/username/.ssh/github_repo1.pub
ssh-rsa AAAAB3NzaC1yc2EAAAADAQABAAABAQDZtdWXgqtfhibmL5PsEly1Toe35ZfHiBHo+YfHT4pQBp+k7pf9KWhWeUdG0+LrAiYfN9sJb21frSza9uUchJdlDKYuxr0vkiZ9YrdZ0G9yENQYy7lL4lKRDuqa+1DA/bMJfiBIIsdPf+dQb32IUNQ+tzqvmab1Hxm1JzGbRE2ycfExSknEcRuvzuAYM/jKOE+IhLVqGgteUnmKQHBvVoxZQz2p80ZgoVn+lKFi2u7vSnGzJWgH9ffMgWhKLFAGMfRiAMAXX//Qb7XXzbSjubxbJBRkz9Flw4h/Os30UKQ2k4tO+EbYFtWiPXwEDbJB4+iyN5882szXfZdE+nGnuVP/ [email protected]
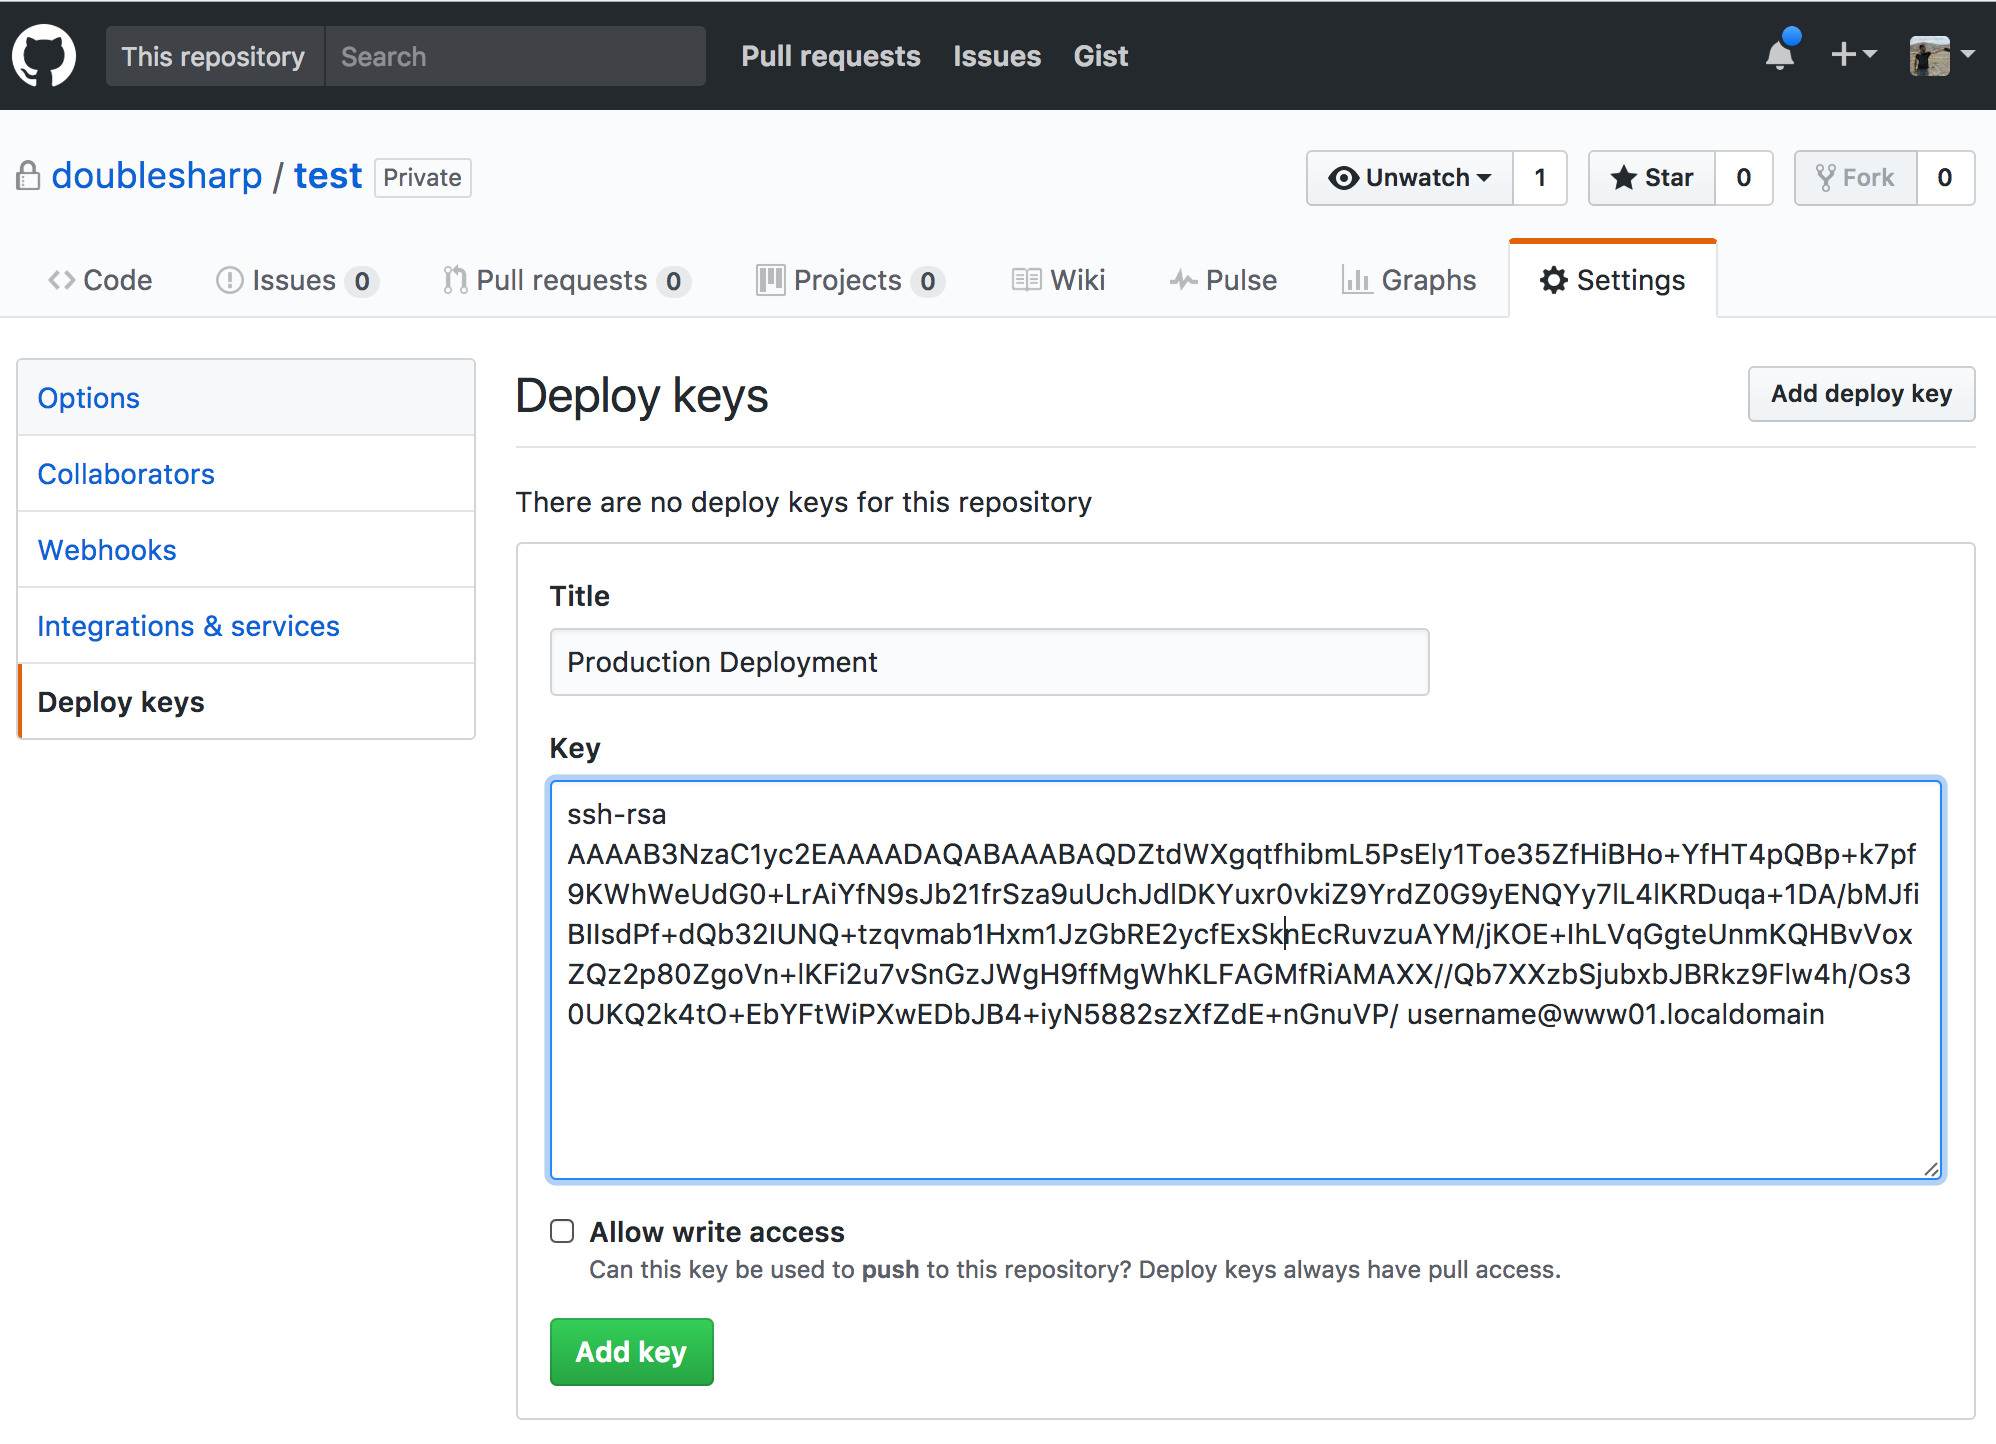
With your public key in hand, visit https://github.com/username/repo1 (adjusting for your username/organization and repository name), and then click “Settings” on the top right followed by “Deploy keys” on the left hand menu. Click the “Add deploy key” button, give your key a name, and then paste in the public key contents, and save by clicking the “Add key” button.
Test Deploy Keys
To test that the key is working use ssh and specify your private key before connecting to Github. It should display your username/organization and repository name in the response before disconnecting.
[username@www01 ~]$ ssh -i /home/username/.ssh/github_repo1 [email protected]
PTY allocation request failed on channel 0
Hi username/repo1! You've successfully authenticated, but GitHub does not provide shell access.
Connection to github.com closed.
Configure SSH Client
Next we need to specify which SSH key to use for each repository using the ~/.ssh/config file. Edit it to create entries for each of the repositories you want to specify a deploy key for.
Host repo1 github.com
Hostname github.com
IdentityFile /home/username/.ssh/github_repo1

Host repo2 github.com
Hostname github.com
IdentityFile /home/username/.ssh/github_repo2
SSH will refuse to use the config file if it has the wrong permissions, so set them to 400.
chmod 400 /home/username/.ssh/config
Clone Git Repository Using Alias
Now we can clone the repository using the SSH alias which will in turn use the correct SSH key. You will still need to specify your username/organization + repository name after the colon. If you want to use a different directory just append it to the end. When you run git pull, or git checkout, etc from within the checkout directory it will now use this SSH alias and correct keys to update the local files.
git clone git@repo1:username/repo1.git
If you want to include this repository in the package.json of a different project (including private ones you have checked out using an alias), make sure to refer to it by the SSH alias as well.
npm i git@repo1:username/repo1.git
{
  "name": "example",
  "dependencies": {
    "repo1": "git@repo1:username/repo1.git"
  }
}
The post Github + Multiple Repository SSH Deploy Keys appeared first on Justin Silver.
]]>The post Install Jenkins as a Service on CentOS 7 appeared first on Justin Silver.
]]>I have previously written about how to Install Jenkins on CentOS as a Service where it was necessary to write your own startup, shutdown, configuration, and init.d scripts. Luckily this is all much easier now as you can install the software directly from a yum repository – you’ll just need to fetch the repo from http://pkg.jenkins-ci.org/redhat/jenkins.repo.
Install Jenkins from the Yum Repository
Make sure you have Java on your system, then fetch the yum repository and install Jenkins.
yum -y install java
curl http://pkg.jenkins-ci.org/redhat/jenkins.repo -o /etc/yum.repos.d/jenkins.repo
rpm --import https://jenkins-ci.org/redhat/jenkins-ci.org.key
yum -y install jenkins
Enable and Start Service
Since CentOS 7 uses Systemd, use it to start the service on reboot.
systemctl enable jenkins
service jenkins start
Access Jenkins
This will start jenkins on port 8080 by default (you can change these settings in /etc/sysconfig/jenkins). Leaving it as is and setting up a reverse Nginx proxy is my preference. Once you load the Jenkins home page you will be prompted to enter a password located in a file on your system to continue the setup. Here is a sample of my Nginx configuration.
# jenkins is upstream listening on port 8080
upstream jenkins {
        server                          127.0.0.1:8080 fail_timeout=0;
}

# nginx is listening on port 80
server {
        listen                          80;
        server_name                     jenkins.example.com;

        location / {

                proxy_set_header        Host $host:$server_port;
                proxy_set_header        X-Real-IP $remote_addr;
                proxy_set_header        X-Forwarded-For $proxy_add_x_forwarded_for;
                proxy_set_header        X-Forwarded-Proto $scheme;

                proxy_pass              http://jenkins;
        }
}
Keep in mind that you may have issues initially proxying to Jenkins if SELinux is configured to block access to port 8080. If you try to load the site via Ngnix and get a “502 Bad Gateway” error, check out the /var/log/audit/audit.log – you will probably see errors regarding Nginx connecting to your port. You can either add the port by hand, or do it automatically with audit2allow.
mkdir ~/.semanage && cd ~/.semanage
cat /var/log/audit/audit.log | grep nginx | grep denied | audit2allow -M semanage
semodule -i semanage.pp
If you need to generate an SSH key for the Jenkins user, use sudo to run as the proper user.
sudo -u jenkins ssh-keygen
Enjoy!
The post Install Jenkins as a Service on CentOS 7 appeared first on Justin Silver.
]]>The post Protected: Salesforce Continuous Integration appeared first on Justin Silver.
]]>The post Protected: Salesforce Continuous Integration appeared first on Justin Silver.
]]>The post Install Jenkins on CentOS as a Service appeared first on Justin Silver.
]]>Updated post: Yum Install Jenkins as a Service on CentOS 7. You probably want to do it this way, it’s much easier. Just saying.
This guide describes how to install Jenkins on your CentOS server as an init.d service. Jenkins is a great continuous integration server that can do a lot of cool automation, but I won’t go into all of those details here. If you don’t have Java or ANT, you should install them before getting started – I am using java-1.7.0-openjdk.x86_64 but choose the appropriate JVM for your server, either the OpenJDK or Oracle JVM is required.
yum -y install java-1.7.0-openjdk.x86_64 ant
Install Jenkins with CentOS Configuration
Now on to the actual setup. All of the uppercase variables in the text below can be set in the /etc/sysconfig/jenkins file. There are defaults for all values, so only create this file if you want to override them for your own environment. First let’s create the JENKINS_USER.
groupadd jenkins
useradd -g jenkins jenkins
Next create your JENKINS_HOME and install Jenkins by downloading the latest version of the jenkins.war.
sudo mkdir -p /usr/local/jenkins
cd /usr/local/jenkins
wget http://mirrors.jenkins-ci.org/war/latest/jenkins.war
Now create the scripts to start and stop the process, called /usr/local/start-jenkins.sh and /usr/local/stop-jenkins.sh respectively. Both of these files should be in the JENKINS_HOME.
/usr/local/jenkins/start-jenkins.sh
#!/bin/bash

# import sysconfig settings and set defaults
[ -f /etc/sysconfig/jenkins ] && . /etc/sysconfig/jenkins
[ "${JENKINS_HOME}" == "" ] &&
	JENKINS_HOME=/usr/local/jenkins
[ "${JENKINS_LOG}" == "" ] &&
	JENKINS_LOG=/home/jenkins/jenkins.log
[ "${JENKINS_JAVA}" == "" ] &&
	JENKINS_JAVA=/usr/bin/java
[ "${JENKINS_JAVAOPTS}" == "" ] &&
	JENKINS_JAVAOPTS=""
[ "${JENKINS_IP}" == "" ] &&
	JENKINS_IP=0.0.0.0
[ "${JENKINS_PORT}" == "" ] &&
	JENKINS_PORT=8080
[ "${JENKINS_ARGS}" == "" ] &&
	JENKINS_ARGS=""

JENKINS_WAR=${JENKINS_HOME}/jenkins.war

# check for config errors
JENKINS_ERRORS=()
[ ! -f ${JENKINS_WAR} ] &&
	JENKINS_ERRORS[${#JENKINS_ERRORS[*]}]="JENKINS_HOME	: The jenkins.war could not be found at ${JENKINS_HOME}/jenkins.war"
[ ! -f $JENKINS_JAVA ] &&
	JENKINS_ERRORS[${#JENKINS_ERRORS[*]}]="JENKINS_JAVA	: The java executable could not be found at $JENKINS_JAVA"

# display errors if there are any, otherwise start the process
if [ ${#JENKINS_ERRORS[*]} != '0' ]
then
	echo "CONFIGURATION ERROR:"
	echo "    The following errors occurred when starting Jenkins."
	echo "    Please set the appropriate values at /etc/sysconfig/jenkins"
	echo ""
	for (( i=0; i<${#JENKINS_ERRORS[*]}; i++ ))
	do
		echo "${JENKINS_ERRORS[${i}]}"
	done
	echo ""
	exit 1
else
	echo "starting service"
	echo "nohup nice $JENKINS_JAVA $JENKINS_JAVAOPTS -jar $JENKINS_WAR --httpListenAddress=$JENKINS_IP --httpPort=$JENKINS_PORT $> $JENKINS_LOG 2>&1 &"
	nohup nice $JENKINS_JAVA $JENKINS_JAVAOPTS -jar $JENKINS_WAR --httpListenAddress=$JENKINS_IP --httpPort=$JENKINS_PORT $> $JENKINS_LOG 2>&1 &
fi
/usr/local/jenkins/stop-jenkins.sh
#!/bin/bash
kill `ps -ef | grep [j]enkins.war | awk '{ print $2 }'`
Now create a script called /etc/init.d/jenkins to allow the server to be started and stopped as a service.
/etc/init.d/jenkins
#! /bin/bash
# chkconfig: 2345 90 10
# description: Jenkins Continuous Integration server
# processname: /usr/local/jenkins/jenkins.war

# Source function library.
. /etc/rc.d/init.d/functions

# Get network sysconfig.
. /etc/sysconfig/network

# Check that networking is up, otherwise we can't start
[ "${NETWORKING}" = "no" ] && exit 0

# Get the Jenkins sysconfig
[ -f /etc/sysconfig/jenkins ] && . /etc/sysconfig/jenkins
[ "${JENKINS_HOME}" = "" ] &&
	JENKINS_HOME=/usr/local/jenkins
[ "${JENKINS_USER}" == "" ] &&
	JENKINS_USER=jenkins

startup=${JENKINS_HOME}/start-jenkins.sh
shutdown=${JENKINS_HOME}/stop-jenkins.sh
export JAVA_HOME=/usr/local/java/

start(){
	echo -n $"Starting Jenkins service: "
	pid=`ps -ef | grep [j]enkins.war | wc -l`
	if [ $pid -gt 0 ]; then
		echo "Jenkins is already running"
		exit 1
	fi
	su - $JENKINS_USER -c $startup
	RETVAL=$?
	[ $RETVAL == 0 ] &&
		echo "Jenkins was started successfully." ||
		echo "There was an error starting Jenkins."
}

stop(){
	action $"Stopping Jenkins service: "
	pid=`ps -ef | grep [j]enkins.war | wc -l`
	if [ ! $pid -gt 0 ]; then
		echo "Jenkins is not running"
		exit 1
	fi
	su - $JENKINS_USER -c $shutdown
	RETVAL=$?
	[ $RETVAL == 0 ] &&
		echo "Jenkins was stopped successfully." ||
		echo "There was an error stopping Jenkins."
}

status(){
	pid=`ps -ef | grep [j]enkins.war | wc -l`
	if [ $pid -gt 0 ]; then
 		echo "Jenkins is running..."
 	else
 		echo "Jenkins is stopped..."
	fi
}

restart(){
 	stop
 	sleep 5
 	start
}

# Call functions as determined by args.
case "$1" in
start)
	start;;
stop)
	stop;;
status)
	status;;
restart)
	restart;;
*)
	echo $"Usage: $0 {start|stop|status|restart}"
	exit 1
esac

exit 0
Make sure that the JENKINS_USER is the owner of the JENKINS_HOME directory and scripts, and that the scripts have executable flags set.
chown -R jenkins. /usr/local/jenkins
chmod a+x /usr/local/jenkins/start-jenkins.sh
chmod a+x /usr/local/jenkins/stop-jenkins.sh
chmod a+x /etc/init.d/jenkins
You can then start, stop, restart, and check the status of the service via the following commands, or control if it is launched on boot using chkconfig:
service jenkins status
service jenkins start
service jenkins restart
service jenkins stop
chkconfig jenkins on
The additional variables that can be set at /etc/sysconfig/jenkins and their defaults are as follows:
# Jenkins system configuration
JENKINS_HOME=/usr/local/jenkins
JENKINS_USER=jenkins
JENKINS_LOG=/home/jenkins/jenkins.log
JENKINS_JAVA=/usr/bin/java
JENKINS_JAVAOPTS=""
JENKINS_IP=0.0.0.0
JENKINS_PORT=8080
JENKINS_ARGS=""
Since my development server already has Apache running on it, the easiest way to expose the application to the world was via a reverse proxy after I installed Jenkins. The VirtualHost for this subdomain ends up looking like the following:
<VirtualHost *:80>
        ServerName jenkins.doublesharp.com
        DocumentRoot    /var/www/html

        ProxyPass / http://localhost:8080/ nocanon
        ProxyPassReverse / http://localhost:8080/
        ProxyRequests Off
        ProxyPreserveHost On
        <Proxy http://localhost:8080/*>
                Order deny,allow
                Allow from all
        </Proxy>
        # If using reverse proxy from SSL
        #Header edit Location ^http: https:
</VirtualHost>
Complete the setup by restarting Apache.
service httpd restart
The post Install Jenkins on CentOS as a Service appeared first on Justin Silver.
]]>