The post Wildcard SSL Certs: Let’s Encrypt & Cloudflare appeared first on Justin Silver.
]]>My servers have been using free Let’s Encrypt SSL certificates for some time now, but I was really excited to hear about support for wildcard SSL certificates in 2018. Wildcards are now available thus I am now using Let’s Encrypt Wildcard SSL Certificates with Cloudflare DNS-01 challenges from my Jenkins CI/CD server. The wildcard ssl cert is generated manually the first time, afterwards it uses a root user cron job to check for certificate renewals. After the certbot tool is finished with the renewal request it calls a “post hook” script that copies the wildcard SSL certificates (as needed) to the Jenkins home directory. From there they can be deployed via SSH to the servers.
The SSH user does not have root access, rather the wildcard SSL certificates are symlinked from a user account to the Nginx configuration. Nginx is scheduled to gracefully reload approximately 30 minutes after the SSL certificate renewals are processed, therefore new any new certificate will be served shortly after it is generated.
Generate Wildcard SSL Certs
# configuration for cloudflare
CLOUDFLARE_EMAIL="[email protected]"
CLOUDFLARE_API_KEY="put-your-key-here"
DOMAIN="your-domain.com"

# as root configure your cloudflare secrets
mkdir -p /root/.secrets
cat <<CLOUDFLARE_CONFIG > /root/.secrets/cloudflare.ini
dns_cloudflare_email="$CLOUDFLARE_EMAIL"
dns_cloudflare_api_key="$CLOUDFLARE_API_KEY"
CLOUDFLARE_CONFIG

# make sure they are hidden, the api key is more powerful than a password!
chmod 0700 /root/.secrets/
chmod 0400 /root/.secrets/cloudflare.ini

# install pip, upgrade, then install the cloudflare/certbot tool
yum install -y python-pip
pip install --upgrade pip
pip install certbot-dns-cloudflare

# generate a wildcard cert for the domain using a dns challenge
#
# --quiet, suppress output
# --non-interactive, avoid user input
# --agree-tos, agree to tos on first run
# --keep-until-expiring, keep existing certs
# --preferred-challenges, specify to use dns-01 challenge
# --dns-cloudflare, use the cloudflare dns plugin
# --dns-cloudflare-credentials, path to ini config
# -d, domains to generate keys for, you can add additional ones if needed
certbot certonly \
  --quiet \
  --non-interactive \
  --agree-tos \
  --keep-until-expiring \
  --preferred-challenges dns-01 \
  --dns-cloudflare \
  --dns-cloudflare-credentials /root/.secrets/cloudflare.ini \
  -d $DOMAIN,*.$DOMAIN
Ubuntu / Debian
apt-get update -y
apt-get install -y python3-pip
pip install --upgrade acme pip
pip install certbot-dns-cloudflare
Certbot Post Hook for Jenkins
This bash script will be run after certbot renewals are processed to make the SSL certs available to Jenkins for distribution to the servers.
# where we are going to store the SSL certs for deployment
JENKINS_SSL="/home/jenkins/secrets/ssl"
DOMAIN="your-domain.com"

# run this after the certbot renewal to copy keys to jenkins
POST_HOOK_PATH="/usr/local/bin/certbot-post-hook"
cat <<CERTBOT_POST_HOOK > "$POST_HOOK_PATH"
# copy ssl certs and keys
cp /etc/letsencrypt/live/$DOMAIN/fullchain.pem "$JENKINS_SSL/$DOMAIN-fullchain.pem"
cp /etc/letsencrypt/live/$DOMAIN/privkey.pem "$JENKINS_SSL/$DOMAIN-privkey.pem"

# make sure the jenkins user can read them
chown -R jenkins.jenkins "$JENKINS_SSL"
CERTBOT_POST_HOOK

# make post hook executable
chmod +x "$POST_HOOK_PATH"
SSL Certificate Renewals
On the Jenkins server add a crontab entry for the root user to process SSL certificate renewals. Note the path to $POST_HOOK_PATH above is used here, so adjust as needed. The same credentials used to generate the cert will be used here as well, as a result they do not need to be included again.
# process let's encrypt renewals at 3:30am
30 3 * * * /usr/bin/certbot renew --quiet --post-hook /usr/local/bin/certbot-post-hook > /dev/null 2>&1
Certbot Post Hook for Jenkins
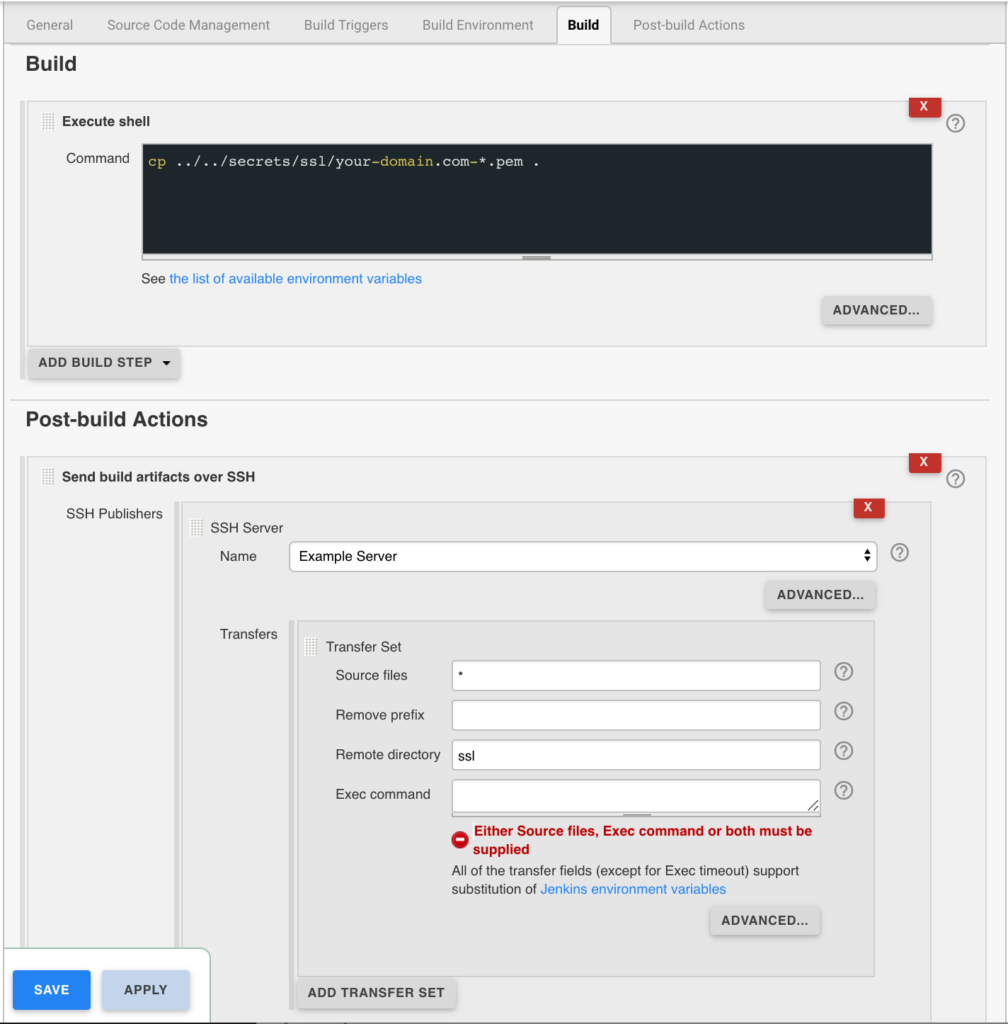
Jenkins is used to handle the SSL certificate deployment to the app servers because it is already set up to deploy files to my servers via SSH. First the required certificates are copied to the workspace, then uploaded using an SSH transfer set to each server. These certificates are then symlinked by the root user to the Nginx configuration for user. A cron job on each app server gracefully restarts nginx nightly to pick up any new certificates.
In the example below the certificates end up in a user home directory like so /home/username/ssl/your-domain.com-fullchain.pem therefore you will need to adjust for your username and domain.
Gracefully Reload Nginx
Pick up new certificates from renewals by gracefully reloading Nginx via a root cron job due to Nginx not seeing the change otherwise.
# reload nginx gracefully at 4:00am
0 4 * * * /usr/sbin/service nginx reload
The post Wildcard SSL Certs: Let’s Encrypt & Cloudflare appeared first on Justin Silver.
]]>The post Dynamically Update /etc/hosts from NGINX appeared first on Justin Silver.
]]>I wanted to guarantee that requests coming from one of my servers going to a domain they host are routed to localhost. The solution I arrived at was to generate a list of domains hosted under NGINX virtual hosts and dynamically updates /etc/hosts, so go do this I wrote a bash script. This script can then be called via cron (or other scripts scheduled in cron or otherwise) to concatenate to the actual hosts file.
Setup Configuration
First we need to create a directory to hold the custom configuration files called /etc/hosts.d/ and then we want to make a backup of our existing /etc/hosts file to use as the base, “main” configuration for our script. The files that will be appended to the main file will be in the hosts.d directory and end with the extension *.conf.
# Create a configuration directory for hosts.conf files
mkdir -p /etc/hosts.d/
# Copy the default /etc/hosts file to be our "main" conf file
cp /etc/hosts /etc/hosts.conf
Create Bash Script
Next create a bash script called /usr/local/bin/hosts that checks for custom configuration files and conditionally includes them into the /etc/hosts file. You can schedule this script via cron or call it from other scripts on demand if it’s only necessary to regenerate the file sporadically.
Don’t forget to run chmod +x /usr/local/bin/hosts to make it executable.
#!/bin/bash
#
# Create the /etc/hosts file using a base configuration and dynamic conf files
##################################################################################


HOSTS="/etc/hosts"
MAIN="/etc/hosts.conf"
CONF="/etc/hosts.d/*.conf"

# Test for *.conf files
if ls $CONF 1> /dev/null 2>&1; then
	# Get main and extra conf files
	cat $MAIN $CONF> $HOSTS
else
	# Get main conf file only
	cat $MAIN> $HOSTS
fi
Send Nginx Virtual Hosts to 127.0.0.1
Next we can leverage all the work so far to create a script that gets all the domains for virtual hosts on Nginx and puts them into a file that can then be appended to /etc/hosts. We’ll call it /usr/local/bin/nginx_to_hosts and once again remember to make it executable with chmod +x /usr/local/bin/nginx_to_hosts
#!/bin/bash
#
# Get virtual hosts from Nginx, create custom hosts entries, regenerate hosts file
##################################################################################

# This is where we will save the custom hosts entries
CONF="/etc/hosts.d/nginx_hosts.conf"

# Get a list of all the Nginx virtual host domains
domains=`find /etc/nginx/ -type f -name "*.conf" -print0 | xargs -0 egrep '^(\s|\t)*server_name' | sed -r 's/(.*server_name\s*|;)//g'`

# Set each domain to point to localhost
hosts=$(for domain in $domains; do printf "\n127.0.0.1 $domain"; done)

# Create the custom host file for Nginx domains
printf "#Nginx Virtual Host Domains $hosts\n" > $CONF

# Regenerate /etc/hosts file
/usr/local/bin/hosts
The post Dynamically Update /etc/hosts from NGINX appeared first on Justin Silver.
]]>The post MySQL / MariaDB Backup & Archive Script appeared first on Justin Silver.
]]>I am using MariaDB – the open source version of MySQL – and wanted an easy way to backup my databases on a regular schedule without having to do anything when I created or dropped a database. MariaDB is a drop in replacement for MySQL, so this script should work as is. I put together this base script that will use the show databases command to iterate over each database so that it can be passed to mysqldump. The nice command is used to lower the impact to your regular server work.
Once exported the resulting SQL files are compressed into an archive using tar with bzip2 compression, which saves quite a bit of space over gzip from my tests with this kind of data. After the archive is created the source SQL files are deleted (again using nice) and finally anything in the directory older than the specified archive days value will be deleted.
You will need to create a file called /etc/sysconfig/dbbackup that stores the USERNAME and PASSWORD parameters for the script.
#/bin/bash
#
# MySQL/MariaDB backup script
# Justin Silver
# http://www.justinsilver.com
#
# Use cron to schedule this script to run as frequently as you want.
###################################################################################

# Set properties in this file
SYSCONFIG="/etc/sysconfig/dbbackup"

# User with SELECT, SHOW VIEW, EVENT, and TRIGGER, or... root
#USERNAME="USERNAME"
#PASSWORD="PASSWORD"

# Archive path
ARCHIVE_PATH="/var/backups"

# Archive filename
ARCHIVE_FILE="databases_`date +%F_%H-%M-%S`.tbz2"

# Archives older than this will be deleted
ARCHIVE_DAYS="15"

# Set or override config variables here
if [ -f $SYSCONFIG ]; then
    source $SYSCONFIG
fi

if [ -z "$USERNAME" ] || [ -z "$PASSWORD" ]; then
    echo "You must set USERNAME and PASSWORD in $SYSCONFIG";
    exit
fi

# Change working directory
cd $ARCHIVE_PATH

# Get all of the databases
for database in `mysql -u $USERNAME -p"$PASSWORD" -Bse 'show databases'`; do

        # Skip ones we don't want to back up
        if [ "performance_schema" == "$database" ]; then continue; fi
        if [ "information_schema" == "$database" ]; then continue; fi

        # Use Nice to dump the database
        nice mysqldump -u $USERNAME -p"$PASSWORD" --events $database > $database.sql

done

# Use Nice to create a tar compressed with bzip2
nice tar -cjf $ARCHIVE_FILE *.sql

# Remove the SQL files
nice rm -rf *.sql

# Remove old archive files
nice find . -mtime +$ARCHIVE_DAYS -exec rm {} \;
The post MySQL / MariaDB Backup & Archive Script appeared first on Justin Silver.
]]>The post Monitor IPSec VPN Tunnel appeared first on Justin Silver.
]]>I have an IPSec Tunnel built from one of my servers to an integration partner which is used to secure our web service calls. It uses a IPSec, OpenSwan, and Pluto to maintain a private network. Unfortunately I was seeing that this tunnel would for some reason collapse, requiring me to manually restart IPSec to rebuild the tunnel and re-enable our web services. This usually seemed to happen around 1am so despite many, many (MANY), emails, I wouldn’t actually fix it for several hours.
To aid in the process of stopping and then restarting the services, I wrote a bash script to handle all the comments. I only have one IPSec interface of ipsec0 which is used in my script. Make sure to chmod +x /usr/local/bin/ipsec-restart.sh.
#!/bin/bash

# get the -i or --interface argument value
while [[ $# > 1 ]]
do
key="$1"
case $key in
    -i|--interface)
    INTERFACE="$2"
    shift # past argument
    ;;
esac
shift # past argument or value
done

# show an error if the interface isn't specified
if [ -z "$INTERFACE" ]
  then
    echo "You must provide an interface argument with -i or --interface"
    exit
fi

# restart ipsec, then bring up the IPSec tunnel
/sbin/service ipsec restart
/usr/sbin/ipsec whack --shutdown
/usr/sbin/ipsec setup --restart
/usr/sbin/ipsec auto --add $INTERFACE
sleep 5
/usr/sbin/ipsec auto --up $INTERFACE
Next step is to have the system automatically run the script when the tunnel goes down. Using NetCat (nc) is a good option for this – it can actually do a crazy number of things I won’t go into here. Basically we want to test the hostname of our service to see if we can open port 80, and if not, run the restart script. Passing in -w 10 tells it to wait 10 seconds to time out. By redirecting the output we can have this show nothing if it connects successfully, but email the address specified in the MAILTO with the ipsec-restart.sh output. Run this script every 5 minutes (and as root) by adding it to crontab while logged in as root, or using sudo crontab -e to edit.
# Monitor VPN
MAILTO="[email protected]"
*/5 * * * * ( nc -w 10 -z hostname.webservice.com 80 ) >& /dev/null || /usr/local/bin/ipsec-restart.sh -i ipsec0
The post Monitor IPSec VPN Tunnel appeared first on Justin Silver.
]]>The post Disable WP-Cron in WordPress appeared first on Justin Silver.
]]>What is WP-Cron?
WP-Cron is the way that WordPress executes scheduled jobs that are added via wp_schedule_event() or one of its associated functions. First it’s a bit of a hack given the single threaded-ness of PHP. It’s simply not possible to spin up a Thread like you would in Java to do the work asynchronously, and we don’t want the users to have to wait while we run a large job. To get around this WordPress checks to see if there are any scheduled jobs with an execution time in the past (more on this in a bit), and will then make a request to itself calling wp-cron.php with a querystring of doing_wp_cron. The job can now run in this new request (which is a different PHP process) and the page HTML is returned to the users without ever trying to fetch the results.
What’s good about WP-Cron?
WP-Cron lets you do things like check for plugin updates or other arbitrary tasks at set intervals – once or twice a day, longer, or more frequently if you desire. In many ways this mimics the functionality of cron on your Linux box.
There are lots of useful things you can do with a scheduled task – send emails, update derived database values, really anything that you want to happen regularly, but not on every request. If you’re ok with some user’s seeing slightly stale data in exchange for better performance, you can use a WP-Cron job to indicate that the cache needs to be primed.
What’s bad about WP-Cron?
While WP-Cron can be a very useful tool, there are some downsides to it as well. As mentioned earlier it can only check for jobs that should have already run, meaning that the scheduled $execution_time < time(), but this can be an issue on sites with low traffic, especially if you actually care what time the task will be run. Even if your site does decent traffic during the day, maybe it drops way off at night and you want to run something as close to 1:00AM as possible… which might or might not happen.
There is also the performance hit you take making an HTTP request, even though it’s to yourself. Why check the database and WP-Cron locks to see if the HTTP request is even necessary? Speaking of locks – while much better about locking WP-Cron, sites with heavy traffic can occasionally end up with multiple WP-Cron requests (if user requests come in at the exact same time).
How to disable WP-Cron?
The way that I handle WP-Cron on my sites is to disable it entirely by setting the DISABLE_WP_CRON constant to true in wp-config.php. This will prevent WordPress from checking for WP-Cron tasks at all when a user makes a request.
The next step is to set cron on the system to make the request to wp-cron.php based on whatever schedule works best for you. You can have it run as frequently as once per minute, or up to… forever. Probably whatever the smallest resolution of your recurring tasks are is best, unless you are using wp_schedule_single_event() to run something asynchronously – then a minute might be best.
Disable WP-Cron in wp-config.php
define( 'DISABLE_WP_CRON', true );
Schedule WP-Cron using crontab
# Run WP-Cron every 5 minutes
*/5 * * * * /usr/bin/curl --silent http://example.com/wp-cron.php?doing_wp_cron >/dev/null
The post Disable WP-Cron in WordPress appeared first on Justin Silver.
]]>The post Change Interval in Munin With Existing RRD Data appeared first on Justin Silver.
]]>The default settings for Munin will result in RRD files containing 5 minute intervals of data, or 300 seconds as it is stored internally. It is possible to change this interval by changing /etc/cron.d/munin. It’s also necessary to change the update_rate in your Munin configuration, usually found in /etc/munin-node.conf. This value should match the resolution of the munin cron.
If you make this change before you start collecting data, great! If you do already have historical data that you want to keep, you need to convert the data to work with the new interval. The only documentation I was able to find on this matter on the Munin site was issue #1282 update_rate needs documentation, which in turn referenced http://www.elturista.net/2012/01/02/changing-step-time-of-a-rrd-file/ however this file is no longer available. I was able to locate it using the WayBack Machine, and in the interest of preservation I am reposting here with additional updates of my own.
rrdtool dump file.rrd > file.5.xml
./rrd_step_reduce.py file.5.xml 5 > file1.xml
rrdtool restore file1.xml file.rrd
#!/usr/bin;/python
# -*- coding: utf-8 -*-

# This program is free software: you can redistribute it and/or modify
# it under the terms of the GNU General Public License as published by
# the Free Software Foundation, either version 3 of the License, or
# (at your option) any later version.
#
# This program is distributed in the hope that it will be useful,
# but WITHOUT ANY WARRANTY; without even the implied warranty of
# MERCHANTABILITY or FITNESS FOR A PARTICULAR PURPOSE.  See the
# GNU General Public License for more details.
#
# You should have received a copy of the GNU General Public License
# along with this program.  If not, see <http://www.gnu.org/licenses/>.

import sys
from copy import deepcopy
from StringIO import StringIO

try:
    from lxml import etree
except ImportError:
    try:
        import xml.etree.cElementTree as etree
    except ImportError:
        try:
            import xml.etree.ElementTree as etree
        except ImportError:
            try:
                import cElementTree as etree
            except ImportError:
                try:
                    import elementtree.ElementTree as etree
                except ImportError:
                    raise

def main(dumpfile, factor):

    xmldoc = etree.parse(dumpfile)
    root = xmldoc.getroot()

    # change step, reducing it by a factor of "factor"
    step = root.find("step")
    assert(step!=None)
    old_step = int(step.text)
    new_step = old_step/factor
    step.text = str(new_step)

    database = root.findall("rra/database")
    for d in database:
        index = 0
        count = len(d)
        while count > 0:
            for i in range(0, factor-1):
                #d.insert(index+1, NaNdoc.getroot())
                d.insert(index+1, deepcopy(d[index]))
            index = index + factor
            count = count - 1

    print etree.tostring(root)

if __name__ == "__main__":
    # arguments
    if len(sys.argv) != 3:
        print "rrd_step_reduce.py rrddump.xml factor"
        sys.exit(-1)

    # call main
    main(sys.argv[1], int(sys.argv[2])))
The post Change Interval in Munin With Existing RRD Data appeared first on Justin Silver.
]]>The post Production Cron Tasks appeared first on Justin Silver.
]]>Useful if you run scheduled tasks in production and want to leverage cron, via Orchestrate.io. The Gist shell script for cron_helper.sh is below.
#!/bin/bash

usage() {
  cat << EOF
Usage: $0 [OPTION]... COMMAND
Execute the given command in a way that works safely with cron. This should
typically be used inside of a cron job definition like so:
* * * * * $(which "$0") [OPTION]... COMMAND

Arguments:
  -c           Ensure that the job never exits non zero.
  -e EXITFILE  The exit file that will have a time stamp written to it if the
               job succeeds.
  -h           This help message.
  -i           Nice the job so that it doesn't over consume resources.
  -k LOCKFILE  The lock file to hold while the job is running.
  -l LOGFILE   The log file to write stdout and stderr too.
  -n NAME      The name of this cron job. Giving the cron job a name causes
               log lines to include it in the output, and automatically sets
               EXITFILE, LOCKFILE, and LOGFILE to some simple default values.

               EXITFILE will be set to /var/run/\$USER/NAME.exit if
               /var/run/\$USER exists, otherwise it will write to
               /var/tmp/\$USER/NAME.exit

               LOCKFILE will be set to /var/run/\$USER/NAME.lock if
               /var/run\$USER exists, otherwise it will write to
               /var/tmp/\$USER/NAME.lock

               LOGFILE will be set to /var/log/\$USER/NAME.log if
               /var/log/\$USER exists, otherwise it will write to
               /var/tmp/$USER/NAME.log
  -s           If set the script will sleep a random time between 0 and 60
               seconds before starting the command.
  -t           If set then the output from the script will be automatically
               timestamped when being written to the log file.

COMMAND is the command that should be executed.
EOF
}

SAFE_EXIT=0
EXIT_FILE=""
NICE=0
LOCK_FILE=""
LOG_FILE=""
NAME=""
SLEEP=0
TIMESTAMP=0

# This is a cach of all the groups the user is a member of. We use it with
# canwrite() later.
GROUPS=""

# Checks to see if the shell array ($2) contains $1.
contains() {
  local i
  for i in "${@:2}"; do
    [[ "$i" == "$1" ]] && return 0
  done
  return 1
}

# Checks to see if the current user can write to the given file. This will check the
# file permissions first, and if the file does not exist then it will check the
# directory permissions.
canwrite() {
  local perm
  local owner
  local group

  if [ -f "$1" ] ; then
    read perm owner group < <(stat -Lc "%a %G %U" "$1" 2> /dev/null)
  else
    read perm owner group < <(stat -Lc "%a %G %U" "$(dirname $1)" 2> /dev/null)
  fi
  if [ $? -ne 0 ] ; then
    return 1
  fi

  if [ "$owner" == "$USER" ] ; then
    if [ $((perm&0200)) -ne 0 ] ; then
      return 1
    fi
    return 0
  elif contains "$group" "${GROUPS[@]}" ; then
    if [ $((perm&0020)) -ne 0 ] ; then
      return 1
    fi
    return 0
  else
    if [ $((perm&0002)) -ne 0 ] ; then
      return 1
    fi
    return 0
  fi
}

name() {
  NAME="$1"

  # Exit file
  if [ -z "$EXIT_FILE" ] ; then
    if canwrite "/var/run/${USER}/${NAME}.exit" ; then
      EXIT_FILE="/var/run/${USER}/${NAME}.exit"
    else
      mkdir -p "/var/tmp/${USER}"
      EXIT_FILE="/var/tmp/${USER}/${NAME}.exit"
    fi
  fi

  # Lock File
  if [ -z "$LOCK_FILE" ] ; then
    if canwrite "/var/run/${USER}/${NAME}.lock" ; then
      LOCK_FILE="/var/run/${USER}/${NAME}.lock"
    else
      mkdir -p "/var/tmp/${USER}"
      LOCK_FILE="/var/tmp/${USER}/${NAME}.lock"
    fi
  fi

  # Log File
  if [ -z "$LOG_FILE" ] ; then
      if canwrite "/var/run/${USER}/${NAME}.lock" ; then
      LOG_FILE="/var/log/${USER}/${NAME}.log"
    else
      mkdir -p "/var/tmp/${USER}"
      LOG_FILE="/var/tmp/${USER}/${NAME}.log"
    fi
  fi
}

while getopts "ce:hik:l:n:st" arg; do
  case $arg in
    c) SAFE_EXIT=1 ;;
    e) EXIT_FILE="$OPTARG" ;;
    h) usage ; exit ;;
    i) NICE=1 ;;
    k) LOCK_FILE="$OPTARG" ;;
    l) LOG_FILE="$OPTARG" ;;
    n) name "$OPTARG" ;;
    s) SLEEP=1 ;;
    t) TIMESTAMP=1 ;;
  esac
done
shift $((OPTIND-1))


# This function will write a log line to the output. This can either be called by the
# timestamper, or internally.
log() {
  if [ $TIMESTAMP -eq 1 ] ; then
    echo "$(date) $*"
  else
    echo "$*"
  fi
}

# Setup logging first so we can report to the user what is happening.
if [ -n "$LOG_FILE" ] ; then
  exec > "$LOG_FILE" 2>&1
fi

# Attempt to lock the lock file if it is set.
if [ -n "$LOCK_FILE" ] ; then
  exec 200>> "$LOCK_FILE"
  flock -n -x 200
  if [ $? -ne 0 ] ; then
    log "Unable to obtain a lock, is a job already running?"
    if [ $SAFE_EXIT -eq 1 ] ; then
      exit 0
    else
      exit 1
    fi
  fi
fi

# Sleep a random amount between 0 and 60 seconds.
if [ $SLEEP -eq 1 ] ; then
  sleep $((RANDOM%60))
fi

# Get the pre-command in case we need to nice the job.
PRECOMMAND=""
if [ $NICE -eq 1 ] ; then
  PRECOMMAND="nice"
fi

# Run the command.
if [ $TIMESTAMP -eq 1 ] ; then
  $PRECOMMAND "$@" 2>&1 | while read line ; do log "$line" ; done
else
  $PRECOMMAND "$@" 2>&1
fi
EXIT_STATUS=$?

# Process the exit file.
if [ -n "$EXIT_FILE" -a $EXIT_STATUS -eq 0 ] ; then
  date > "$EXIT_FILE"
fi

# Exit status
if [ $SAFE_EXIT -eq 1 ] ; then
  exit 0
else
  exit $EXIT_STATUS
fi
The post Production Cron Tasks appeared first on Justin Silver.
]]>