The post Wildcard SSL Certs: Let’s Encrypt & Cloudflare appeared first on Justin Silver.
]]>My servers have been using free Let’s Encrypt SSL certificates for some time now, but I was really excited to hear about support for wildcard SSL certificates in 2018. Wildcards are now available thus I am now using Let’s Encrypt Wildcard SSL Certificates with Cloudflare DNS-01 challenges from my Jenkins CI/CD server. The wildcard ssl cert is generated manually the first time, afterwards it uses a root user cron job to check for certificate renewals. After the certbot tool is finished with the renewal request it calls a “post hook” script that copies the wildcard SSL certificates (as needed) to the Jenkins home directory. From there they can be deployed via SSH to the servers.
The SSH user does not have root access, rather the wildcard SSL certificates are symlinked from a user account to the Nginx configuration. Nginx is scheduled to gracefully reload approximately 30 minutes after the SSL certificate renewals are processed, therefore new any new certificate will be served shortly after it is generated.
Generate Wildcard SSL Certs
# configuration for cloudflare
CLOUDFLARE_EMAIL="[email protected]"
CLOUDFLARE_API_KEY="put-your-key-here"
DOMAIN="your-domain.com"

# as root configure your cloudflare secrets
mkdir -p /root/.secrets
cat <<CLOUDFLARE_CONFIG > /root/.secrets/cloudflare.ini
dns_cloudflare_email="$CLOUDFLARE_EMAIL"
dns_cloudflare_api_key="$CLOUDFLARE_API_KEY"
CLOUDFLARE_CONFIG

# make sure they are hidden, the api key is more powerful than a password!
chmod 0700 /root/.secrets/
chmod 0400 /root/.secrets/cloudflare.ini

# install pip, upgrade, then install the cloudflare/certbot tool
yum install -y python-pip
pip install --upgrade pip
pip install certbot-dns-cloudflare

# generate a wildcard cert for the domain using a dns challenge
#
# --quiet, suppress output
# --non-interactive, avoid user input
# --agree-tos, agree to tos on first run
# --keep-until-expiring, keep existing certs
# --preferred-challenges, specify to use dns-01 challenge
# --dns-cloudflare, use the cloudflare dns plugin
# --dns-cloudflare-credentials, path to ini config
# -d, domains to generate keys for, you can add additional ones if needed
certbot certonly \
  --quiet \
  --non-interactive \
  --agree-tos \
  --keep-until-expiring \
  --preferred-challenges dns-01 \
  --dns-cloudflare \
  --dns-cloudflare-credentials /root/.secrets/cloudflare.ini \
  -d $DOMAIN,*.$DOMAIN
Ubuntu / Debian
apt-get update -y
apt-get install -y python3-pip
pip install --upgrade acme pip
pip install certbot-dns-cloudflare
Certbot Post Hook for Jenkins
This bash script will be run after certbot renewals are processed to make the SSL certs available to Jenkins for distribution to the servers.
# where we are going to store the SSL certs for deployment
JENKINS_SSL="/home/jenkins/secrets/ssl"
DOMAIN="your-domain.com"

# run this after the certbot renewal to copy keys to jenkins
POST_HOOK_PATH="/usr/local/bin/certbot-post-hook"
cat <<CERTBOT_POST_HOOK > "$POST_HOOK_PATH"
# copy ssl certs and keys
cp /etc/letsencrypt/live/$DOMAIN/fullchain.pem "$JENKINS_SSL/$DOMAIN-fullchain.pem"
cp /etc/letsencrypt/live/$DOMAIN/privkey.pem "$JENKINS_SSL/$DOMAIN-privkey.pem"

# make sure the jenkins user can read them
chown -R jenkins.jenkins "$JENKINS_SSL"
CERTBOT_POST_HOOK

# make post hook executable
chmod +x "$POST_HOOK_PATH"
SSL Certificate Renewals
On the Jenkins server add a crontab entry for the root user to process SSL certificate renewals. Note the path to $POST_HOOK_PATH above is used here, so adjust as needed. The same credentials used to generate the cert will be used here as well, as a result they do not need to be included again.
# process let's encrypt renewals at 3:30am
30 3 * * * /usr/bin/certbot renew --quiet --post-hook /usr/local/bin/certbot-post-hook > /dev/null 2>&1
Certbot Post Hook for Jenkins
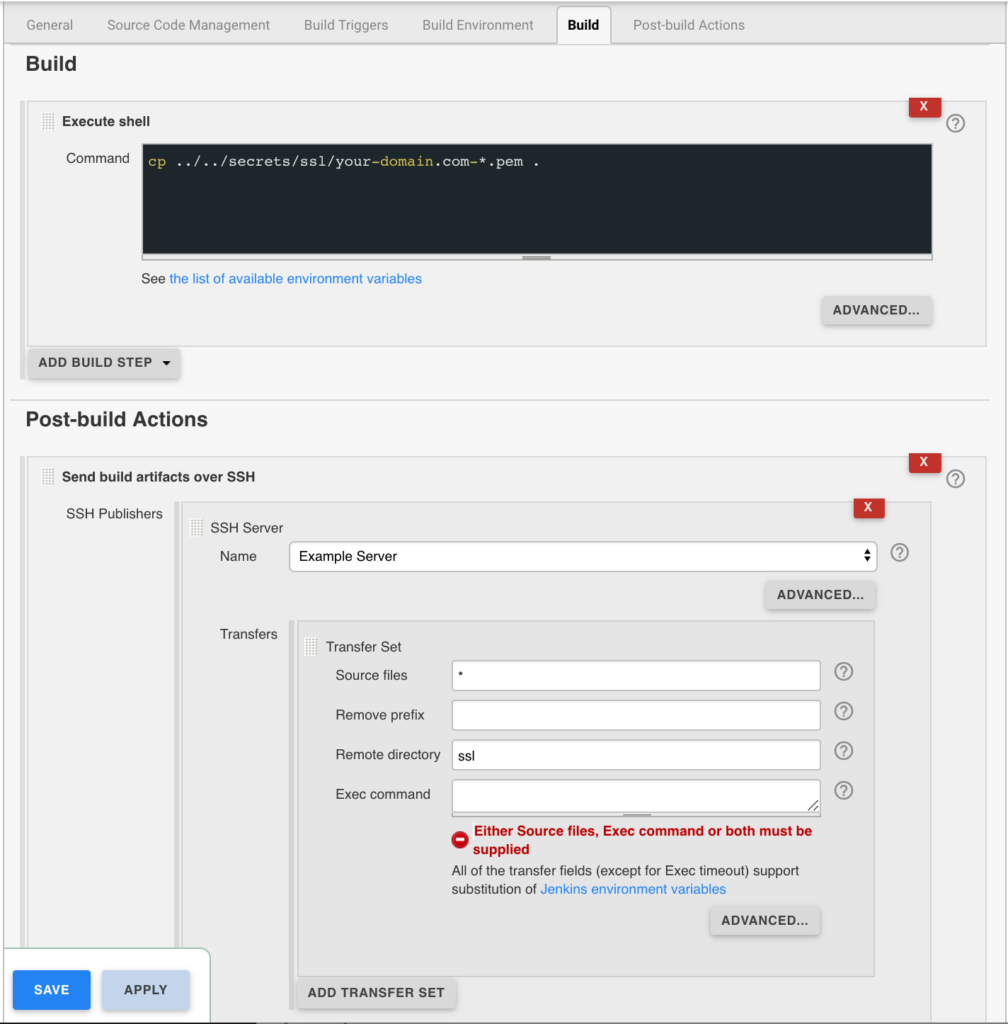
Jenkins is used to handle the SSL certificate deployment to the app servers because it is already set up to deploy files to my servers via SSH. First the required certificates are copied to the workspace, then uploaded using an SSH transfer set to each server. These certificates are then symlinked by the root user to the Nginx configuration for user. A cron job on each app server gracefully restarts nginx nightly to pick up any new certificates.
In the example below the certificates end up in a user home directory like so /home/username/ssl/your-domain.com-fullchain.pem therefore you will need to adjust for your username and domain.
Gracefully Reload Nginx
Pick up new certificates from renewals by gracefully reloading Nginx via a root cron job due to Nginx not seeing the change otherwise.
# reload nginx gracefully at 4:00am
0 4 * * * /usr/sbin/service nginx reload
The post Wildcard SSL Certs: Let’s Encrypt & Cloudflare appeared first on Justin Silver.
]]>The post Using NGINX as an Atlassian JIRA Reverse Proxy appeared first on Justin Silver.
]]>I use JIRA in a cloud infrastructure where it’s obviously desirable to serve the contents over SSL, therefore I set up an NGINX as a JIRA reverse proxy for unencrypted requests to the JIRA backend service and handle the SSL on the front end with Let’s Encrypt. We need to let JIRA know that we are proxying it over HTTPS however by setting some values in server.xml first.
Notice that my Let’s Encrypt SSL certificates are in the /etc/letsencrypt/live/jira.doublesharp.com directory, but yours will be specific to the hostname you create them for. The certs are created via the letsencrypt command and use Nginx to process the validation request. Once created the generated PEM files can be used in your Nginx config. Note that you will need to comment out this line in the SSL config if they don’t yet exist, start Nginx to create the certs, uncomment the lines to enable SSL, and then restart Nginx once again (whew!).
JIRA Reverse Proxy Configuration
Configure JIRA to add proxyName, proxyPort, scheme, and secure parameters to the Tomcat Connector in server.xml.
<Connector port="8081"
           maxThreads="150"
           minSpareThreads="25"
           connectionTimeout="20000"
           enableLookups="false"
           maxHttpHeaderSize="8192"
           protocol="HTTP/1.1"
           useBodyEncodingForURI="true"
           redirectPort="8443"
           acceptCount="100"
           disableUploadTimeout="true"
           bindOnInit="false"

           proxyName="jira.doublesharp.com"
           proxyPort="443"
           scheme="https"
           secure="true"
/>
Don’t forget to copy the database driver to $JIRA_INSTALL/lib.
Nginx Reverse Proxy Configuration
Note use of “jira.doublesharp.com” in config and change as needed. This configuration uses a subdomain specific certificate from Let’s Encrypt, but you could also use a Wildcard Certificate for your JIRA reverse proxy setup as well which can help to consolidate your key generation.
# Upstream JIRA server on port 8081. Use 127.0.0.1 and not localhost to force IPv4.
upstream jira {
  server       127.0.0.1:8081 fail_timeout=0;
}

# listen on HTTP2/SSL
server {
  listen       443 ssl http2;
  server_name  jira.doublesharp.com;

  # ssl certs from letsencrypt
  ssl_certificate /etc/letsencrypt/live/jira.doublesharp.com/fullchain.pem;
  ssl_certificate_key /etc/letsencrypt/live/jira.doublesharp.com/privkey.pem;

  location / {
    # allow uploads up to 10MB
    client_max_body_size 10m;
    # set proxy headers for cloudflare/jira
    proxy_set_header  Host $host:$server_port;
    proxy_set_header  X-Real-IP $remote_addr;
    proxy_set_header  X-Forwarded-For $proxy_add_x_forwarded_for;
    proxy_set_header  X-Forwarded-Proto $scheme;
    # hand the request off to jira on non-ssl
    proxy_pass        http://jira;
  }
}

# redirect HTTP and handle let's encrypt requests
server {
  listen       80;
  server_name  jira.doublesharp.com;
  root         /var/lib/jira;

  # handle letsencrypt domain validation
  location ~ /.well-known {
    allow all;
  }

  # send everything else to HTTPS
  location / {
    return 302 https://jira.doublesharp.com;
  }
}
The post Using NGINX as an Atlassian JIRA Reverse Proxy appeared first on Justin Silver.
]]>