The post Dual Primary DRBD on CentOS 6: GFS2 & Pacemaker appeared first on Justin Silver.
]]>This guide describes how to create a pair of redundant file servers using DRBD for replication, RedHat GFS2 (Global File System), and Pacemaker for cluster management. In this case we are also using RackSpace Cloud Servers and associated OpenStack features, so we will use the nova client to create the networks, servers, and storage before logging on to finish the configuration.
Once completed you will have dual primary DRBD configuration which allows reads and writes to both nodes at the same time – enabling load balanced NFS for example.
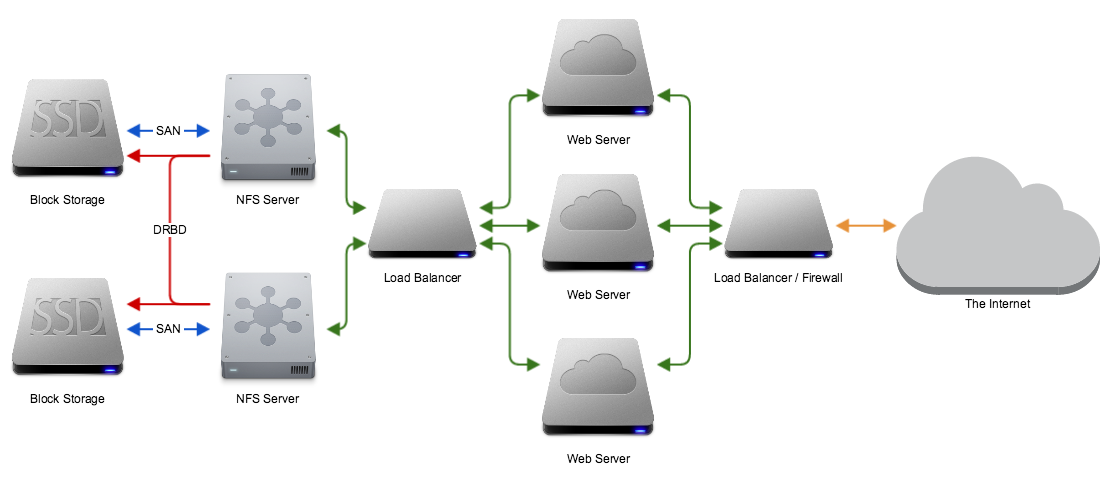
Network Architecture
This is a rough diagram of the network architecture. Each file server is attache to a block storage device, and the file servers will synchronize their disks using DRBD on a private storage network. On a different internal network the NFS servers are fronted by a load balancer (or multiple) which is then attached to your servers. Those servers are then fronted by load balancers, firewalls, etc, or serve content to your internal network. You could also have clients connect directly to the NFS share exposed on the load balancer.
Create RackSpace Cloud Network
First we will need to create a private Cloud Network that we can dedicate to replication. We will call the network “storage-replication” and give it 192.168.1.x. You will need to capture the id that is returned so that you can attach it to a Cloud Server.
nova network-create storage-replication 192.168.1.0/24
+----------+--------------------------------------+
| Property | Value                                |
+----------+--------------------------------------+
| cidr     | 192.168.1.0/24                       |
| id       | 7c99ba74-c28c-4c52-9c5a-xxxxxxxxxxxx |
| label    | storage-replication                  |
+----------+--------------------------------------+
Create RackSpace Cloud Servers
Now that we have a network setup, let’s create two servers and assign them to it. You will need to specify an --image (the one below is for CentOS 6.5 PVHVM) however you can get a list of them using nova image-list. We are going to use a 4GB standard Cloud Server, but again you can use a different --flavor value from the results of nova flavor-list. The --nic net-id is where you place your private network id, and the --file option lets us insert an SSH key so we don’t have to bother with the password after the server is built. We put the script to sleep for 30 seconds to encourage the VM to be provisioned on a different hypervisor to provide additional redundancy. When all is said and done we have two new cloud servers named fileserver-1 and fileserver-2, and once again you should capture the id‘s for later use.
for i in 1 2; \
	do nova boot \
	--image 41e59c5f-530b-423c-86ec-13b23de49288 \
	--flavor 5 \
	--nic net-id=7c99ba74-c28c-4c52-9c5a-xxxxxxxxxxxx \
	--file /root/.ssh/authorized_keys=/Users/justinsilver/.ssh/id_dsa.pub \
	fileserver-${i}; \
	sleep 30; \
done
+------------------------+--------------------------------------+
| Property               | Value                                |
+------------------------+--------------------------------------+
| status                 | BUILD                                |
| updated                | 2014-02-26T08:16:59Z                 |
| OS-EXT-STS:task_state  | scheduling                           |
| key_name               | None                                 |
| image                  | CentOS 6.5 (PVHVM)                   |
| hostId                 |                                      |
| OS-EXT-STS:vm_state    | building                             |
| flavor                 | 4GB Standard Instance                |
| id                     | 69f66617-44e2-4cbc-8a34-xxxxxxxxxxxx |
| user_id                | xxxxxxxxxxxxxxxxxxxxxxxxxxxxxxxx     |
| name                   | fileserver-1                         |
| adminPass              | xxxxxxxxxxxx                         |
| tenant_id              | xxxxxx                               |
| created                | 2014-02-26T08:16:58Z                 |
| OS-DCF:diskConfig      | MANUAL                               |
| accessIPv4             |                                      |
| accessIPv6             |                                      |
| progress               | 0                                    |
| OS-EXT-STS:power_state | 0                                    |
| config_drive           |                                      |
| metadata               | {}                                   |
+------------------------+--------------------------------------+
+------------------------+--------------------------------------+
| Property               | Value                                |
+------------------------+--------------------------------------+
| status                 | BUILD                                |
| updated                | 2014-02-26T08:17:32Z                 |
| OS-EXT-STS:task_state  | scheduling                           |
| key_name               | None                                 |
| image                  | CentOS 6.5 (PVHVM)                   |
| hostId                 |                                      |
| OS-EXT-STS:vm_state    | building                             |
| flavor                 | 4GB Standard Instance                |
| id                     | 5f0a5c3e-0dfa-4583-bddc-xxxxxxxxxxxx |
| user_id                | xxxxxxxxxxxxxxxxxxxxxxxxxxxxxxxx     |
| name                   | fileserver-2                         |
| adminPass              | xxxxxxxxxxxx                         |
| tenant_id              | xxxxxx                               |
| created                | 2014-02-26T08:17:31Z                 |
| OS-DCF:diskConfig      | MANUAL                               |
| accessIPv4             |                                      |
| accessIPv6             |                                      |
| progress               | 0                                    |
| OS-EXT-STS:power_state | 0                                    |
| config_drive           |                                      |
| metadata               | {}                                   |
+------------------------+--------------------------------------+
Create Cloud Block Storage
Next we can create a pair of Cloud Block Storage devices to attach to our newly created Cloud Servers. We are going to use SSD instead of SATA for improved read performance and size it to 200GB – you can choose whatever value you need for your purposes – and remember that since we will be using LVM we can resize later though some care should be take up front. Again pay attention to the id‘s that are returned so that we can attach them to the Cloud Servers.
for i in 1 2; \
	do nova volume-create \
	--display-name fileserver-${i} \
	--volume-type SSD 200; \
done;
+---------------------+--------------------------------------+
| Property            | Value                                |
+---------------------+--------------------------------------+
| status              | available                            |
| display_name        | fileserver-1                         |
| attachments         | []                                   |
| availability_zone   | nova                                 |
| bootable            | false                                |
| created_at          | 2014-02-26T07:11:37.000000           |
| display_description | None                                 |
| volume_type         | SSD                                  |
| snapshot_id         | None                                 |
| source_volid        | None                                 |
| size                | 200                                  |
| id                  | db75fdd8-da9f-48df-861a-xxxxxxxxxxxx |
| metadata            | {}                                   |
+---------------------+--------------------------------------+
+---------------------+--------------------------------------+
| Property            | Value                                |
+---------------------+--------------------------------------+
| status              | available                            |
| display_name        | fileserver-2                         |
| attachments         | []                                   |
| availability_zone   | nova                                 |
| bootable            | false                                |
| created_at          | 2014-02-26T07:11:40.000000           |
| display_description | None                                 |
| volume_type         | SSD                                  |
| snapshot_id         | None                                 |
| source_volid        | None                                 |
| size                | 200                                  |
| id                  | 28a2905e-49e0-426c-8b33-xxxxxxxxxxxx |
| metadata            | {}                                   |
+---------------------+--------------------------------------+
Now use the ID’s of the Cloud Servers and Cloud Block Storage to attach the storage device to the appropriate server.
nova volume-attach 69f66617-44e2-4cbc-8a34-xxxxxxxxxxxx db75fdd8-da9f-48df-861a-xxxxxxxxxxxx /dev/xvdb && \
nova volume-attach 5f0a5c3e-0dfa-4583-bddc-xxxxxxxxxxxx 28a2905e-49e0-426c-8b33-xxxxxxxxxxxx /dev/xvdb
+----------+--------------------------------------+
| Property | Value                                |
+----------+--------------------------------------+
| device   | /dev/xvdb                            |
| serverId | 69f66617-44e2-4cbc-8a34-xxxxxxxxxxxx |
| id       | db75fdd8-da9f-48df-861a-xxxxxxxxxxxx |
| volumeId | db75fdd8-da9f-48df-861a-xxxxxxxxxxxx |
+----------+--------------------------------------+
+----------+--------------------------------------+
| Property | Value                                |
+----------+--------------------------------------+
| device   | /dev/xvdb                            |
| serverId | 5f0a5c3e-0dfa-4583-bddc-xxxxxxxxxxxx |
| id       | 28a2905e-49e0-426c-8b33-xxxxxxxxxxxx |
| volumeId | 28a2905e-49e0-426c-8b33-xxxxxxxxxxxx |
+----------+--------------------------------------+
DRBD Cloud Server Configuration
Once the servers are provisioned, connect to them both to continue the configuration. Since this is a dual primary DRBD configuration you will eventually be able to read and write to both, however for the initial sync we will use fileserver-1 as the primary.
As these are brand new servers it’s recommended to fetch all updates, allow traffic on your private network via iptables and reboot in case there were any kernel patches. Make sure to save your iptables changes or they will be lost after rebooting.
DRBD is in the EL repository which is not included by default but it can be fetched via an RPM. Once this RPM has been installed you can use yum to install both the DRBD driver and utils.
rpm -ivh http://elrepo.org/elrepo-release-6-5.el6.elrepo.noarch.rpm
yum -y update
iptables -A INPUT -m iprange --src-range 192.168.1.1-192.168.1.255 -j ACCEPT
service iptables save
yum install -y kmod-drbd84 drbd84-utils
modprobe drbd
Protect yourself from DNS outages, lookups, and the pain of using the wrong interface by assigning a hostname in the hosts file of each server. By entering the hostnames here we can ensure that corosync and cman use the correct interface for cluster management.
192.168.1.1 fileserver-1
192.168.1.2 fileserver-2
Create a partition on both hosts of the same size. You can use the full Cloud Block Storage or a piece of it (hint: 1GB will sync a lot faster if you’re just doing a test) but for the rest of this guide make sure to assign it to /dev/xvdb1.
In this guide we are going to use LVM to manage the volume so that we can shrink/grow it as needed. To do this you will need to press “T” after the partition is created and then choose “8e” for “Linux LVM”. Press “w” to save and exit or just “q” to exit and lose your changes.
fdisk /dev/xvdb
Disk /dev/xvdb: 214.7 GB, 214748364800 bytes
255 heads, 63 sectors/track, 26108 cylinders
Units = cylinders of 16065 * 512 = 8225280 bytes
Sector size (logical/physical): 512 bytes / 512 bytes
I/O size (minimum/optimal): 512 bytes / 512 bytes
Disk identifier: 0x1568dcd9

	Device Boot      Start         End      Blocks   Id  System
/dev/xvdb1               1       26108   209712478+  8e  Linux LVM
pvcreate /dev/xvdb1
	Physical volume "/dev/xvdb1" successfully created
vgcreate fileserver /dev/xvdb1
	Volume group "fileserver" successfully created
lvcreate --name r0 --size 50G fileserver
	Logical volume "r0" created
Now we can create a DRBD resource called r0 using a configuration file called /etc/drbd.d/r0.res. Copy this file onto both nodes and make sure it is the same including whitespace. For the “on” directive you need to use the actual hostname of the server that was entered in /etc/hosts.
resource r0 {
        protocol C;
        startup {
        	become-primary-on both;
        }
        disk {
                fencing resource-and-stonith;
        }
        handlers {
                fence-peer              "/usr/lib/drbd/crm-fence-peer.sh";
                after-resync-target     "/usr/lib/drbd/crm-unfence-peer.sh";
        }
        net {
                cram-hmac-alg sha1;
                shared-secret "DRBD Super Secret Password";
                timeout 180;
                ping-int 3;
                ping-timeout 9;
                allow-two-primaries;
                after-sb-0pri discard-zero-changes;
                after-sb-1pri discard-secondary;
                after-sb-2pri disconnect;
        }
        on fileserver-1 {
                device /dev/drbd1;
                disk /dev/fileserver/r0;
                address 192.168.1.1:7788;
                meta-disk internal;
        }
        on fileserver-2 {
                device /dev/drbd1;
                disk /dev/fileserver/r0;
                address 192.168.1.2:7788;
                meta-disk internal;
        }
}
We are now ready to start the DRBD service, but we want to make sure it doesn’t start on boot as it will be managed by pacemaker.
chkconfig drbd off
service drbd start
drbdadm create-md r0
Writing meta data...
initializing activity log
NOT initializing bitmap
New drbd meta data block successfully created.
success
From fileserver-1 only run the following command to force synchronization for its disk. Check the status and wait until it is 100% complete before continuing.
drbdadm primary --force r0
service drbd status
drbd driver loaded OK; device status:
version: 8.4.4 (api:1/proto:86-101)
GIT-hash: 599f286440bd633d15d5ff985204aff4bccffadd build by phil@Build64R6, 2013-10-14 15:33:06
m:res          cs          ro               ds                     p  mounted  fstype
...            sync'ed:    18.3%            (33656/41188)M
1:r0           SyncSource  Primary/Secondary UpToDate/Inconsistent  C
Now we are ready to promote both DRBD nodes to primary status. You can check the status again and once the sync has completed you are ready to move on.
drbdadm adjust r0
drbdadm primary r0
service drbd status
drbd driver loaded OK; device status:
version: 8.4.4 (api:1/proto:86-101)
GIT-hash: 599f286440bd633d15d5ff985204aff4bccffadd build by phil@Build64R6, 2013-10-14 15:33:06
m:res          cs         ro               ds                 p  mounted  fstype
1:r0           Connected  Primary/Primary  UpToDate/UpToDate  C
Create Clustered Filesystem
Now that DRBD is configured we need to install a clustered filesystem – GFS2 in this case. It handles the details of your filesystem being written and read on multiple nodes as the same time without getting trashed. Using EXT3/4 for example just won’t work properly.
yum -y install gfs2-utils cman pacemaker pacemaker-cli fence-agents resource-agents openais
We are now going to create a /etc/cluster/cluster.conf configuration for a cluster named “pacemaker” (note the max length is 15 characters for corosync.conf). Because DRBD only supports two nodes we can’t reach a quorum in the traditional sense – we must set the special two_node="1" parameter that lets the cluster reach quorum even if a node has failed. Specify that we want to use pacemaker for fencing and we should be good to go. Note the fileserver-1 and fileserver-2 from /etc/hosts.
<?xml version="1.0"?>
<cluster config_version="1" name="pacemaker">
    <cman two_node="1" expected_votes="1"/>
    <fence_daemon clean_start="0" post_fail_delay="0" post_join_delay="3"/>
    <clusternodes>
        <clusternode name="fileserver-1" nodeid="1" votes="1">
            <fence>
                <method name="pcmk-redirect">
                    <device name="pcmk" port="fileserver-1"/>
                </method>
            </fence>
        </clusternode>
        <clusternode name="fileserver-2" nodeid="2" votes="1">
            <fence>
                <method name="pcmk-redirect">
                    <device name="pcmk" port="fileserver-2"/>
                </method>
            </fence>
        </clusternode>
    </clusternodes>
    <fencedevices>
        <fencedevice name="pcmk" agent="fence_pcmk"/>
    </fencedevices>
</cluster>
This is a fairly standard /etc/corosync/corosync.conf configuration however I had to remove the interface > mcastaddress parameter and replace it with broadcast: yes to get the nodes to see each other. We want to bind to 192.168.1.0.
totem {
    version: 2
    token: 3000
    token_retransmits_before_loss_const: 10
    join: 60
    consensus: 3600
    vsftype: none
    max_messages: 20
    clear_node_high_bit: yes
    secauth: off
    threads: 0
    rrp_mode: none
    interface {
        ringnumber: 0
        bindnetaddr: 192.168.1.0
        broadcast: yes
        mcastport: 5405
    }
}
amf {
    mode: disabled
}
service {
    ver:       1
    name:      pacemaker
}
aisexec {
    user:   root
    group:  root
}
logging {
    fileline: off
    to_stderr: yes
    to_logfile: no
    to_syslog: yes
    syslog_facility: daemon
    debug: off
    timestamp: on
    logger_subsys {
        subsys: AMF
        debug: off
        tags: enter|leave|trace1|trace2|trace3|trace4|trace6
    }
}
Starting pacemaker on one node at a time will allow you to monitor the status with cman_tool status and cman_tool nodes. Once everything is started up we can create the GFS2 filesystem on the DRBD resource. Make sure to specify -p lock_dlm for locking management and one journal per node with -j 2. Mounting the devices with -o noatime,nodiratime will give us a performance boost as we don’t really care about access times.
chkconfig pacemaker on
service pacemaker start
mkfs.gfs2 -t pacemaker:storage -p lock_dlm -j 2 /dev/drbd1
mkdir -p /mnt/storage
mount -t gfs2 -o noatime,nodiratime /dev/drbd1 /mnt/storage
STONITH: Shoot The Other Node In The Head
STONITH is not a suggestion when dealing with Dual Primaries, it is an absolute requirement.
– LINBIT support
So now that we have everything up and running this is the not so small task of making sure we are able to deliver uncorrupted data. What happens when the synchronization is lost between nodes? How can we ensure that the misbehaving node is taken out of service? This is what fencing and STONITH accomplish – making sure that data isn’t written to the good nodes until the bad node is out of service, ensuring data integrity.
Install CRM Shell
We are going to use the CRM Shell to control Pacemaker, and we can get it from yum if we install the proper repository.
cd /etc/yum.repos.d/
wget http://download.opensuse.org/repositories/network:/ha-clustering:/Stable/CentOS_CentOS-6/network:ha-clustering:Stable.repo
yum -y install crmsh graphviz
crm configure
property stonith-enabled="false"
commit
exit
crm configure
primitive p_drbd_r1 ocf:linbit:drbd \
	params drbd_resource="drbd1" \
	op start interval="0" timeout="240" \
	op stop interval="0" timeout="100" \
	op monitor interval="29s" role="Master" \
	op monitor interval="31s" role="Slave"
ms ms_drbd_r1 p_drbd_r1 \
	meta master-max="2" \
	master-node-max="1" \
	clone-max="2" \
	clone-node-max="1" \
	notify="true"
primitive p_fs_r1 ocf:heartbeat:Filesystem \
	params device="/dev/drbd1" \
	directory="/mnt/storage" \
	fstype="gfs2" \
	op start interval="0" timeout="60" \
	op stop interval="0" timeout="60" \
	op monitor interval="60" timeout="40"
clone cl_fs_r1 p_fs_r1 meta interleave="true"
colocation co_fs_with_drbd inf: cl_fs_r1 ms_drbd_r1:Master
order o_drbd_before_fs inf: ms_drbd_r1:promote cl_fs_r1
primitive stonith_fence_virsh_fileserver1 stonith:fence_virsh \
	params action="reboot" ipaddr="192.168.1.1" \
	login="root" identity_file="/root/.ssh/id_rsa.pub" \
	port="fileserver-1"
primitive stonith_fence_virsh_fileserver2 stonith:fence_virsh \
	params action="reboot" ipaddr="192.168.1.2" \
	login="root" identity_file="/root/.ssh/id_rsa.pub" \
	port="fileserver-2"
location l_stonith_fence_virsh_machine1_noton_fileserver1 \
	stonith_fence_virsh_fileserver1 -inf: fileserver-1
location l_stonith_fence_virsh_machine1_noton_fileserver2 \
	stonith_fence_virsh_fileserver2 -inf: fileserver-2
property stonith-enabled="true"
commit
exit
Validate the Cluster
Check to make sure that everything is good to go. Now is a good time to make sure things are actually failing over properly before moving to production.
[root@fileserver-1]# service drbd status
drbd driver loaded OK; device status:
version: 8.4.4 (api:1/proto:86-101)
GIT-hash: 599f286440bd633d15d5ff985204aff4bccffadd build by phil@Build64R6, 2013-10-14 15:33:06
m:res    cs         ro               ds                 p  mounted           fstype
1:r0     Connected  Primary/Primary  UpToDate/UpToDate  C  /mnt/storage      gfs2

[root@fileserver-1]# cman_tool nodes
Node  Sts   Inc   Joined               Name
   1   M    152   2014-02-27 22:23:29  fileserver-1
   2   M     76   2014-02-27 22:23:29  fileserver-2

[root@fileserver-2]# cman_tool status
Version: 6.2.0
Config Version: 3
Cluster Name: pacemaker
Cluster Id: 62570
Cluster Member: Yes
Cluster Generation: 152
Membership state: Cluster-Member
Nodes: 2
Expected votes: 1
Total votes: 2
Node votes: 1
Quorum: 1
Active subsystems: 8
Flags: 2node
Ports Bound: 0
Node name: fileserver-1
Node ID: 1
Multicast addresses: 239.192.244.95
Node addresses: 192.168.1.1

[root@fileserver-1]# fence_tool ls
fence domain
member count  2
victim count  0
victim now    0
master nodeid 1
wait state    none
members       1 2
NFS Server
yum -y install nfs*
service rpcbind start
chkconfig rpcbind on
service nfs start
chkconfig nfs on
/mnt/storage 192.168.1.0/24(rw,async,no_root_squash,no_all_squash,no_subtree_check)
- /mnt/storage – NFS mount point
- 192.168.1.0/24 – IP range of clients
- rw – read / write access
- async – faster asynchronous writes
- no_root_squash – allow root
- no_all_squash – allow user
- no_subtree_check – increases performance but lowers security by preventing parent directory permissions to be checked when accessing shares.
mkdir -p /mnt/storage
mount -t nfs -o rsize=32768,wsize=32768,noatime,nodiratime,async fileserver-1:/mnt/storage /mnt/storage/
The post Dual Primary DRBD on CentOS 6: GFS2 & Pacemaker appeared first on Justin Silver.
]]>